> ## Documentation Index
> Fetch the complete documentation index at: https://docs.llmeasy.ru/llms.txt
> Use this file to discover all available pages before exploring further.

# 如何在 Claude Desktop 里使用 Codex 等第三方模型？

> 通过 CC Switch 本地路由，在 Claude Desktop 中使用 GPT 分组模型。

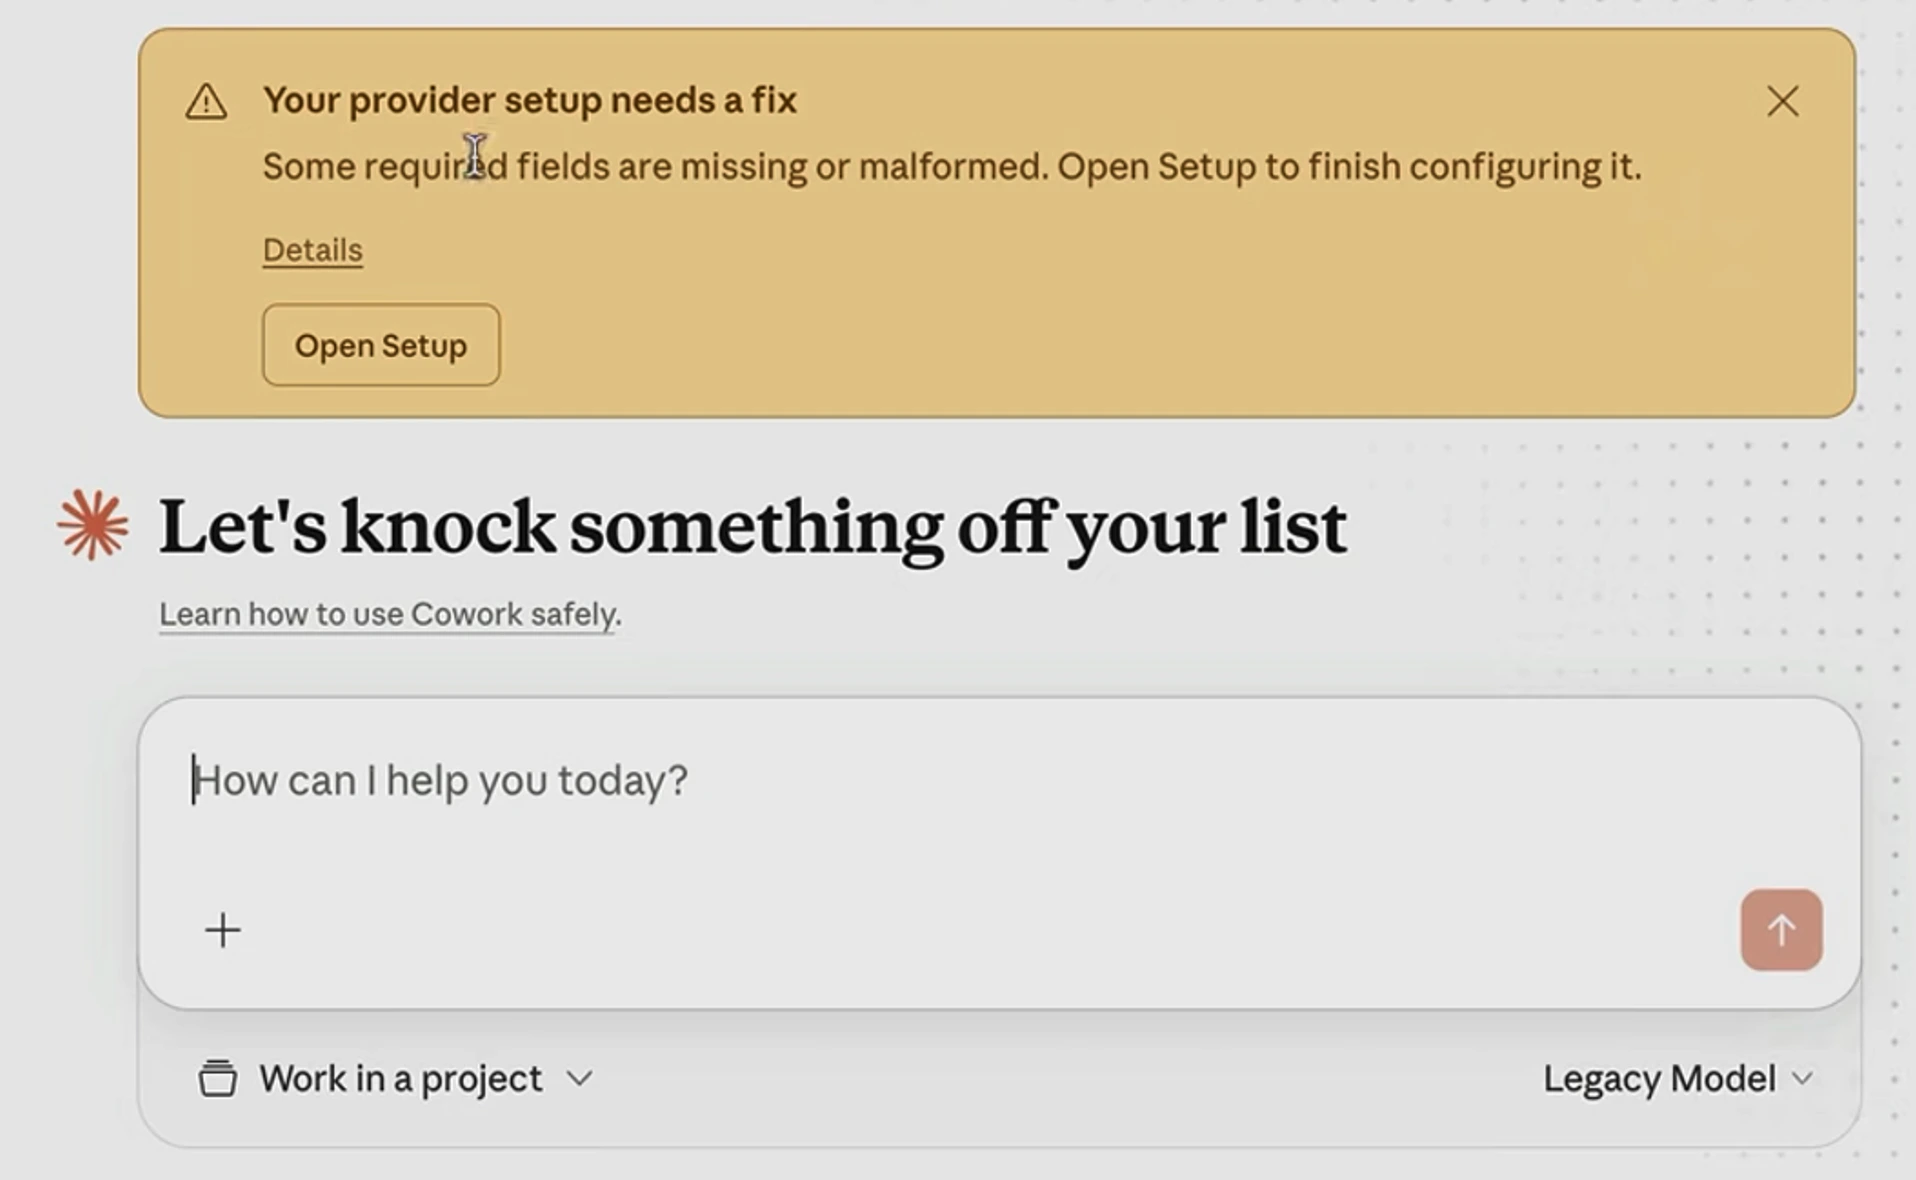
Claude Desktop 新版本对第三方 API 接入做了调整。Gateway 模式会校验模型 ID，直接填写 GPT、DeepSeek、GLM 等非官方模型 ID 时，可能会被拦截。

常见表现是页面顶部出现这条报错：`Your provider setup needs a fix Some required fields are missing or malformed. Open Setup to finish configuring it.` 同时，输入框左下角的第三方模型选择为空，只显示 **Legacy Model** 这类不可用状态。

<Frame>
  <img src="https://mintcdn.com/bettertoken/3Irzp0wIG1eGzGGI/images/claude-desktop-third-party-models/provider-setup-needs-fix.png?fit=max&auto=format&n=3Irzp0wIG1eGzGGI&q=85&s=ef9e493dc92e4eabbaacdc132acd9e2c" alt="Claude Desktop 提示 Your provider setup needs a fix，并且左下角第三方模型为空。" style={{ borderRadius: '0.5rem' }} width="1916" height="1180" data-path="images/claude-desktop-third-party-models/provider-setup-needs-fix.png" />
</Frame>

如果你想在 Claude Desktop 里继续使用 Codex 等第三方模型，建议通过 CC Switch 建立本地路由：先在 CC Switch 的 **Claude Code** 配置里接入 LLMEasy，再把 CC Switch 的本地服务地址填入 Claude Desktop Gateway。

<Info>
  这条路径适合使用 **GPT 分组** API Key。不要把 `https://www.llmeasy.ru/v1` 直接填进 Claude Desktop Gateway。
</Info>

## 配置步骤

<Steps>
  <Step title="下载 Claude 桌面端">
    通过官方链接下载最新版 Claude 桌面端：

    [下载 Claude for Mac](https://claude.ai/api/desktop/darwin/universal/dmg/latest/redirect)

    安装完成后不要登录 Claude 账号，直接进入下一步启用 developer mode。
  </Step>

  <Step title="启用 developer mode">
    打开 Claude 桌面端后，在 macOS 左上角菜单中选择 **Help** → **Troubleshooting** → **Enable Developer Mode**。
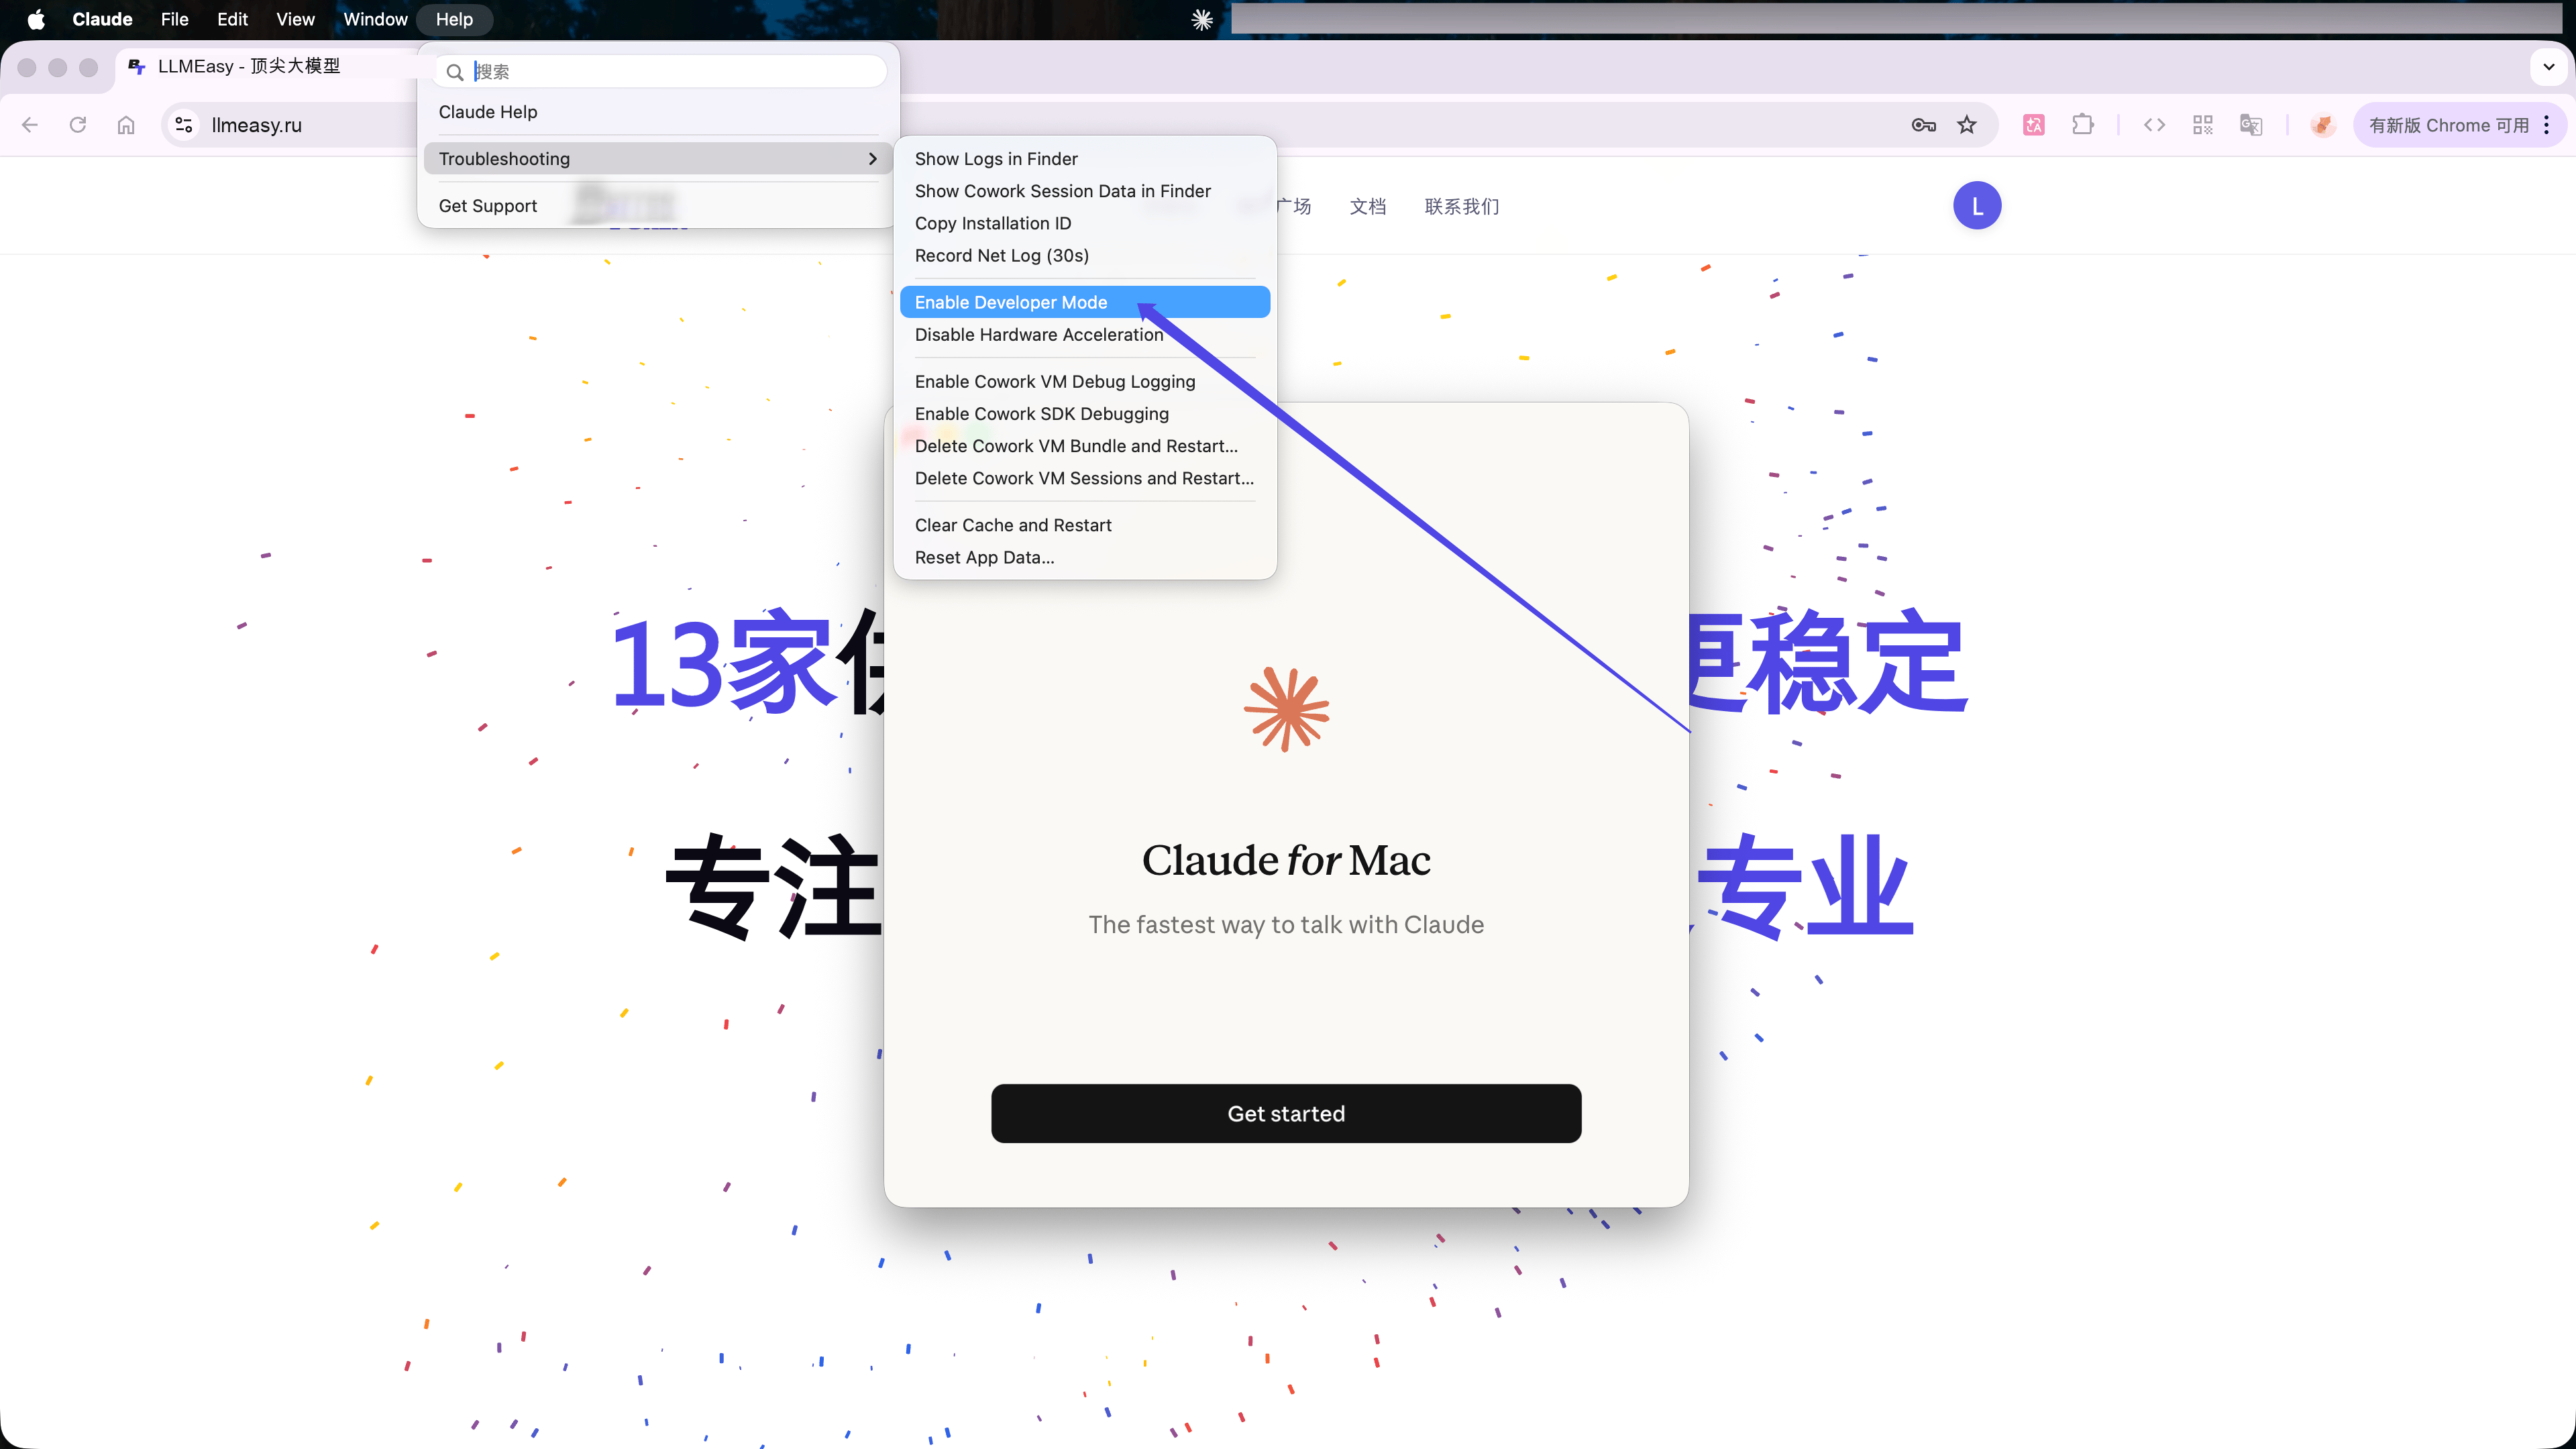
    <Frame>
      <img src="https://mintcdn.com/bettertoken/ejT8e_A0sPBKAOtG/images/claude-desktop-llmeasy-api/enable-developer-mode-menu.png?fit=max&auto=format&n=ejT8e_A0sPBKAOtG&q=85&s=147f5e2eae39abade8d298c9e074a63f" alt="在 Claude 桌面端 Help 菜单里选择 Enable Developer Mode。" style={{ borderRadius: '0.5rem' }} width="3840" height="2160" data-path="images/claude-desktop-llmeasy-api/enable-developer-mode-menu.png" />
    </Frame>

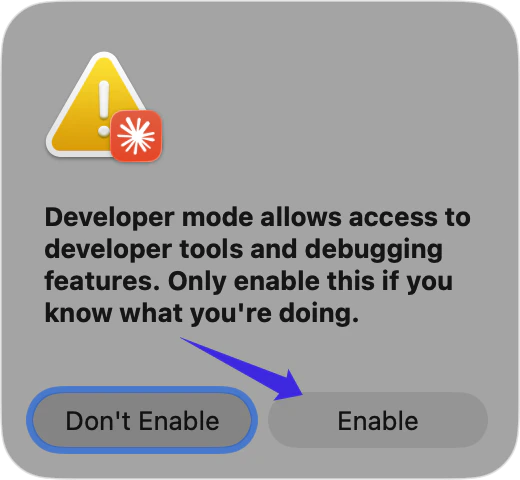
    在确认窗口中点击 **Enable**，然后重启 Claude 桌面端。

    <Frame>
      <img src="https://mintcdn.com/bettertoken/3Irzp0wIG1eGzGGI/images/claude-desktop-llmeasy-api/developer-mode-confirm.png?fit=max&auto=format&n=3Irzp0wIG1eGzGGI&q=85&s=30a7080083bc46d51850c2c75128c098" alt="确认启用 Claude 桌面端 developer mode。" style={{ borderRadius: '0.5rem' }} width="520" height="480" data-path="images/claude-desktop-llmeasy-api/developer-mode-confirm.png" />
    </Frame>
  </Step>

  <Step title="打开第三方推理配置">
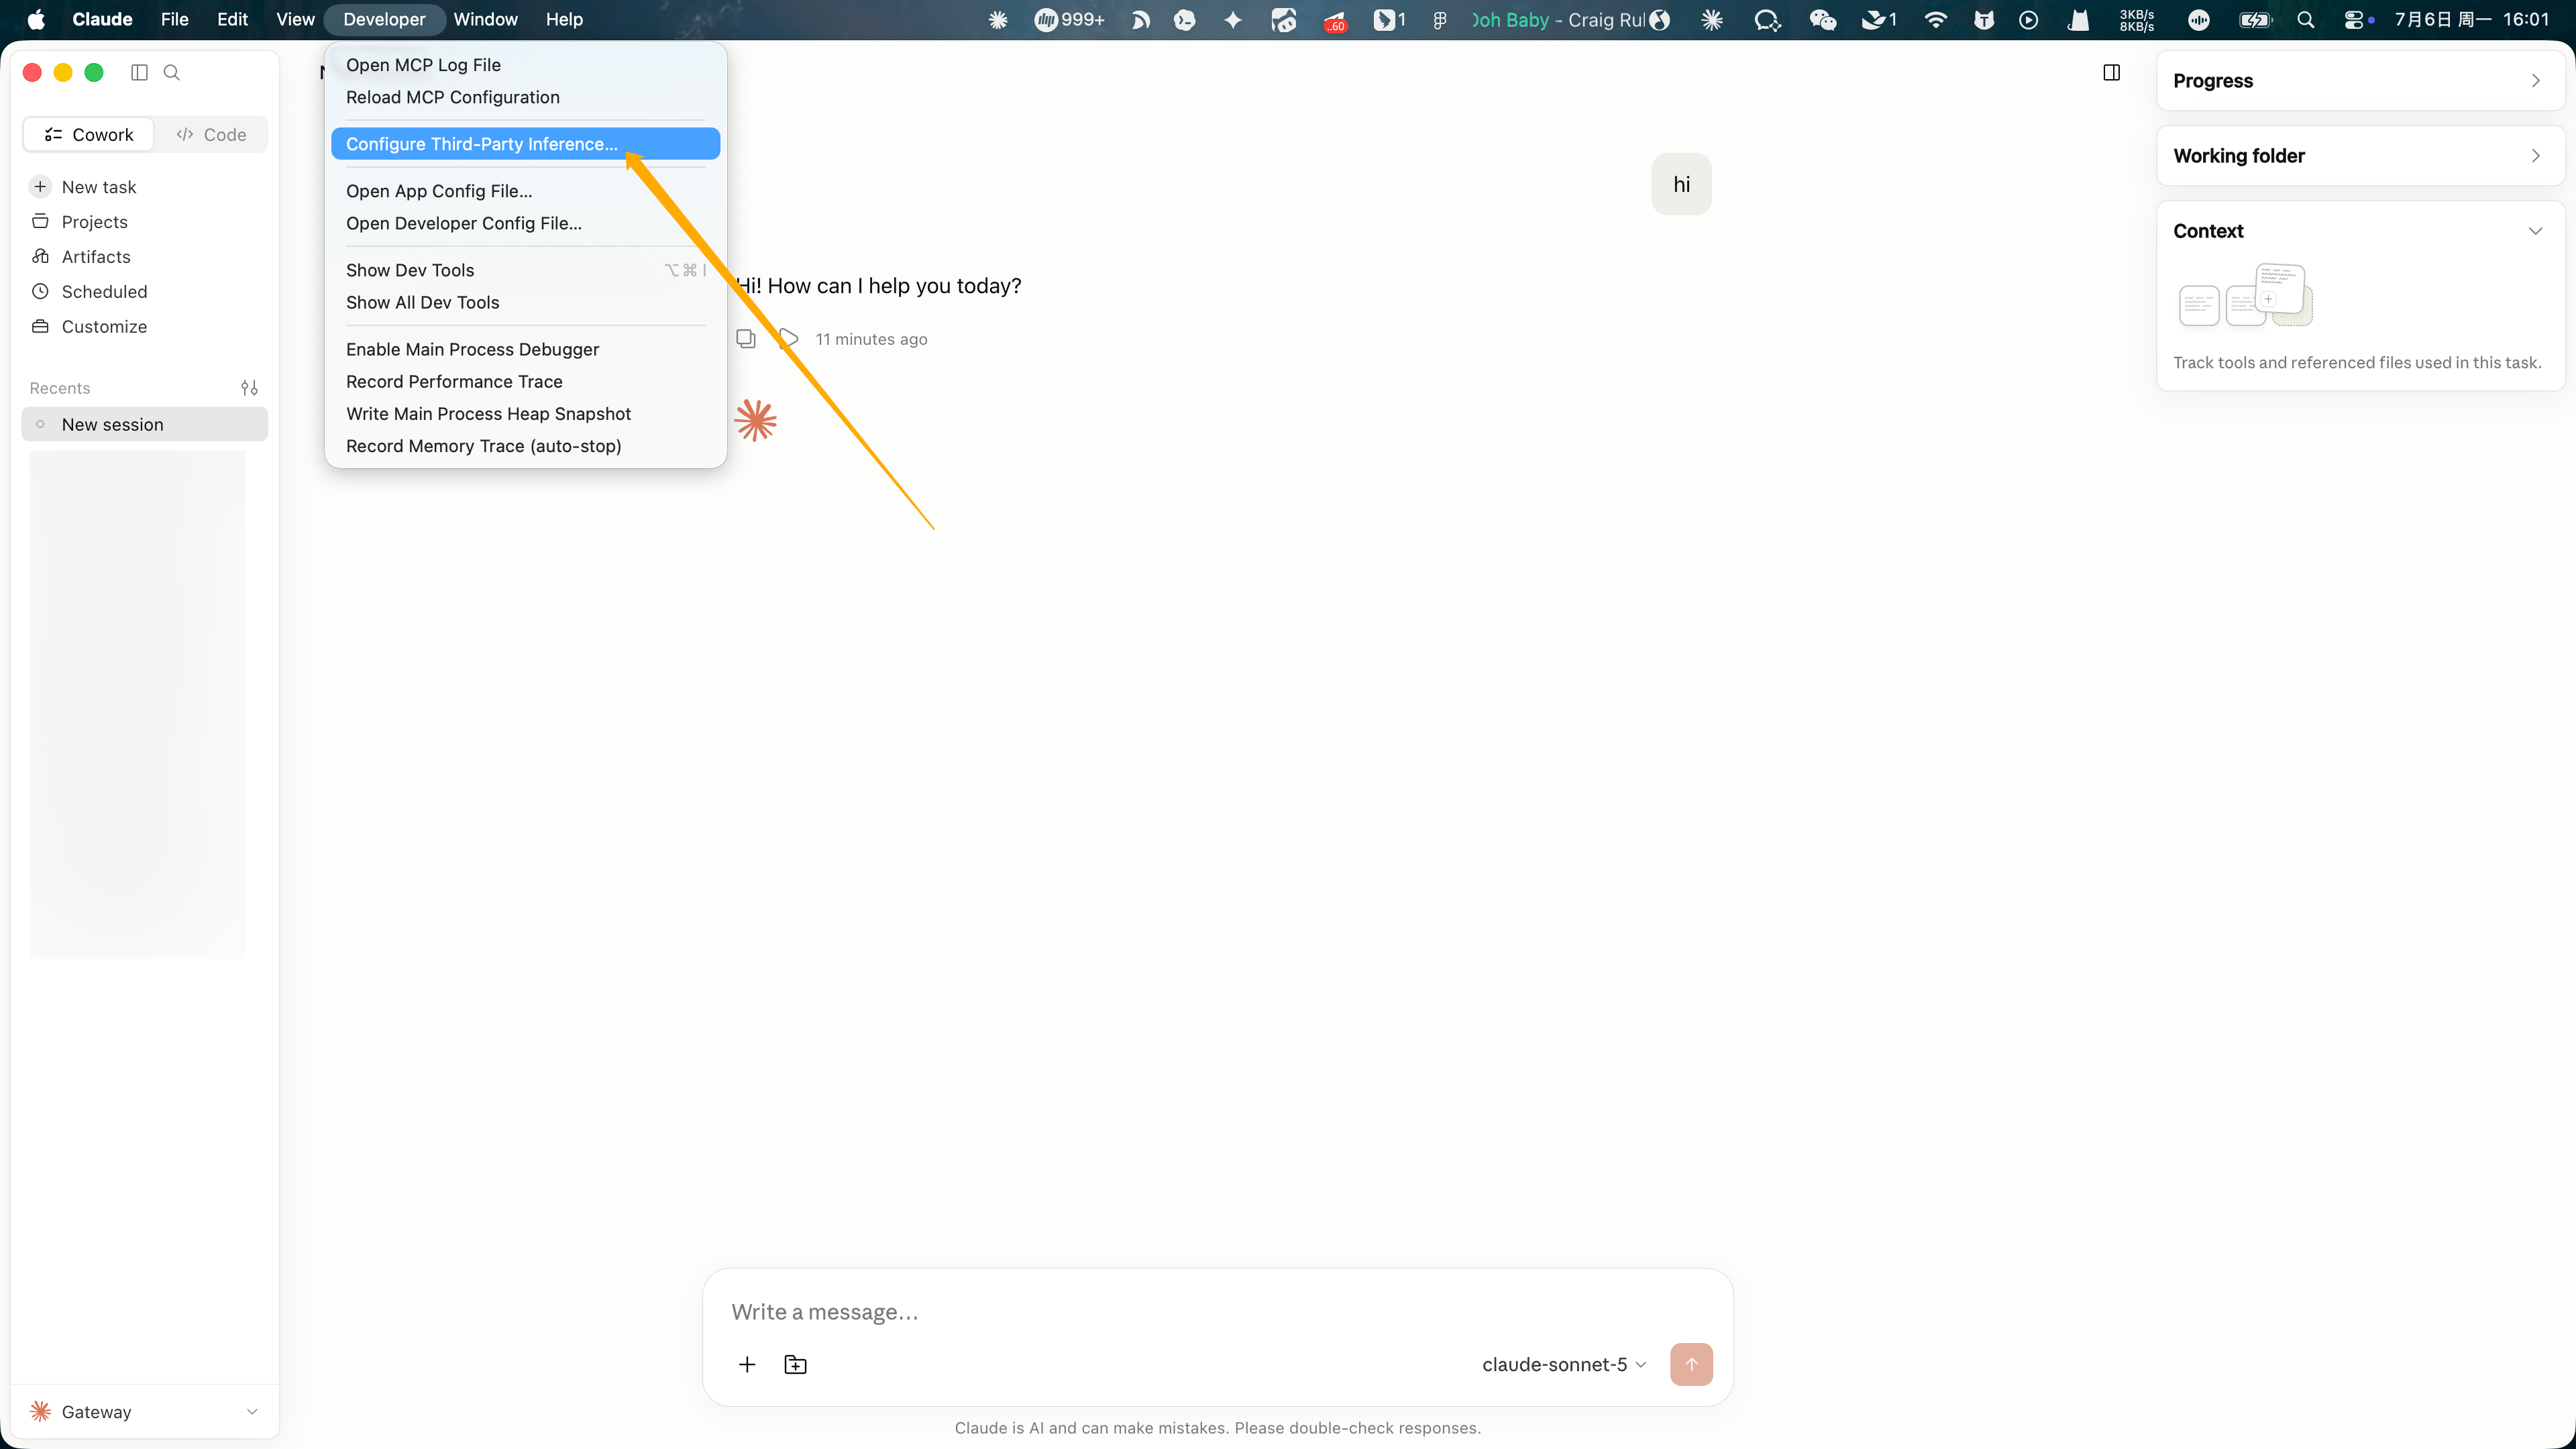
    重启后，macOS 左上角菜单会出现 **Developer** 选项。

    选择 **Developer** → **Configure Third-Party Inference...**。
    <Frame>
      <img src="https://mintcdn.com/bettertoken/Hz5PirDnykYqKKtv/images/claude-desktop-llmeasy-api/configure-third-party-inference.png?fit=max&auto=format&n=Hz5PirDnykYqKKtv&q=85&s=f187947f46a3f22bffff67ed717e91cd" alt="在 Developer 菜单中选择 Configure Third-Party Inference。" style={{ borderRadius: '0.5rem' }} width="3840" height="2160" data-path="images/claude-desktop-llmeasy-api/configure-third-party-inference.png" />
    </Frame>
  </Step>

  <Step title="切到 Claude Code 并添加 provider">
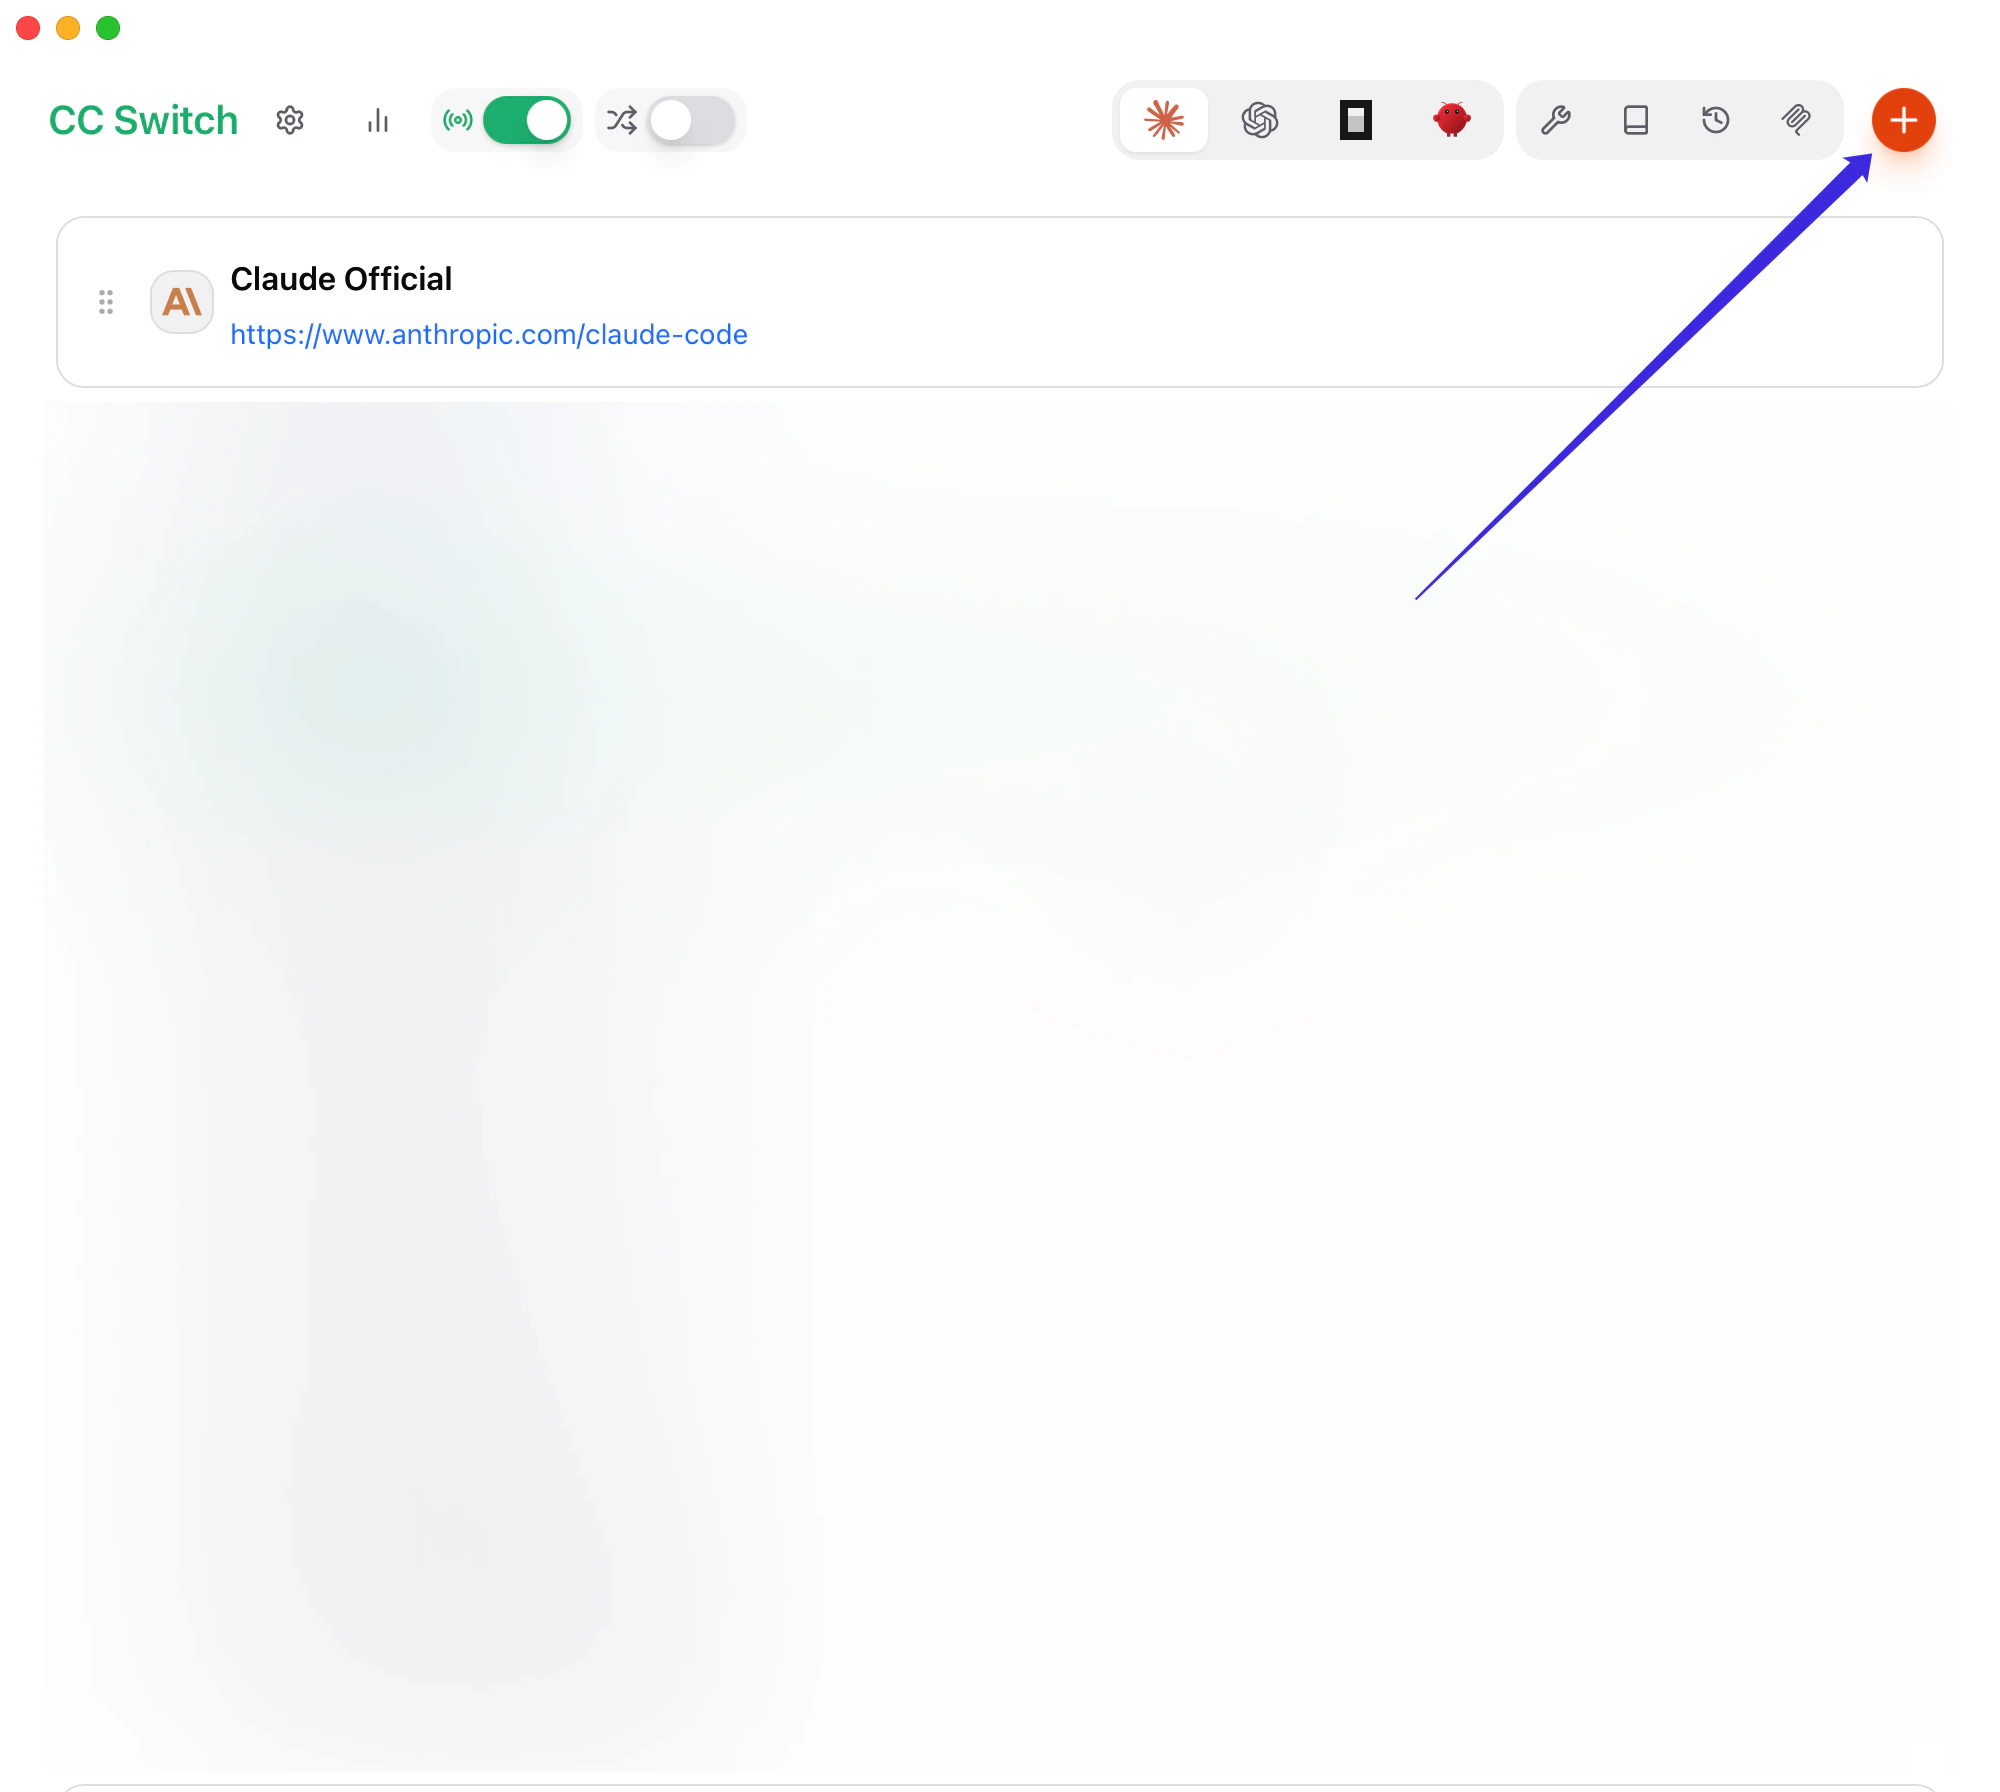
    打开 CC Switch，切到 **Claude Code**，点击 **Add Provider**。

    <Frame>
      <img src="https://mintcdn.com/bettertoken/3Irzp0wIG1eGzGGI/images/cc-switch/claude-code-add-provider.png?fit=max&auto=format&n=3Irzp0wIG1eGzGGI&q=85&s=caf1f2ad7dfadf9d362e1556e1393c07" alt="CC Switch 的 Claude Code 页面，右上角加号按钮用于新增 provider。" style={{ borderRadius: '0.5rem' }} width="2000" height="1792" data-path="images/cc-switch/claude-code-add-provider.png" />
    </Frame>
  </Step>

  <Step title="填写基础字段">
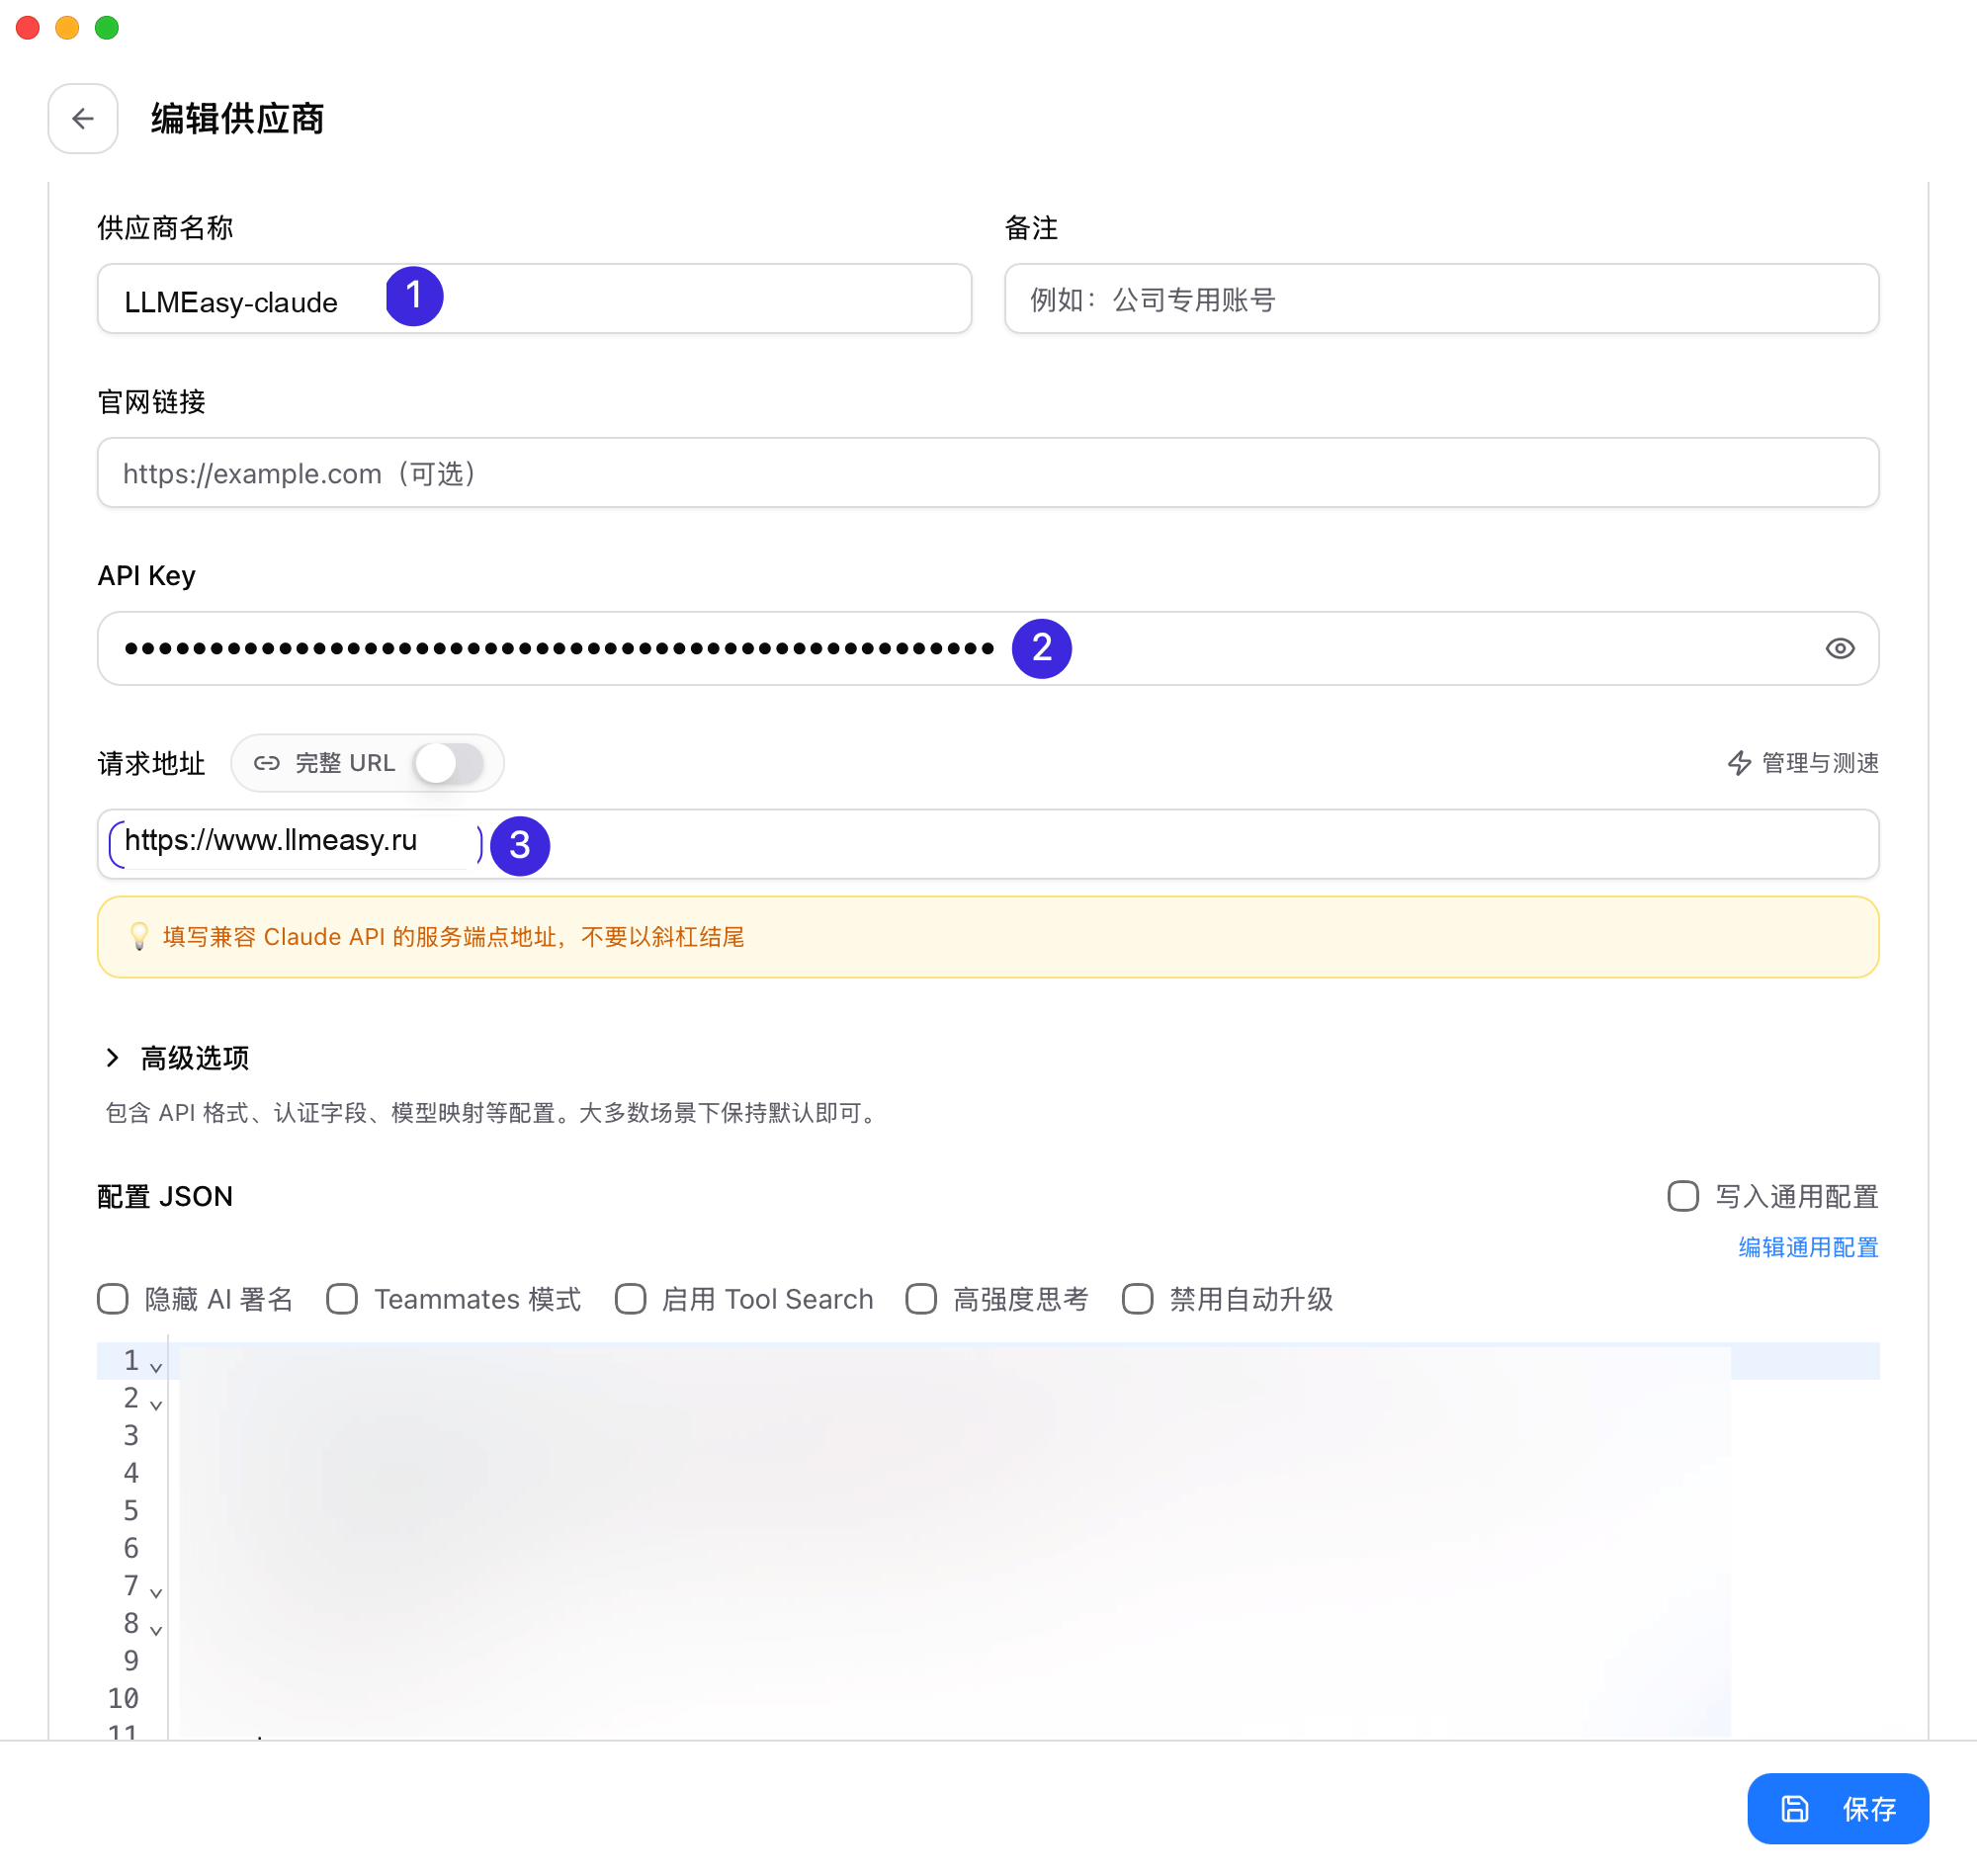
    * **Provider Name**：`LLMEasy`
    * **Base URL**：`https://www.llmeasy.ru`
    * **API Key**：你的 LLMEasy API Key

    下图中的标注对应：

    1. **Provider Name**
    2. **API Key**
    3. **Base URL**
    <Frame>
      <img src="https://mintcdn.com/bettertoken/ejT8e_A0sPBKAOtG/images/cc-switch/claude-code-basic-fields.png?fit=max&auto=format&n=ejT8e_A0sPBKAOtG&q=85&s=3f85334a096631b00c382cee762e6833" alt="CC Switch 的 provider 编辑页面，标出了 Provider Name、API Key 和 Base URL 的填写位置。" style={{ borderRadius: '0.5rem' }} width="2000" height="1898" data-path="images/cc-switch/claude-code-basic-fields.png" />
    </Frame>
  </Step>

  <Step title="设置 API 格式和模型映射">
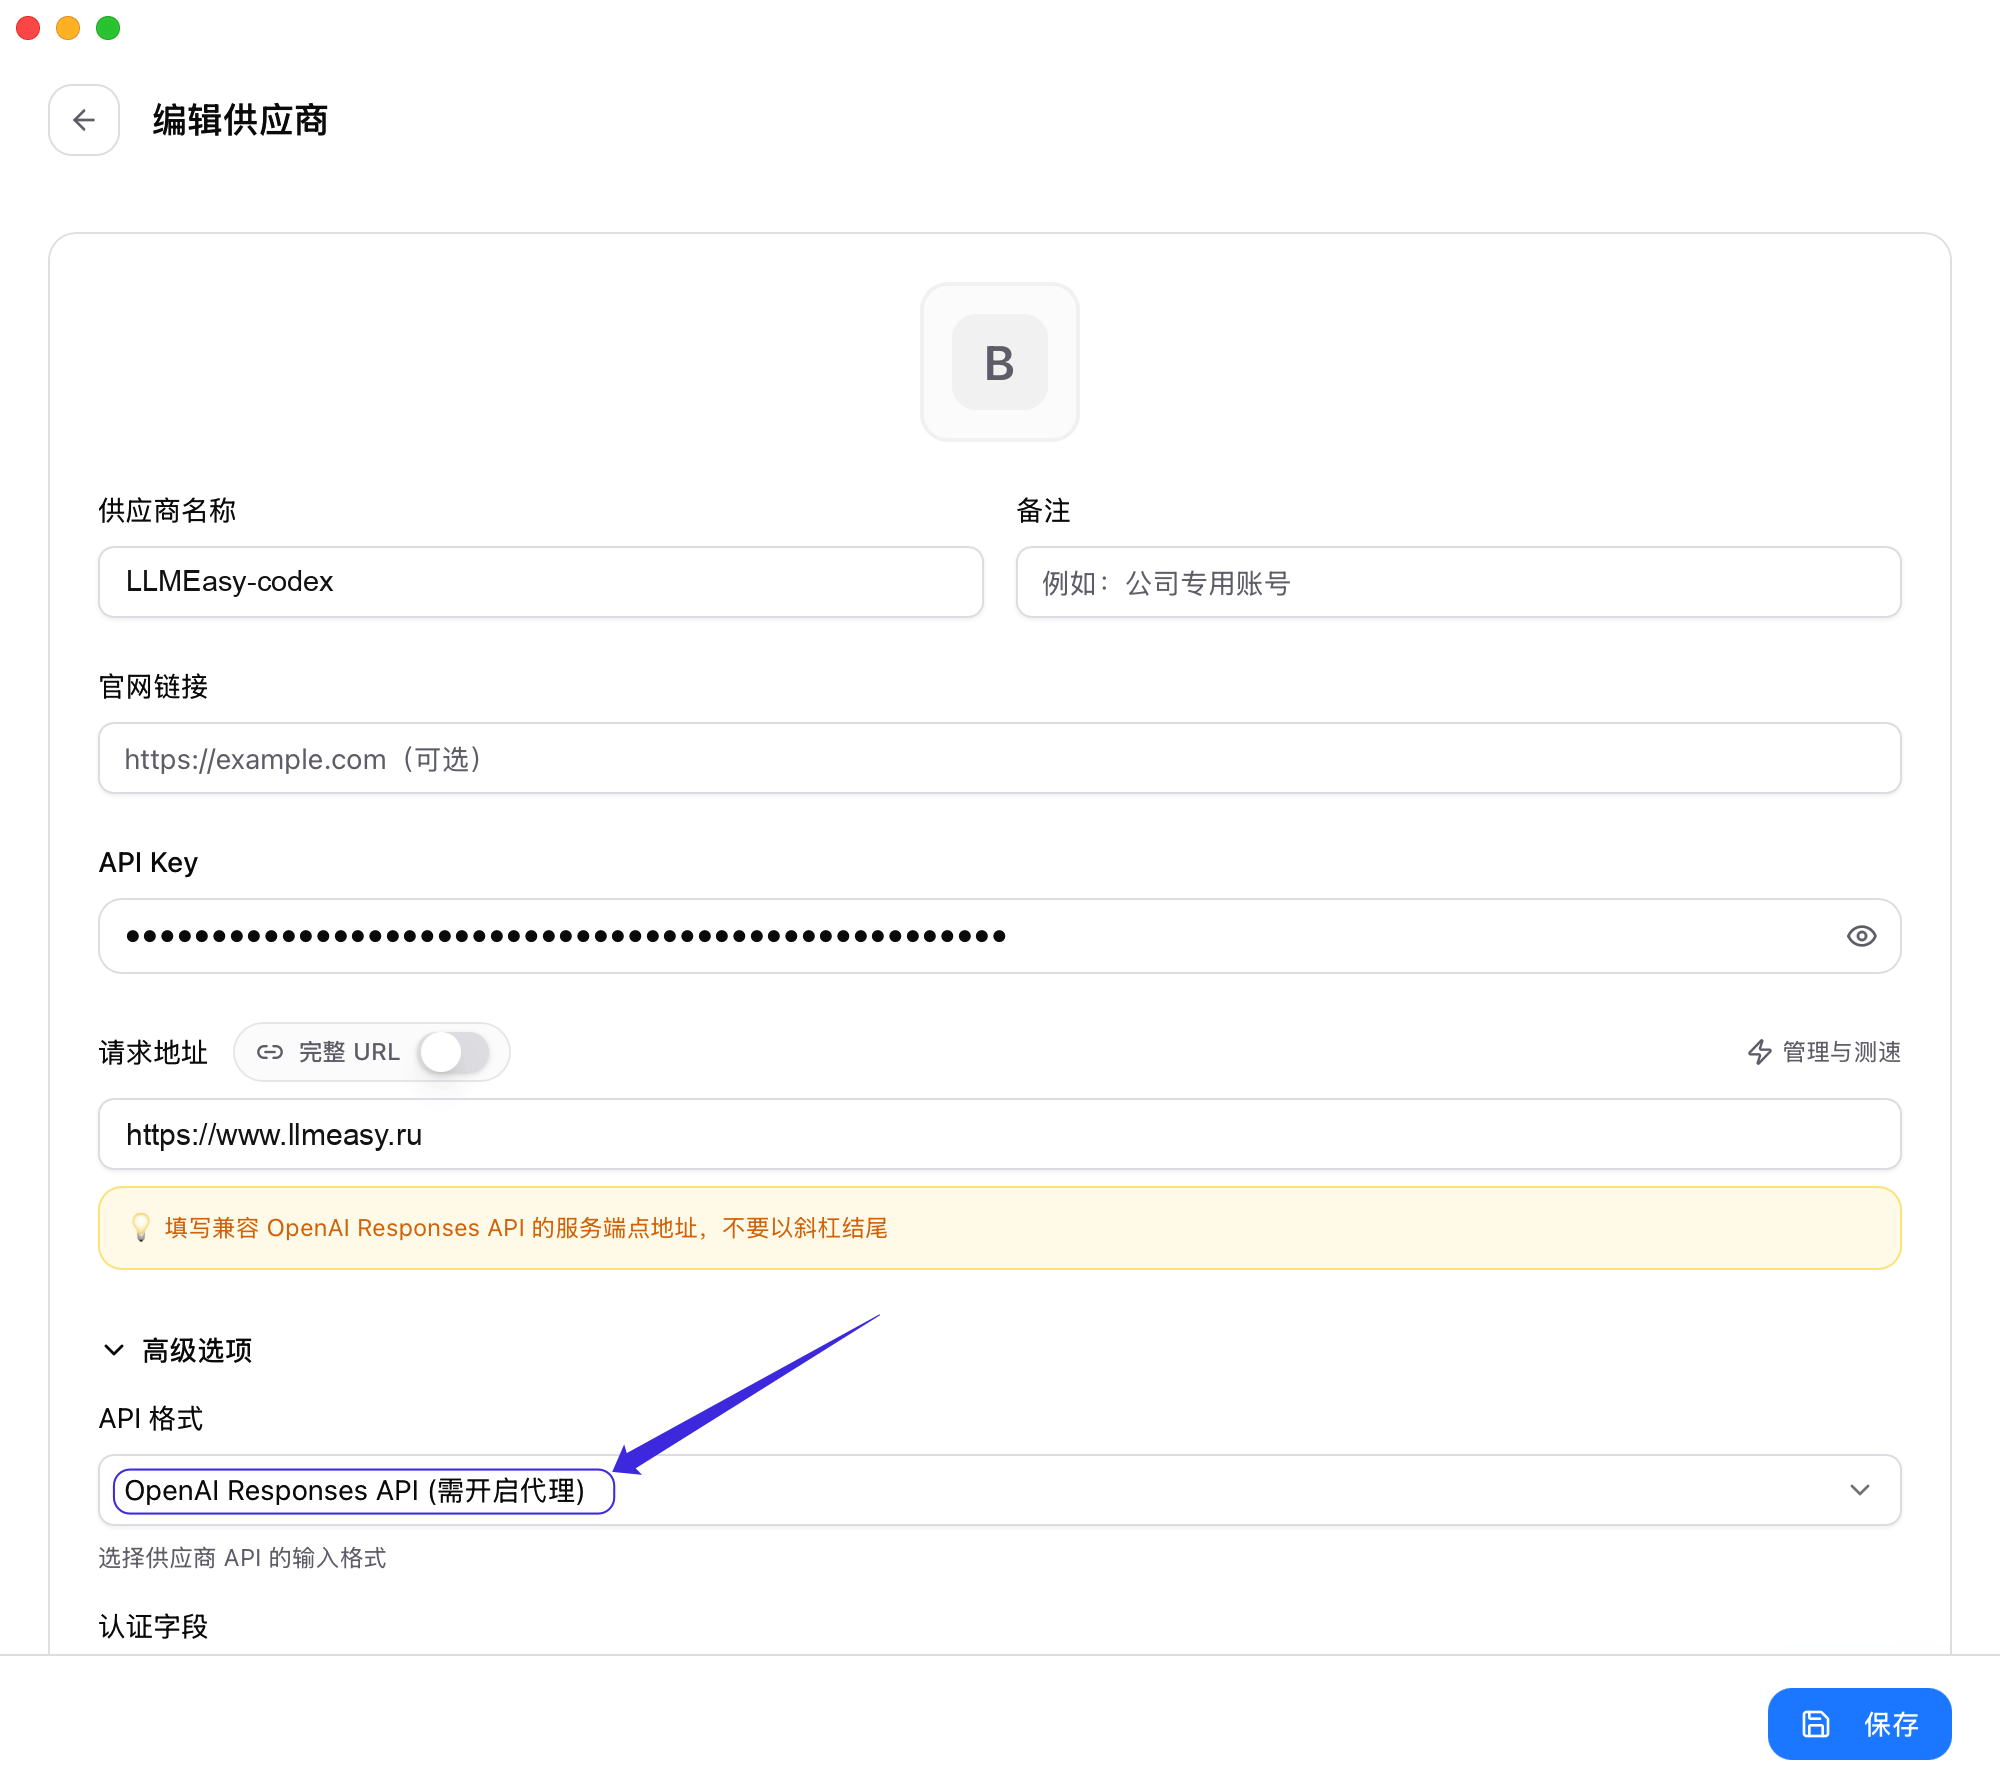
    打开 **高级选项**，在 **API 格式** 中选择 **OpenAI Responses API**。
    <Frame>
      <img src="https://mintcdn.com/bettertoken/ejT8e_A0sPBKAOtG/images/cc-switch/claude-code-api-format.png?fit=max&auto=format&n=ejT8e_A0sPBKAOtG&q=85&s=d7e1ffea7af3dcbef90c5b22e7231731" alt="CC Switch 的高级选项区域，API 格式被设置为 OpenAI Responses API。" style={{ borderRadius: '0.5rem' }} width="2000" height="1792" data-path="images/cc-switch/claude-code-api-format.png" />
    </Frame>

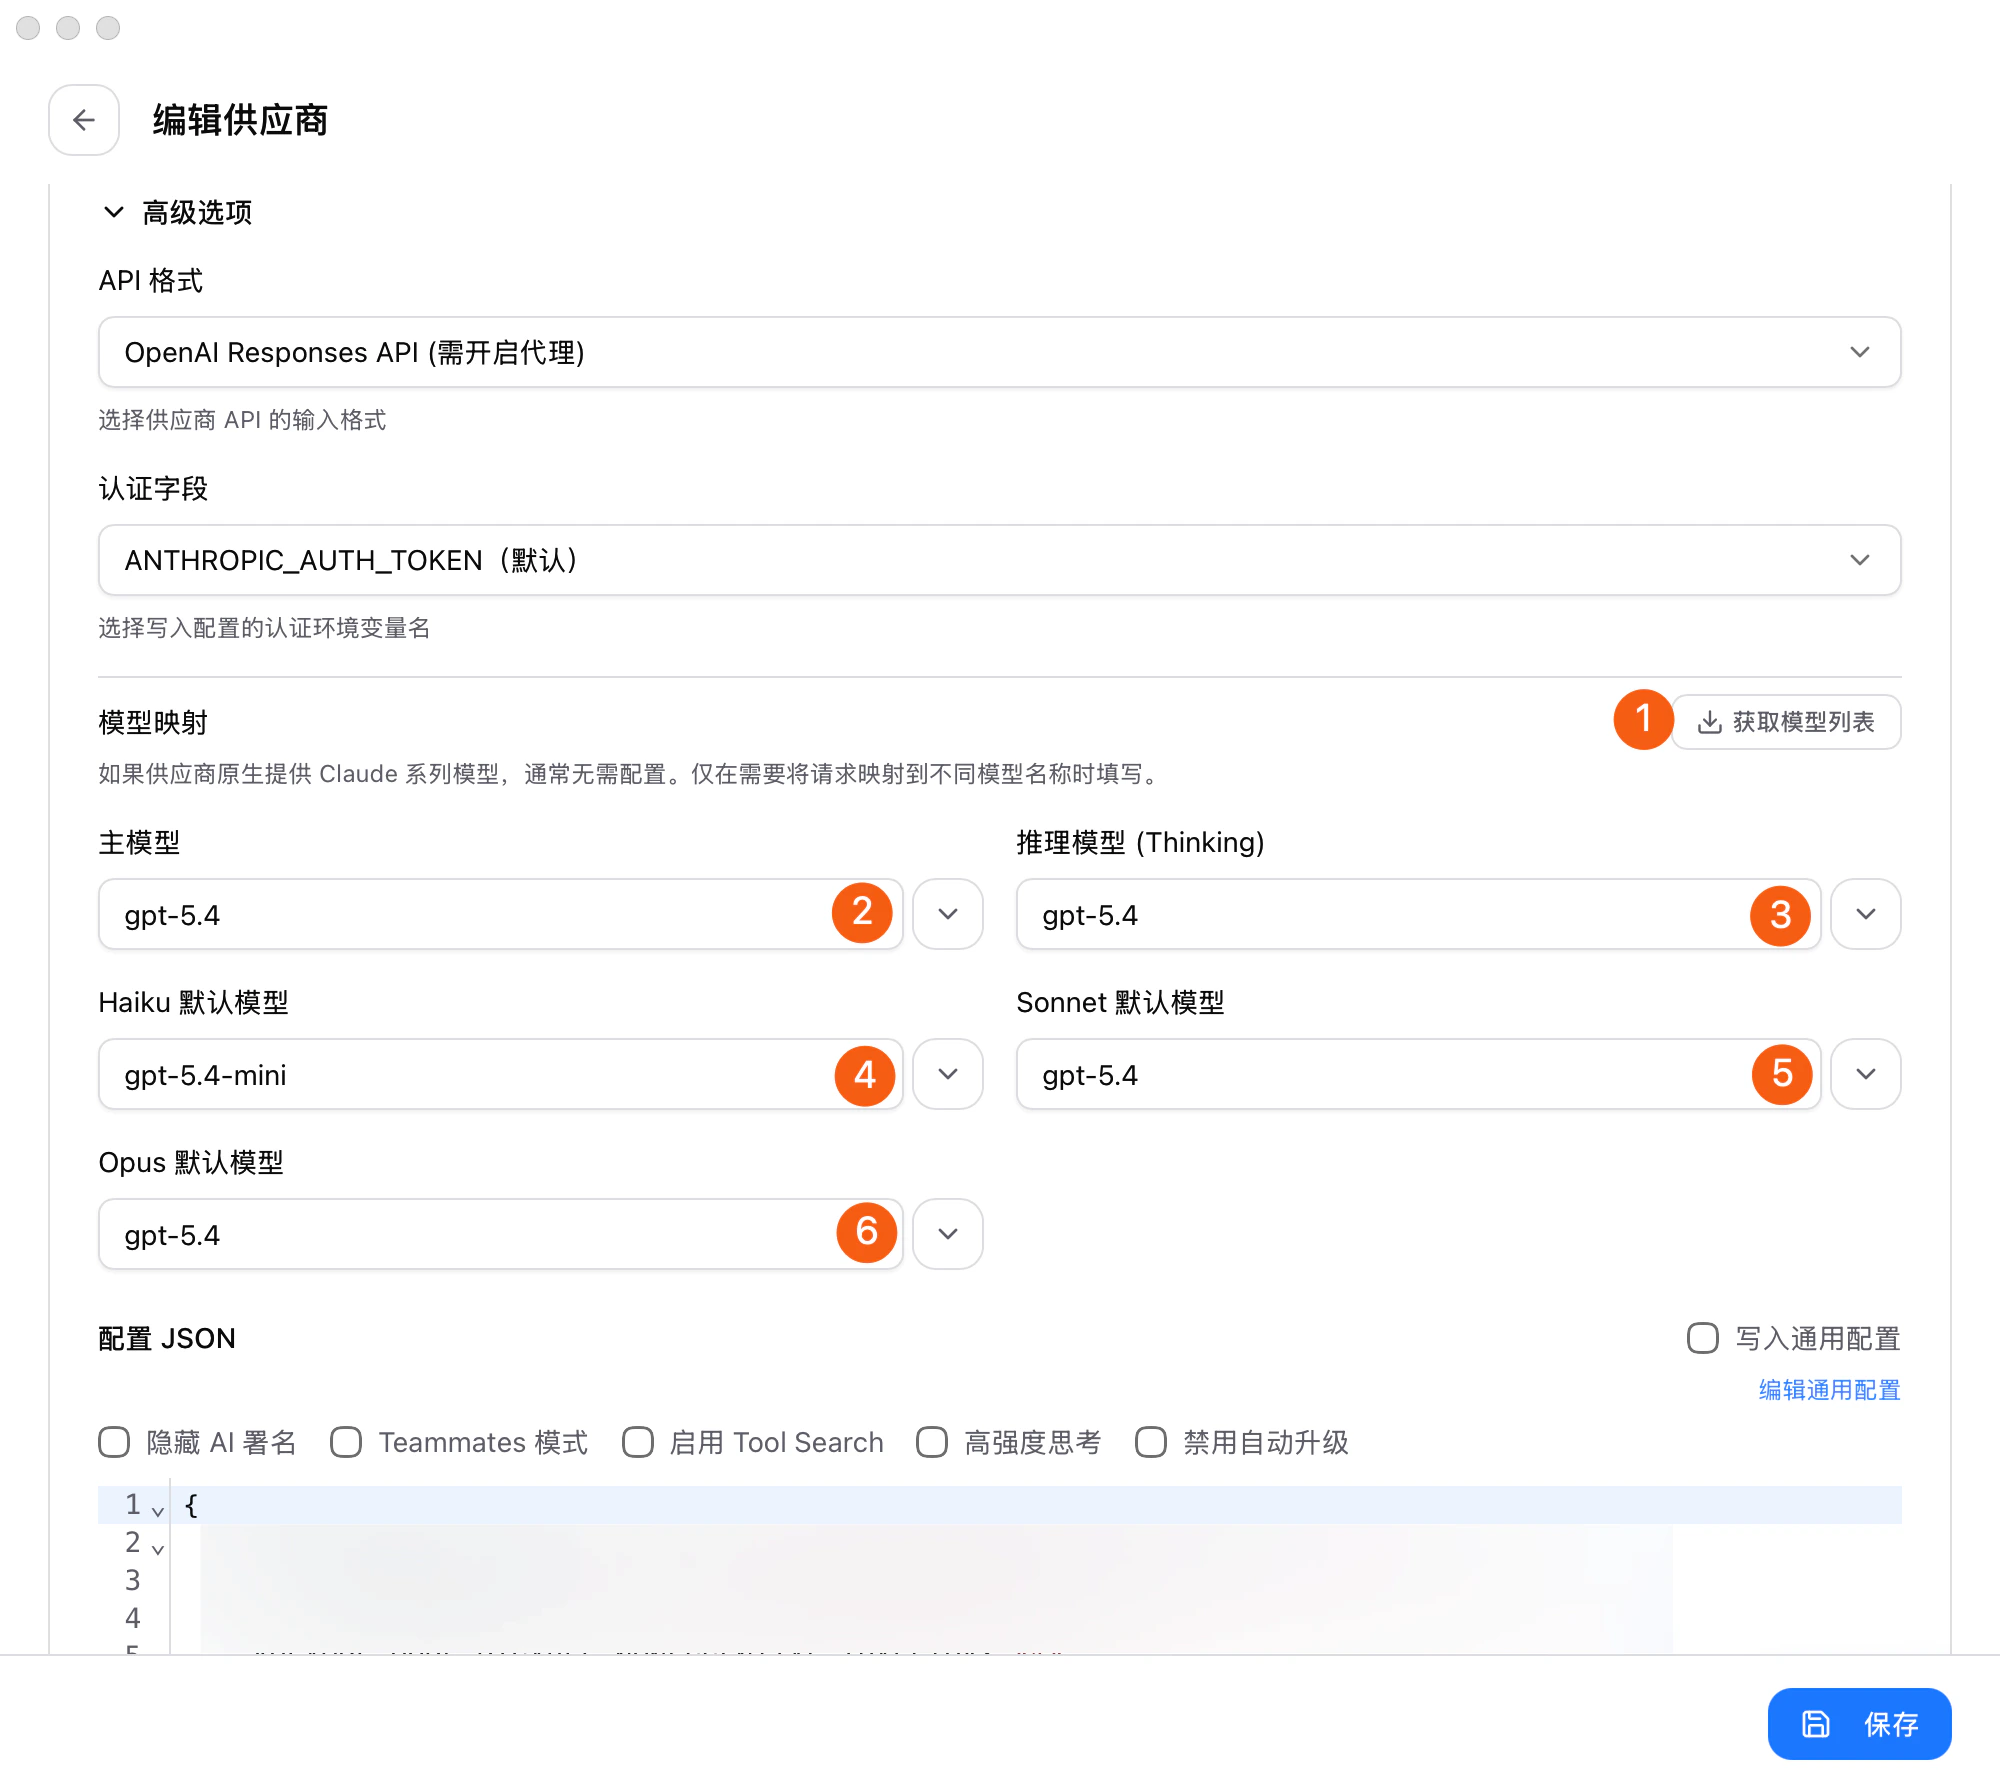
    在 **模型映射** 里点击 **获取模型列表**，将 **主模型**、**推理模型（Thinking）**、**Haiku 默认模型**、**Sonnet 默认模型**、**Opus 默认模型** 都从下拉列表中显式选中。
    <Frame>
      <img src="https://mintcdn.com/bettertoken/3Irzp0wIG1eGzGGI/images/cc-switch/claude-code-model-mapping.png?fit=max&auto=format&n=3Irzp0wIG1eGzGGI&q=85&s=edb9324ade4ee810882017e08b14d051" alt="CC Switch 的模型映射区域，展示了获取模型列表以及主模型、Thinking、Haiku、Sonnet、Opus 的映射位置。" style={{ borderRadius: '0.5rem' }} width="2000" height="1792" data-path="images/cc-switch/claude-code-model-mapping.png" />
    </Frame>

    这里使用的模型都应来自 <a href={"https://www.llmeasy.ru/pricing"}>LLMEasy 模型广场</a> 当前可用的 **GPT 分组**模型 ID。
  </Step>

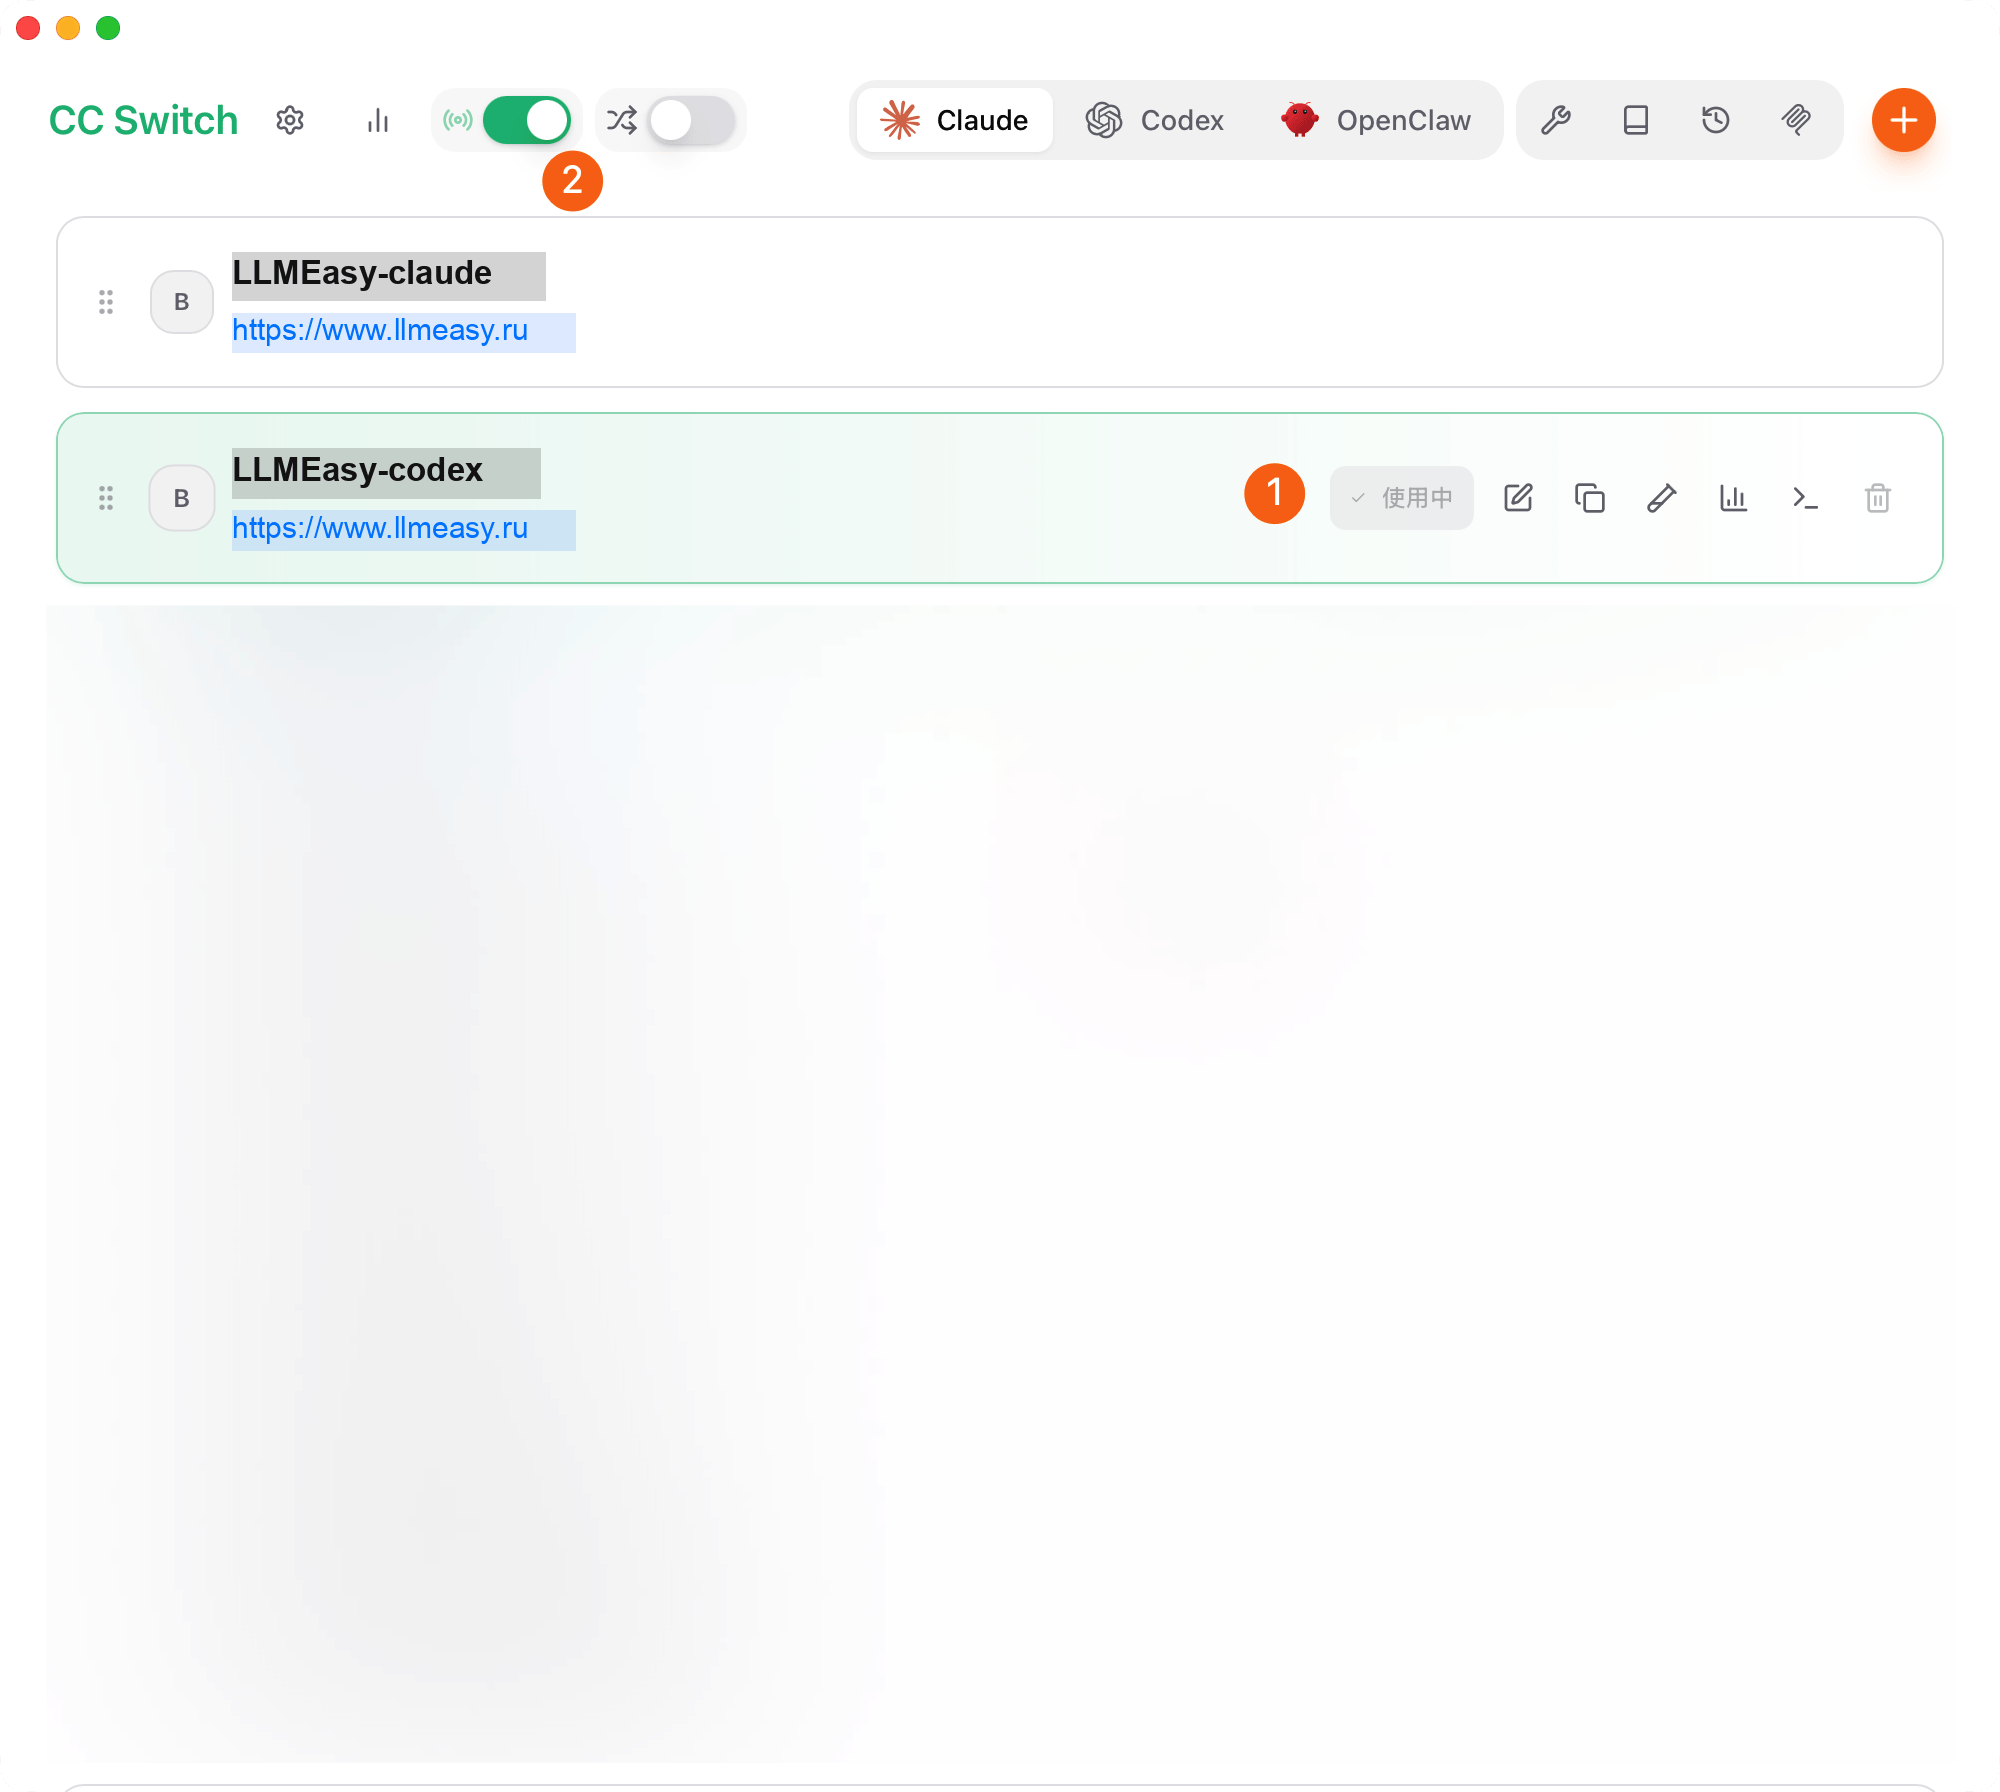
  <Step title="保存、切换，并开启代理">
    保存后，回到渠道列表页：

    1. 将刚保存的 LLMEasy provider 设为 **使用中**
    2. 打开左上角的 **CC Switch 代理功能**
    <Frame>
      <img src="https://mintcdn.com/bettertoken/ejT8e_A0sPBKAOtG/images/cc-switch/claude-code-enable-proxy.png?fit=max&auto=format&n=ejT8e_A0sPBKAOtG&q=85&s=c5f366dd894c2e9d4d2df912f6f014c1" alt="保存后回到渠道列表页，将 LLMEasy 设为使用中，并打开左上角的 CC Switch 代理开关。" style={{ borderRadius: '0.5rem' }} width="2000" height="1792" data-path="images/cc-switch/claude-code-enable-proxy.png" />
    </Frame>
  </Step>

  <Step title="进入 CC Switch 设置">
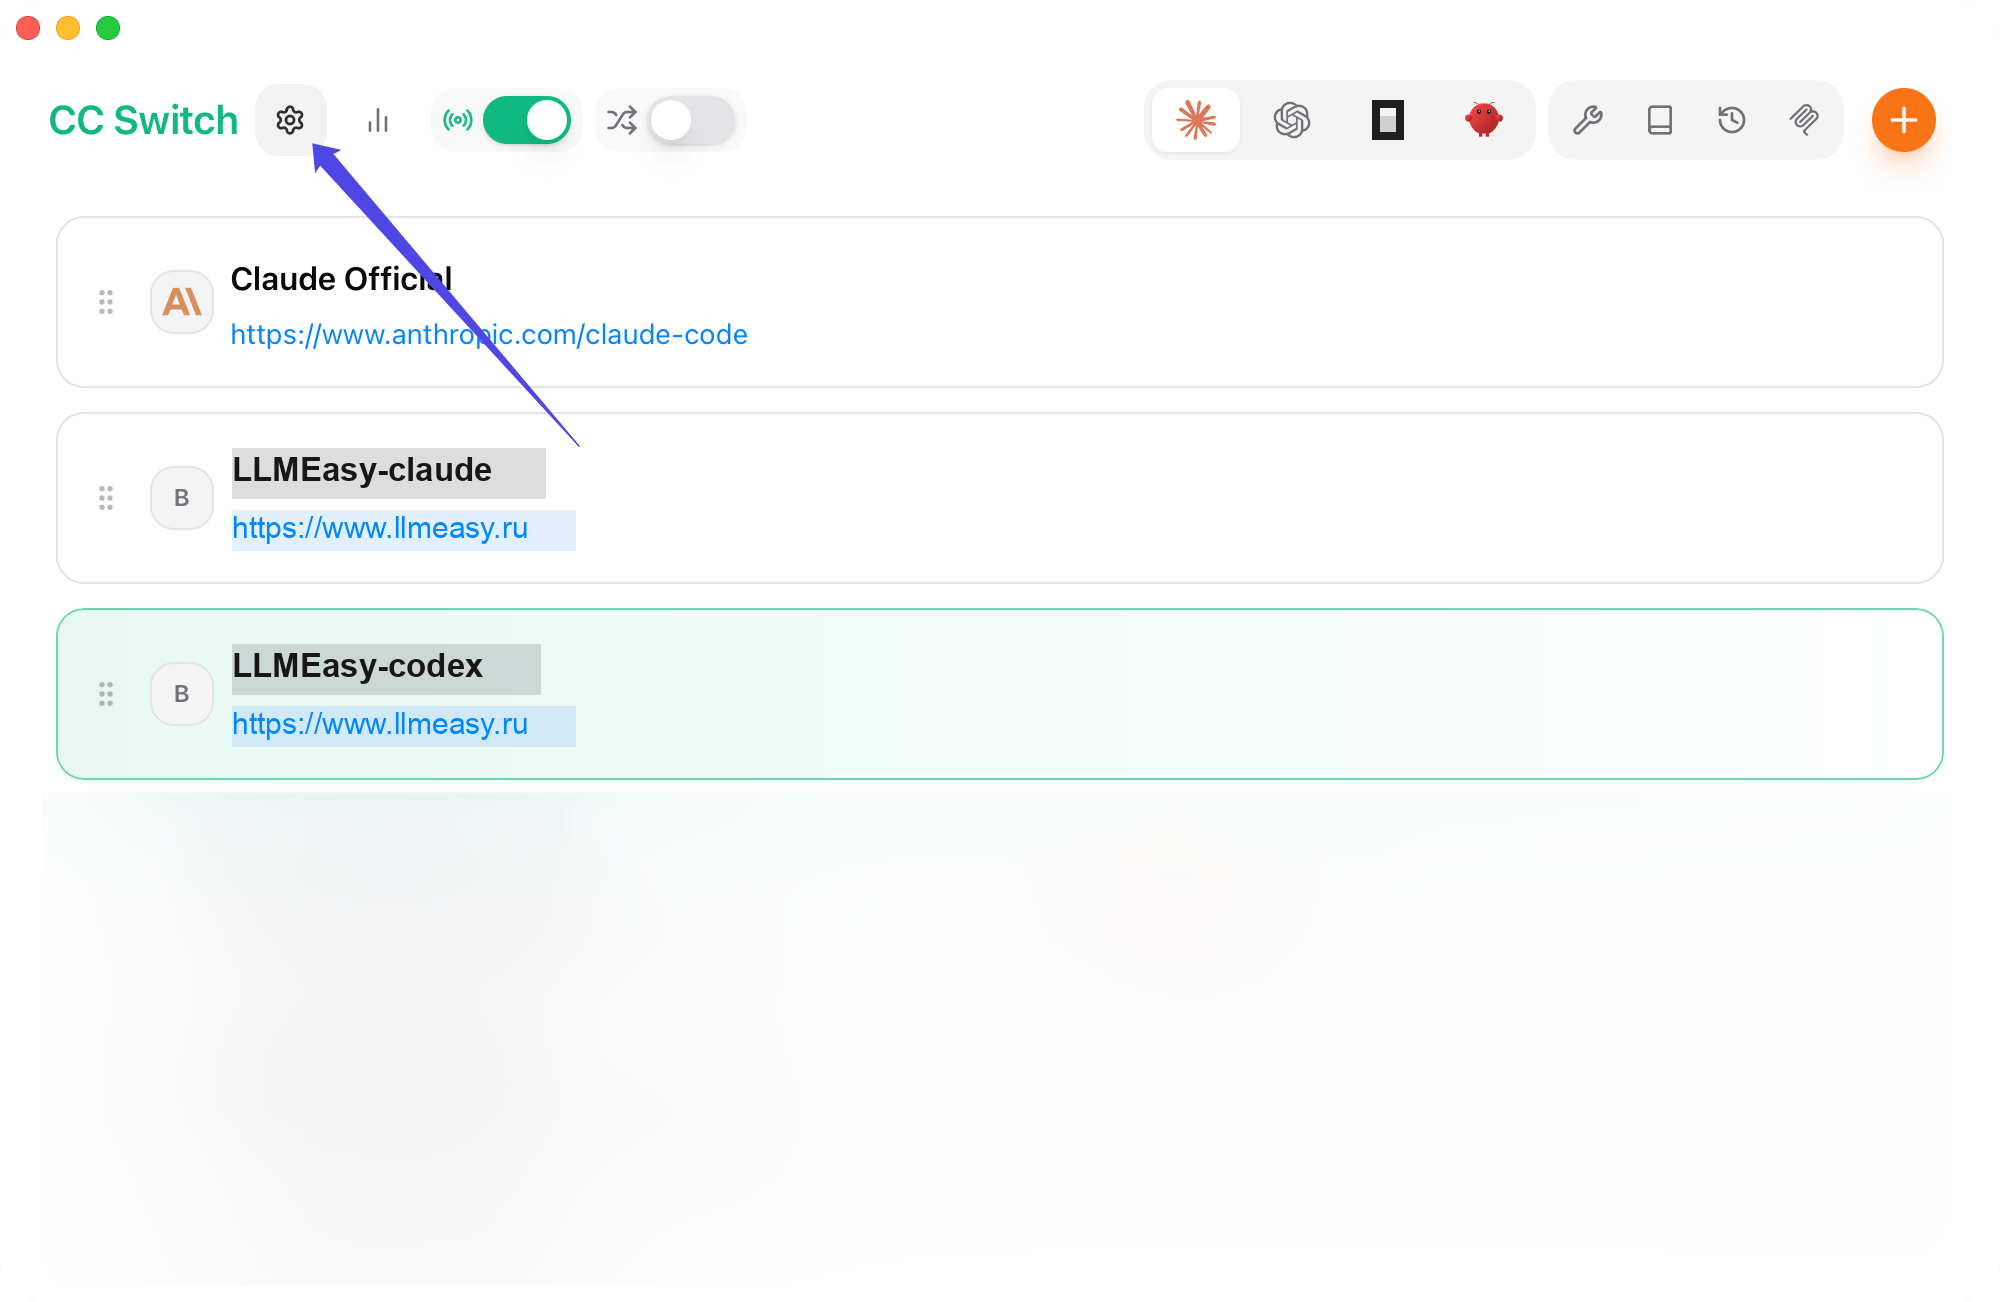
    回到 CC Switch 主界面后，点击左上角的 **设置**。

    <Frame>
      <img src="https://mintcdn.com/bettertoken/ejT8e_A0sPBKAOtG/images/claude-desktop-llmeasy-api/cc-switch-settings-entry.png?fit=max&auto=format&n=ejT8e_A0sPBKAOtG&q=85&s=b07ed283cf3496bb21907a7bd9f19c09" alt="CC Switch 主界面中，左上角设置按钮被箭头标出。" style={{ borderRadius: '0.5rem' }} width="2000" height="1302" data-path="images/claude-desktop-llmeasy-api/cc-switch-settings-entry.png" />
    </Frame>
  </Step>

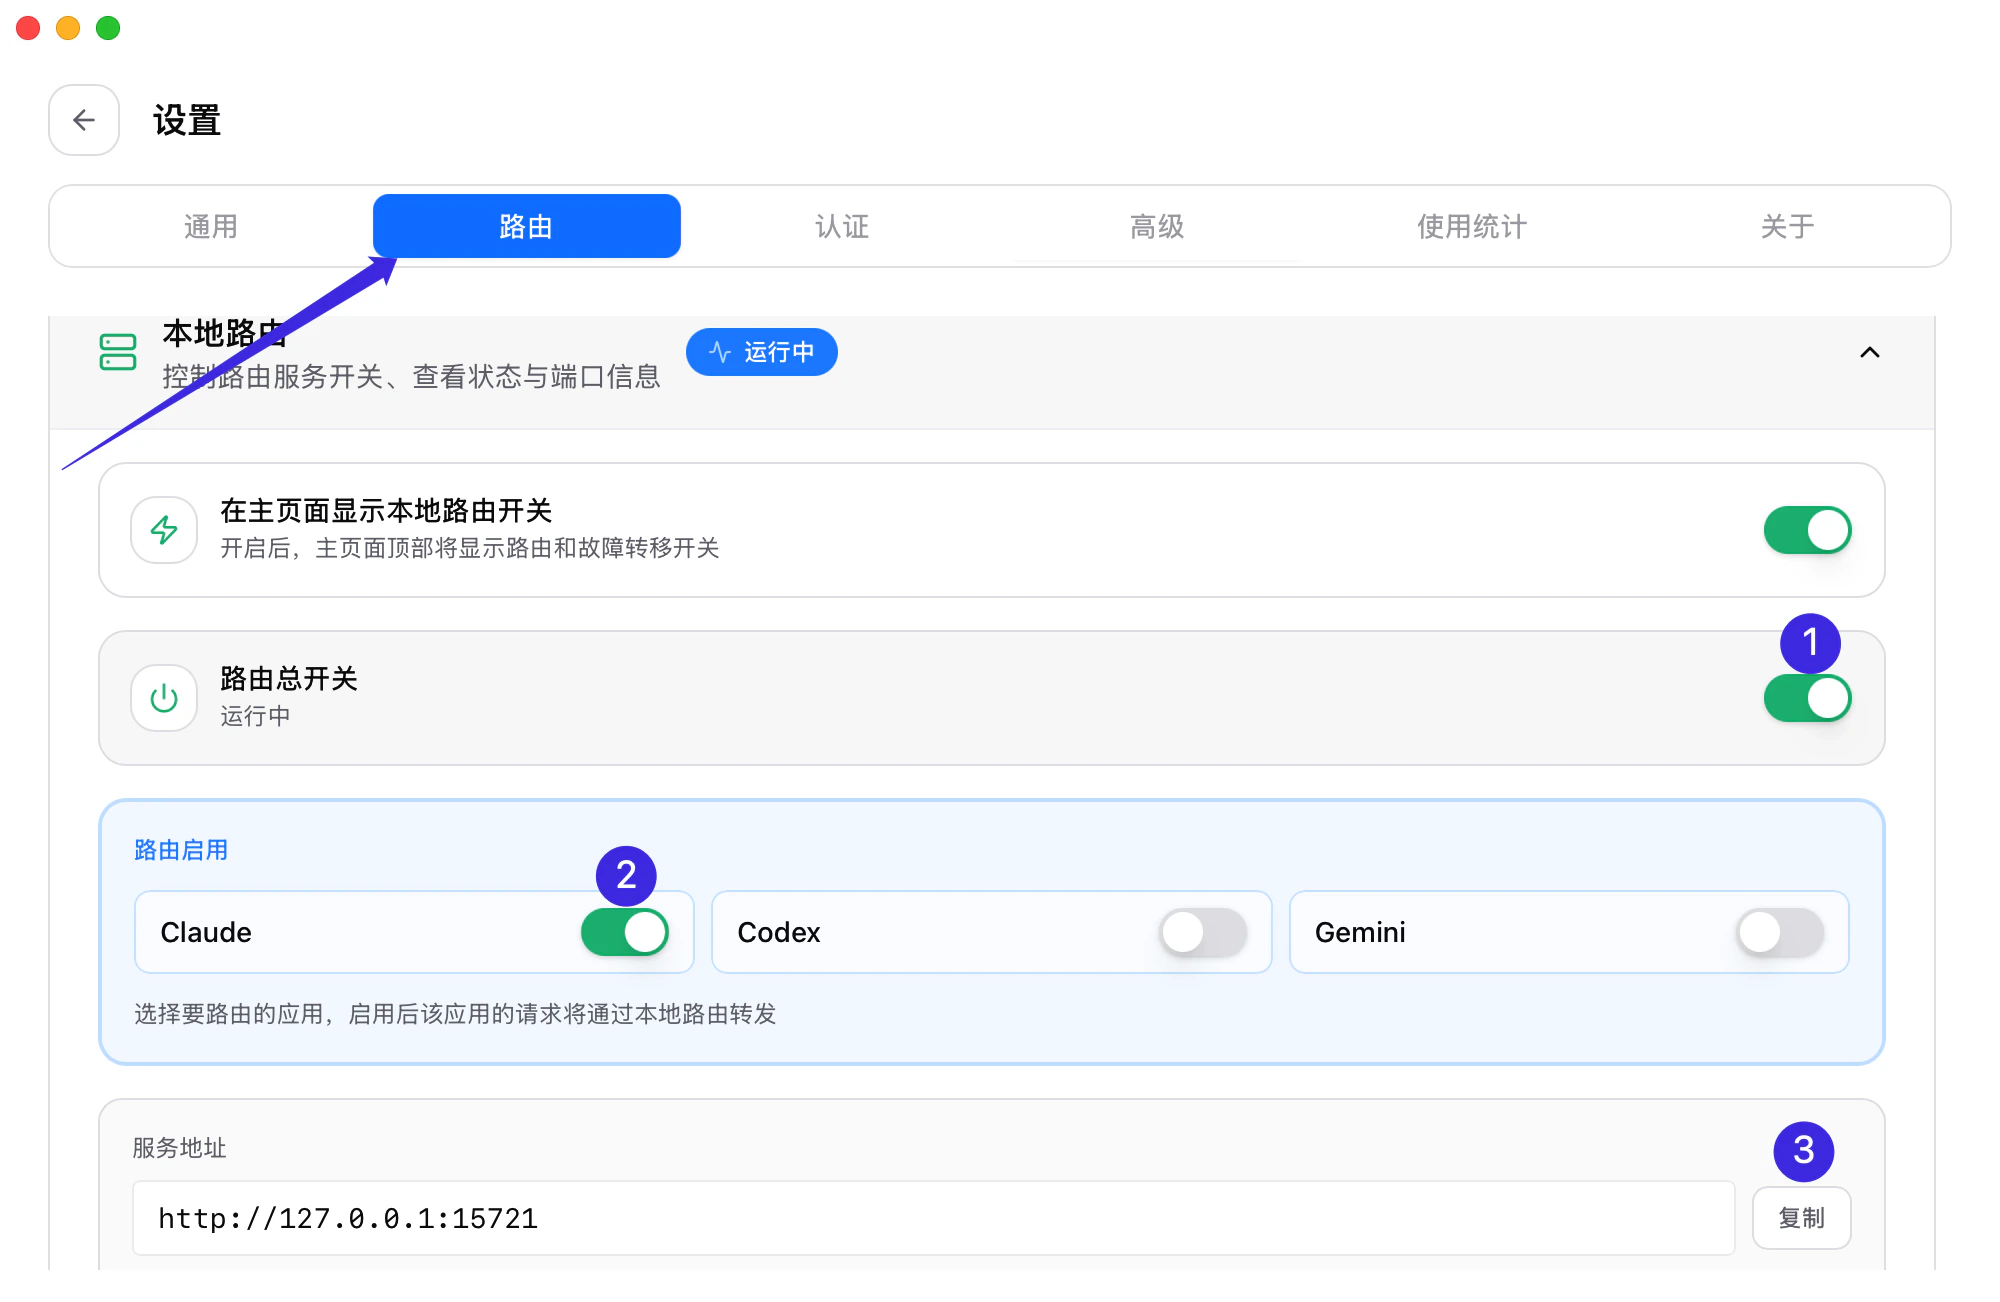
  <Step title="确认路由已打开并复制服务地址">
    进入 **路由** 设置，确认图中标注的 **路由总开关** 和 **Claude** 路由开关都已打开。然后复制下方显示的 **服务地址**。
    <Frame>
      <img src="https://mintcdn.com/bettertoken/3Irzp0wIG1eGzGGI/images/claude-desktop-llmeasy-api/cc-switch-route-service.png?fit=max&auto=format&n=3Irzp0wIG1eGzGGI&q=85&s=eabf3c75a86fdf2e57ba1bfb2d2a4552" alt="CC Switch 路由设置页中，路由总开关、Claude 路由开关和服务地址复制按钮被标出。" style={{ borderRadius: '0.5rem' }} width="2000" height="1302" data-path="images/claude-desktop-llmeasy-api/cc-switch-route-service.png" />
    </Frame>
  </Step>

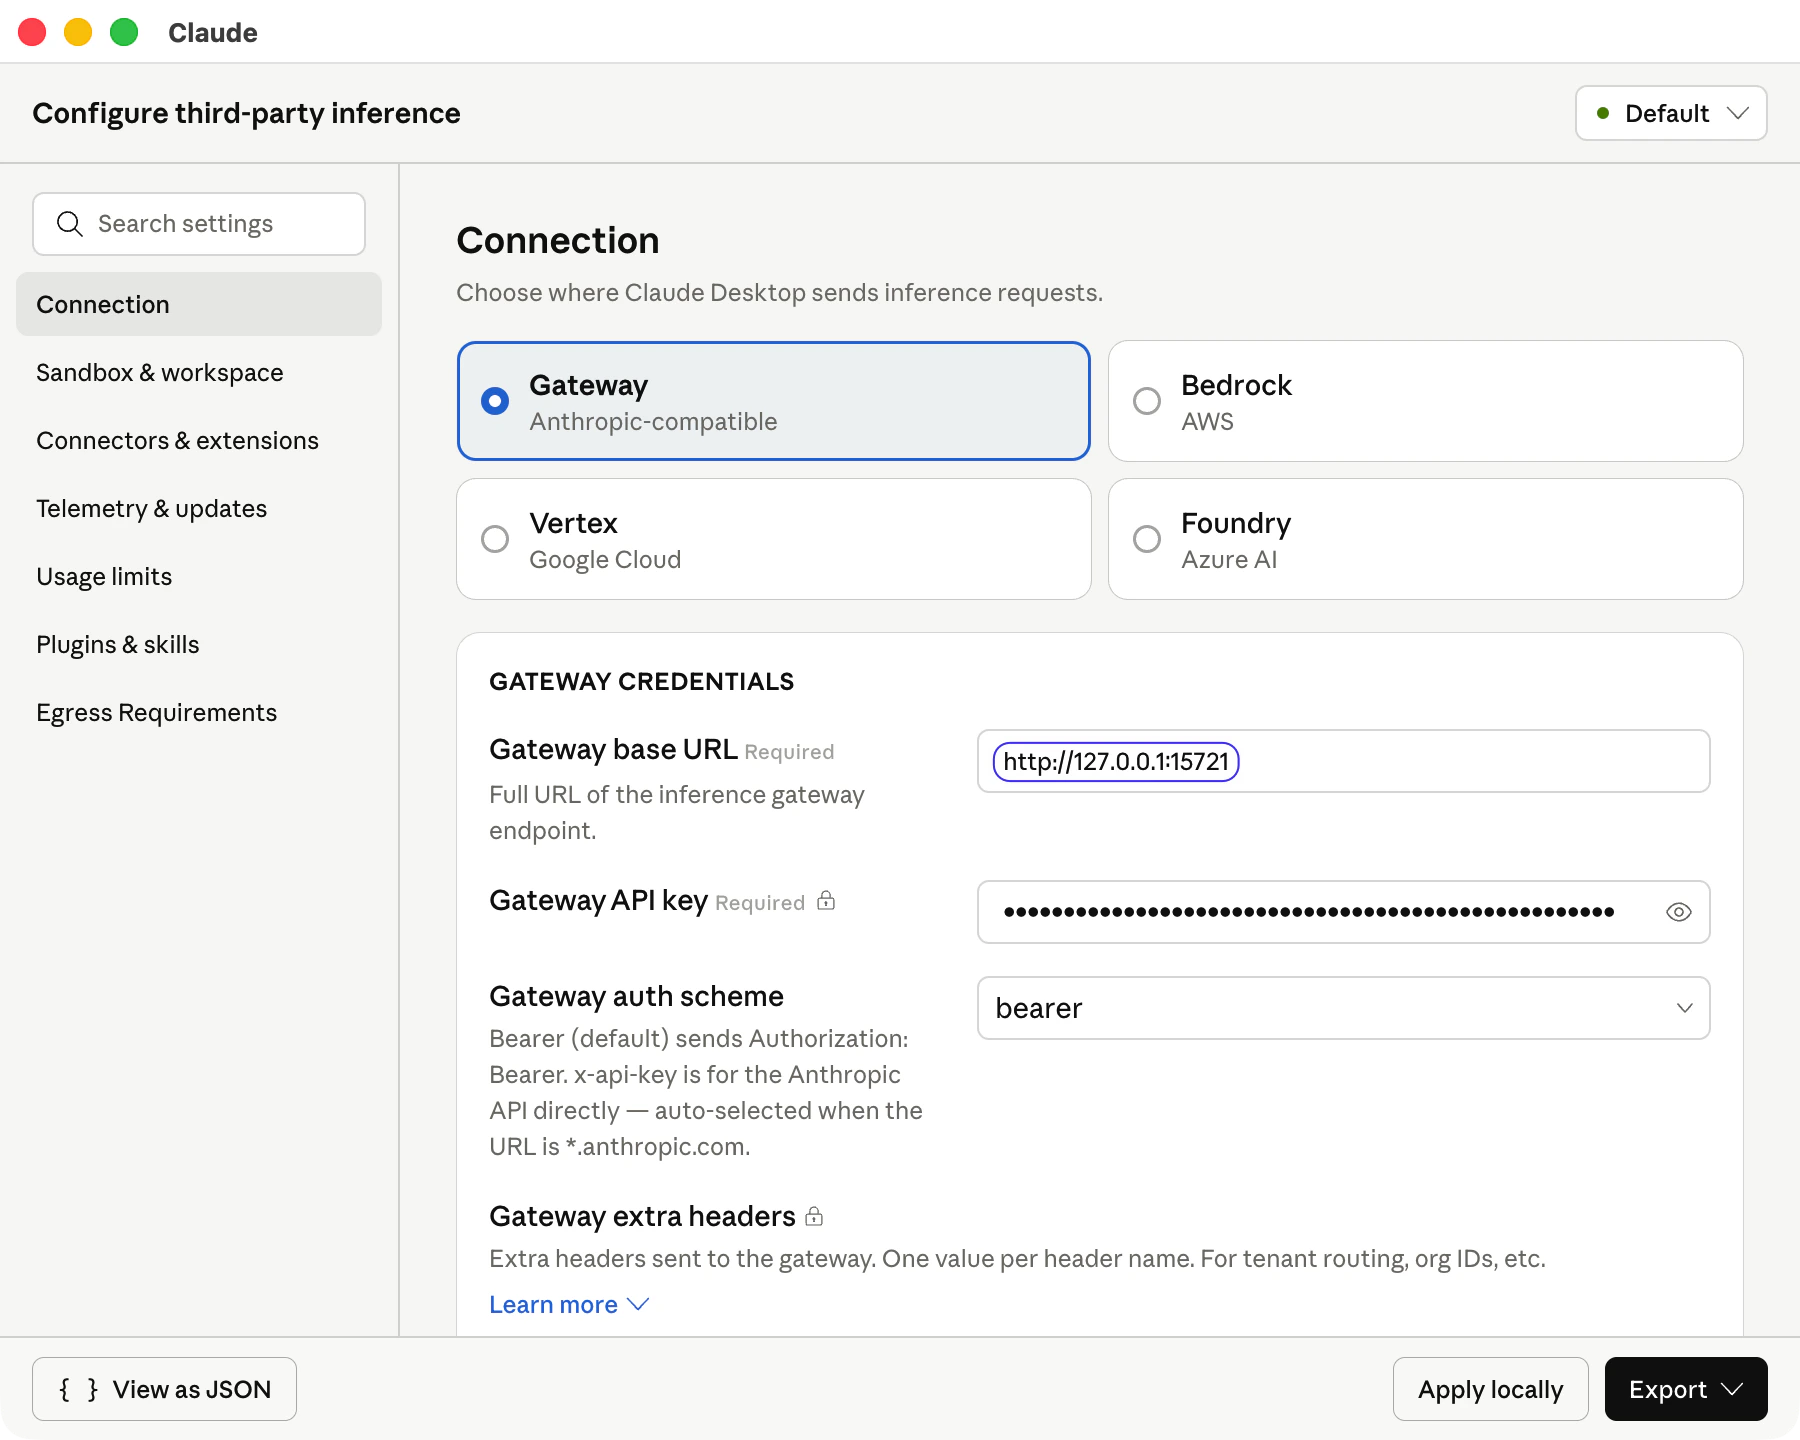
  <Step title="在 Claude 桌面端填入 Gateway base URL">
    回到 Claude 桌面端的第三方推理配置窗口，选择 **Gateway**。把刚才复制的 CC Switch **服务地址** 填入 **Gateway base URL**，并填写你的 LLMEasy API Key。

    **Gateway auth scheme** 选择 `bearer`。
    <Frame>
      <img src="https://mintcdn.com/bettertoken/3Irzp0wIG1eGzGGI/images/claude-desktop-llmeasy-api/claude-gateway-local-route.png?fit=max&auto=format&n=3Irzp0wIG1eGzGGI&q=85&s=f84d8c9b9a97653769cfdfd70dd22c3e" alt="Claude 桌面端 Gateway 配置页中填入 CC Switch 本地服务地址。" style={{ borderRadius: '0.5rem' }} width="1800" height="1440" data-path="images/claude-desktop-llmeasy-api/claude-gateway-local-route.png" />
    </Frame>
  </Step>

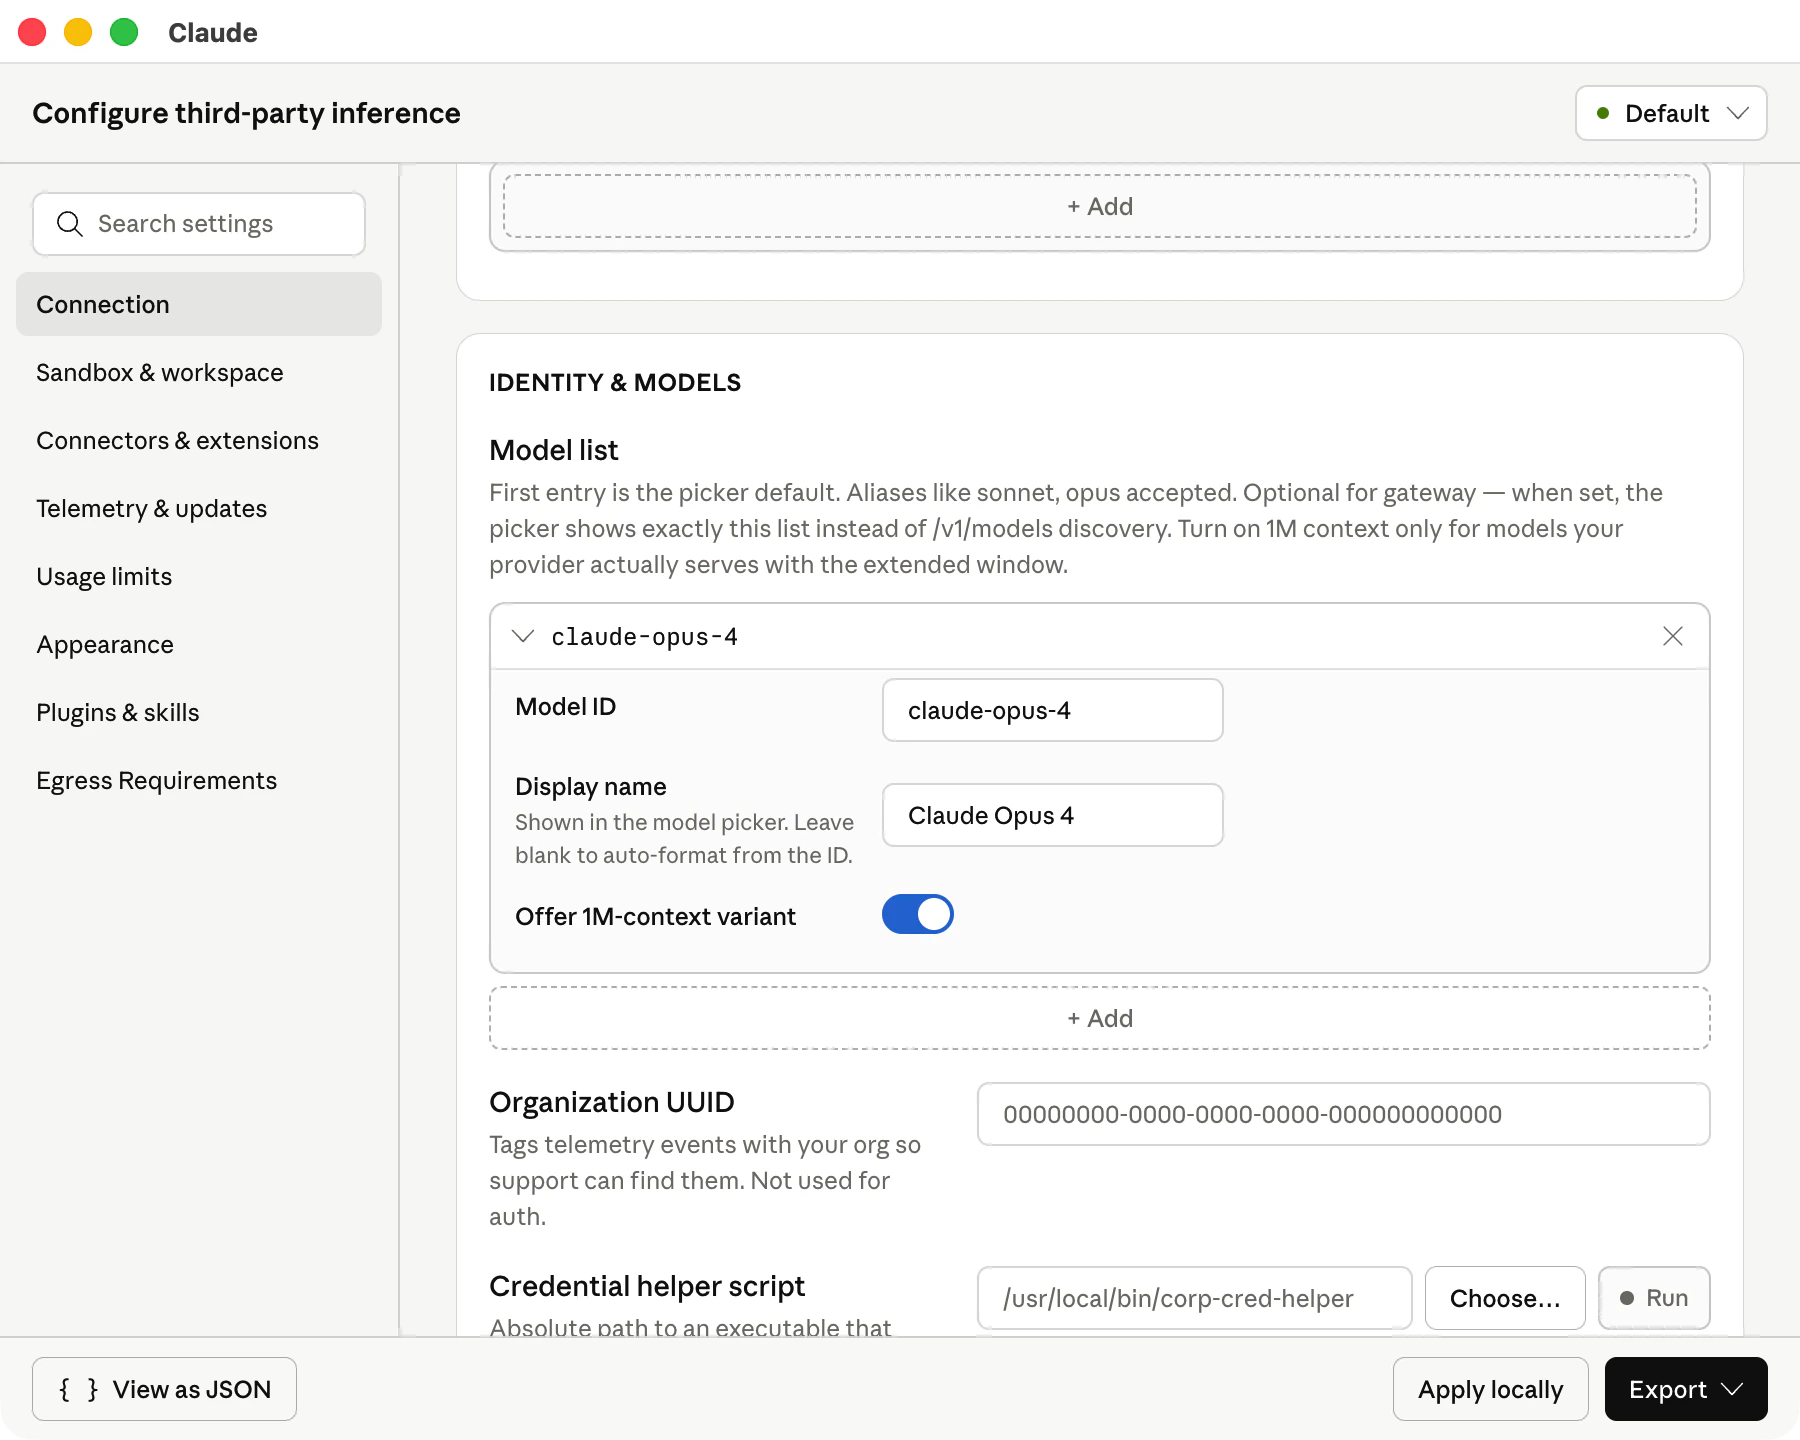
  <Step title="添加模型列表并应用到本机">
    在 **Model list** 里增加要展示的模型。每个模型都需要同时填写 **Model ID** 和 **Display name**。

    例如：

    | Model ID        | Display name    |
    | --------------- | --------------- |
    | `claude-opus-4` | `Claude Opus 4` |

    填写完成后点击 **Apply locally**。
    <Frame>
      <img src="https://mintcdn.com/bettertoken/3Irzp0wIG1eGzGGI/images/claude-desktop-llmeasy-api/claude-model-list-codex-group.png?fit=max&auto=format&n=3Irzp0wIG1eGzGGI&q=85&s=ce8aef0ed312cd8fdd8b8e41717998f0" alt="Claude 桌面端 Model list 中填写 Model ID 和 Display name，并点击 Apply locally。" style={{ borderRadius: '0.5rem' }} width="1800" height="1440" data-path="images/claude-desktop-llmeasy-api/claude-model-list-codex-group.png" />
    </Frame>
  </Step>

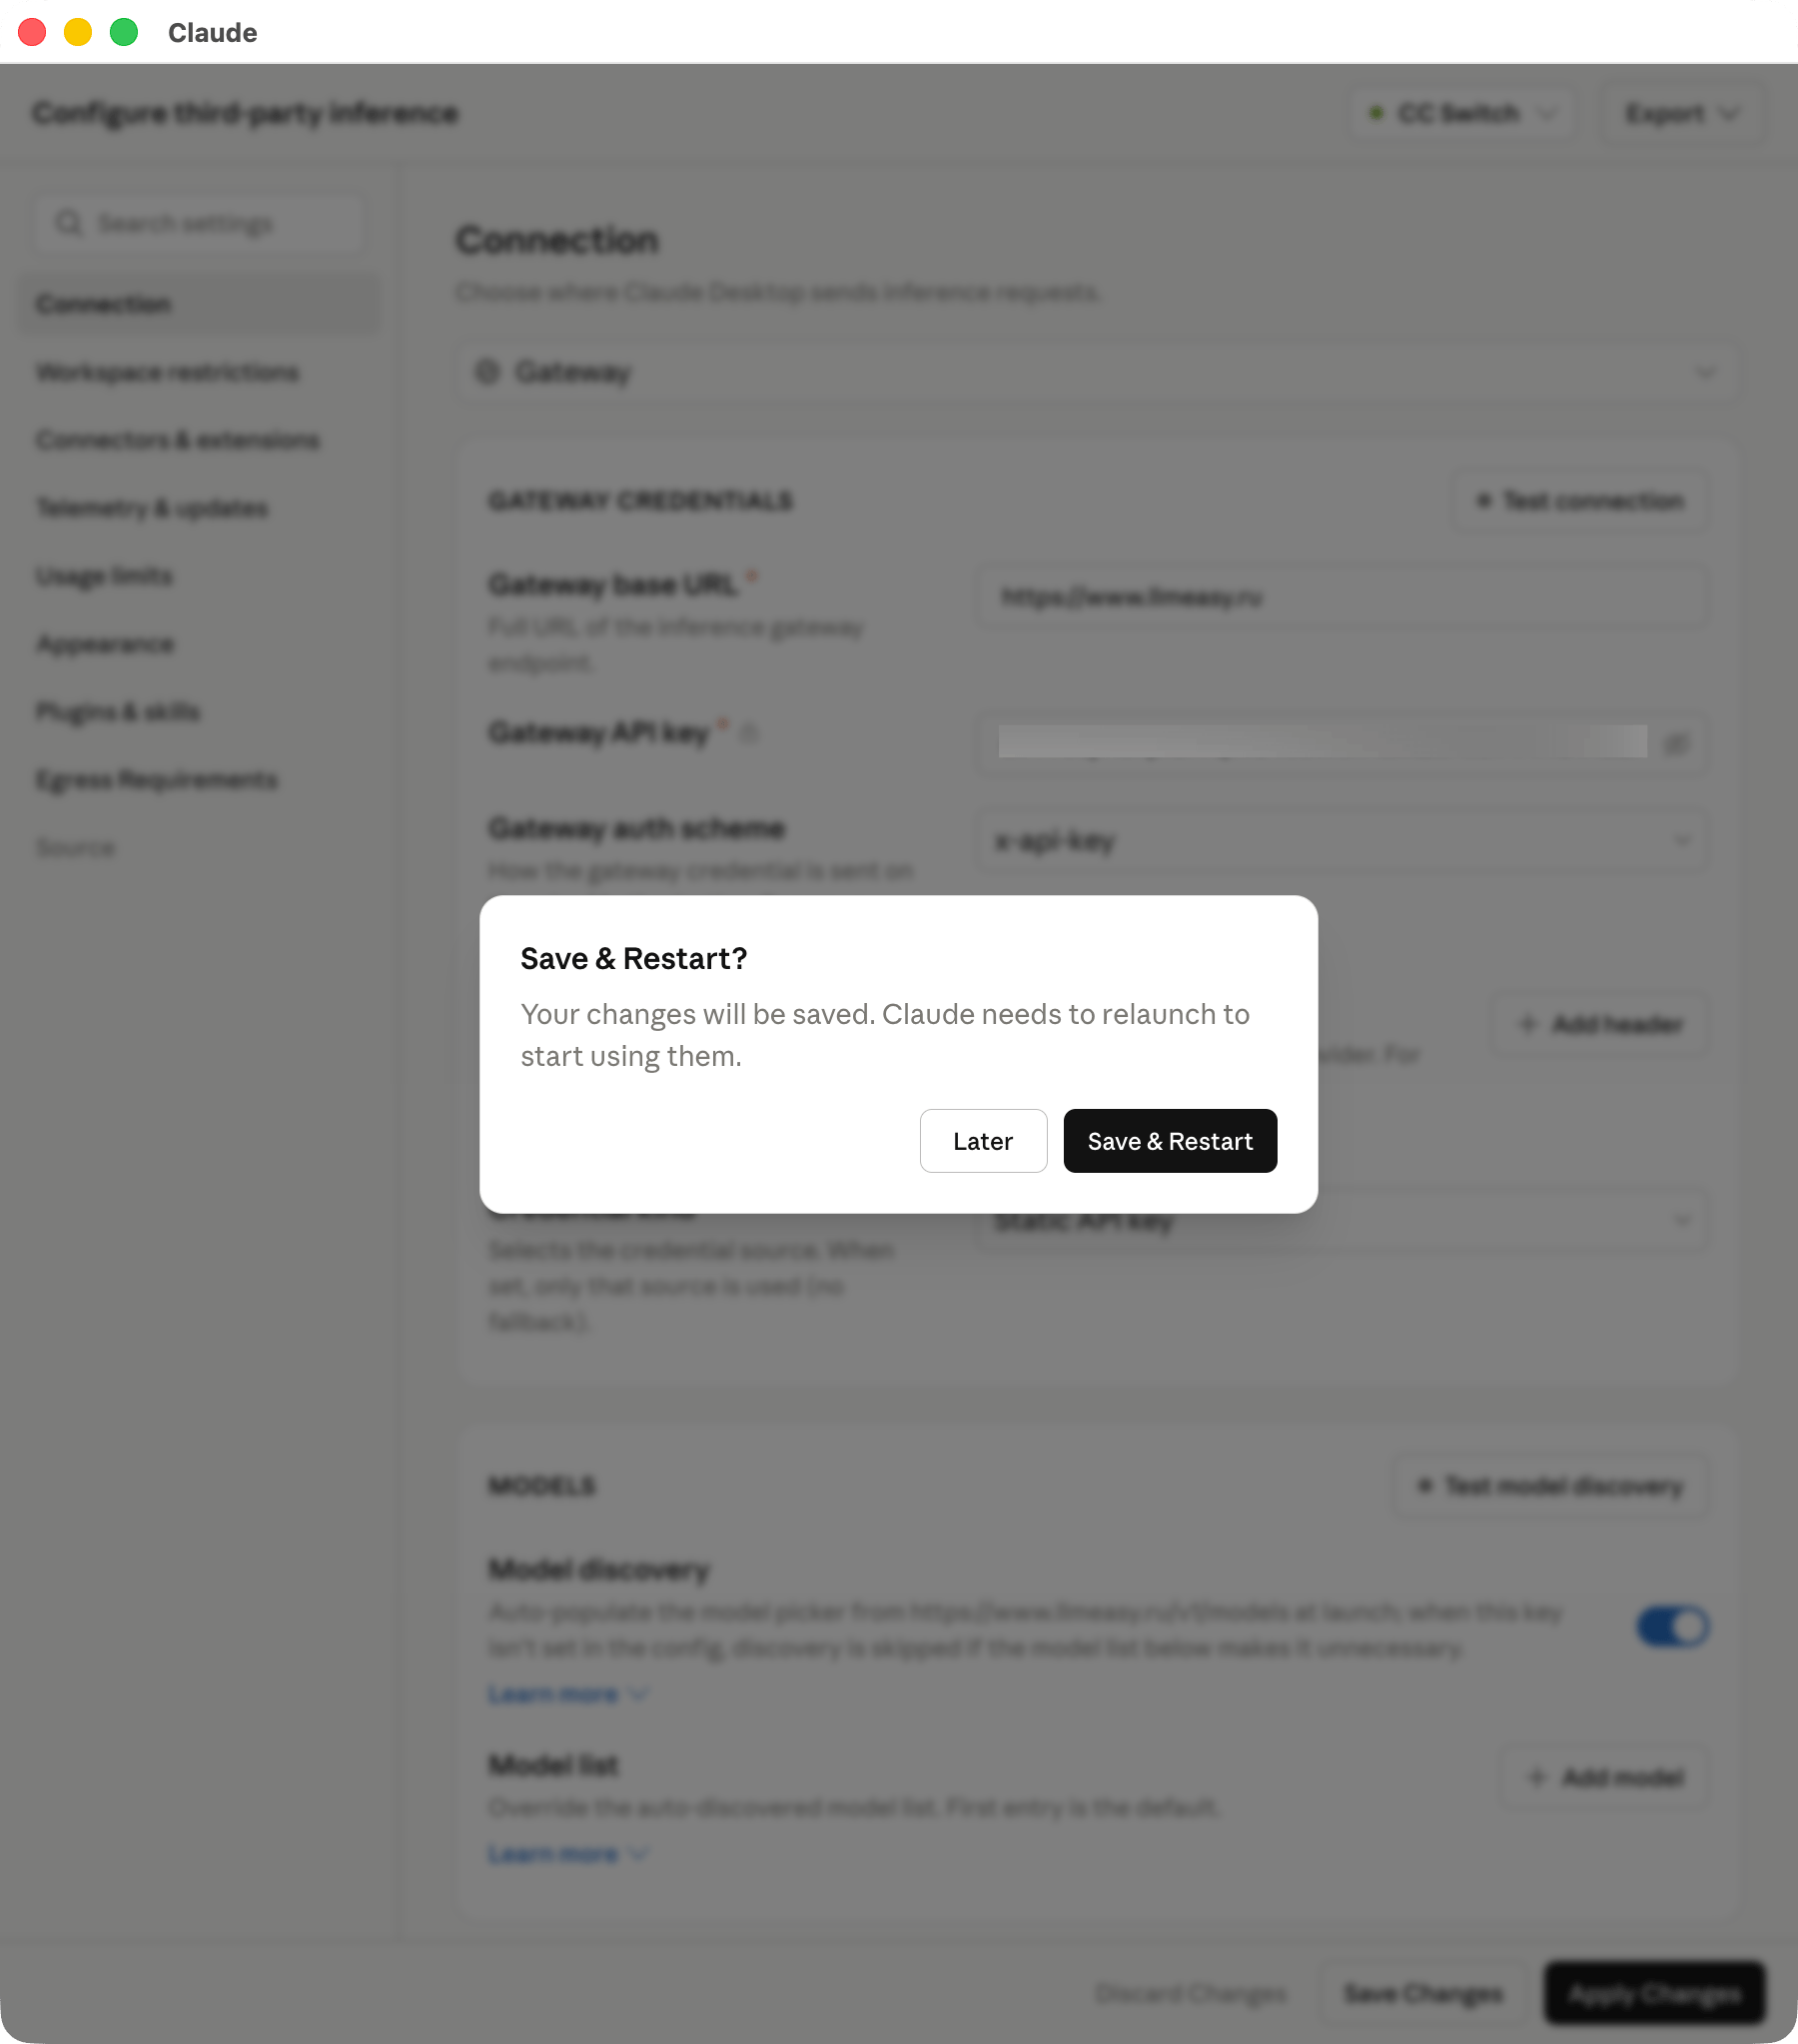
  <Step title="确认重启客户端">
    Claude 写入本地配置后会提示保存并重启。点击 **Save & Restart**，让新网关配置生效。

    <Frame>
      <img src="https://mintcdn.com/bettertoken/Hz5PirDnykYqKKtv/images/claude-desktop-llmeasy-api/relaunch-claude.png?fit=max&auto=format&n=Hz5PirDnykYqKKtv&q=85&s=b0ffd0485974b3cc7f03cce181a19eb2" alt="Claude 桌面端提示 Save & Restart，点击 Save & Restart 保存并重启客户端。" style={{ borderRadius: '0.5rem' }} width="1800" height="2046" data-path="images/claude-desktop-llmeasy-api/relaunch-claude.png" />
    </Frame>
  </Step>

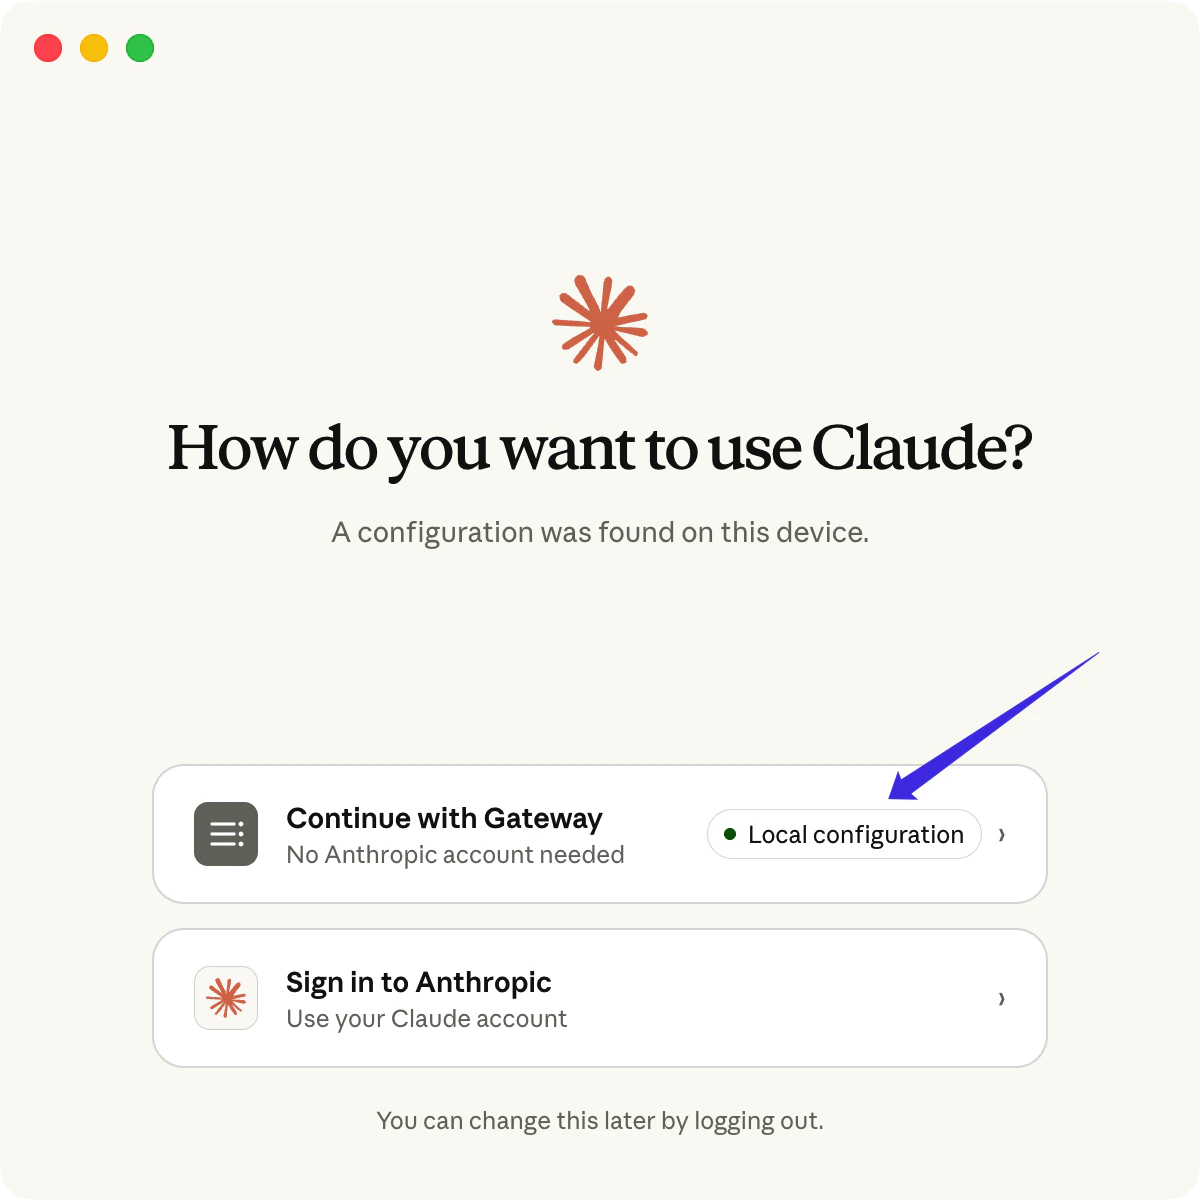
  <Step title="选择 Gateway 网关登录">
    重启后等待约 3 秒，会出现登录方式选择界面。

    <Frame>
      <img src="https://mintcdn.com/bettertoken/3Irzp0wIG1eGzGGI/images/claude-desktop-llmeasy-api/continue-with-gateway.png?fit=max&auto=format&n=3Irzp0wIG1eGzGGI&q=85&s=847eb5601c187dd8680779018340596e" alt="Claude 桌面端显示 Continue with Gateway 登录选项。" style={{ borderRadius: '0.5rem' }} width="1200" height="1200" data-path="images/claude-desktop-llmeasy-api/continue-with-gateway.png" />
    </Frame>

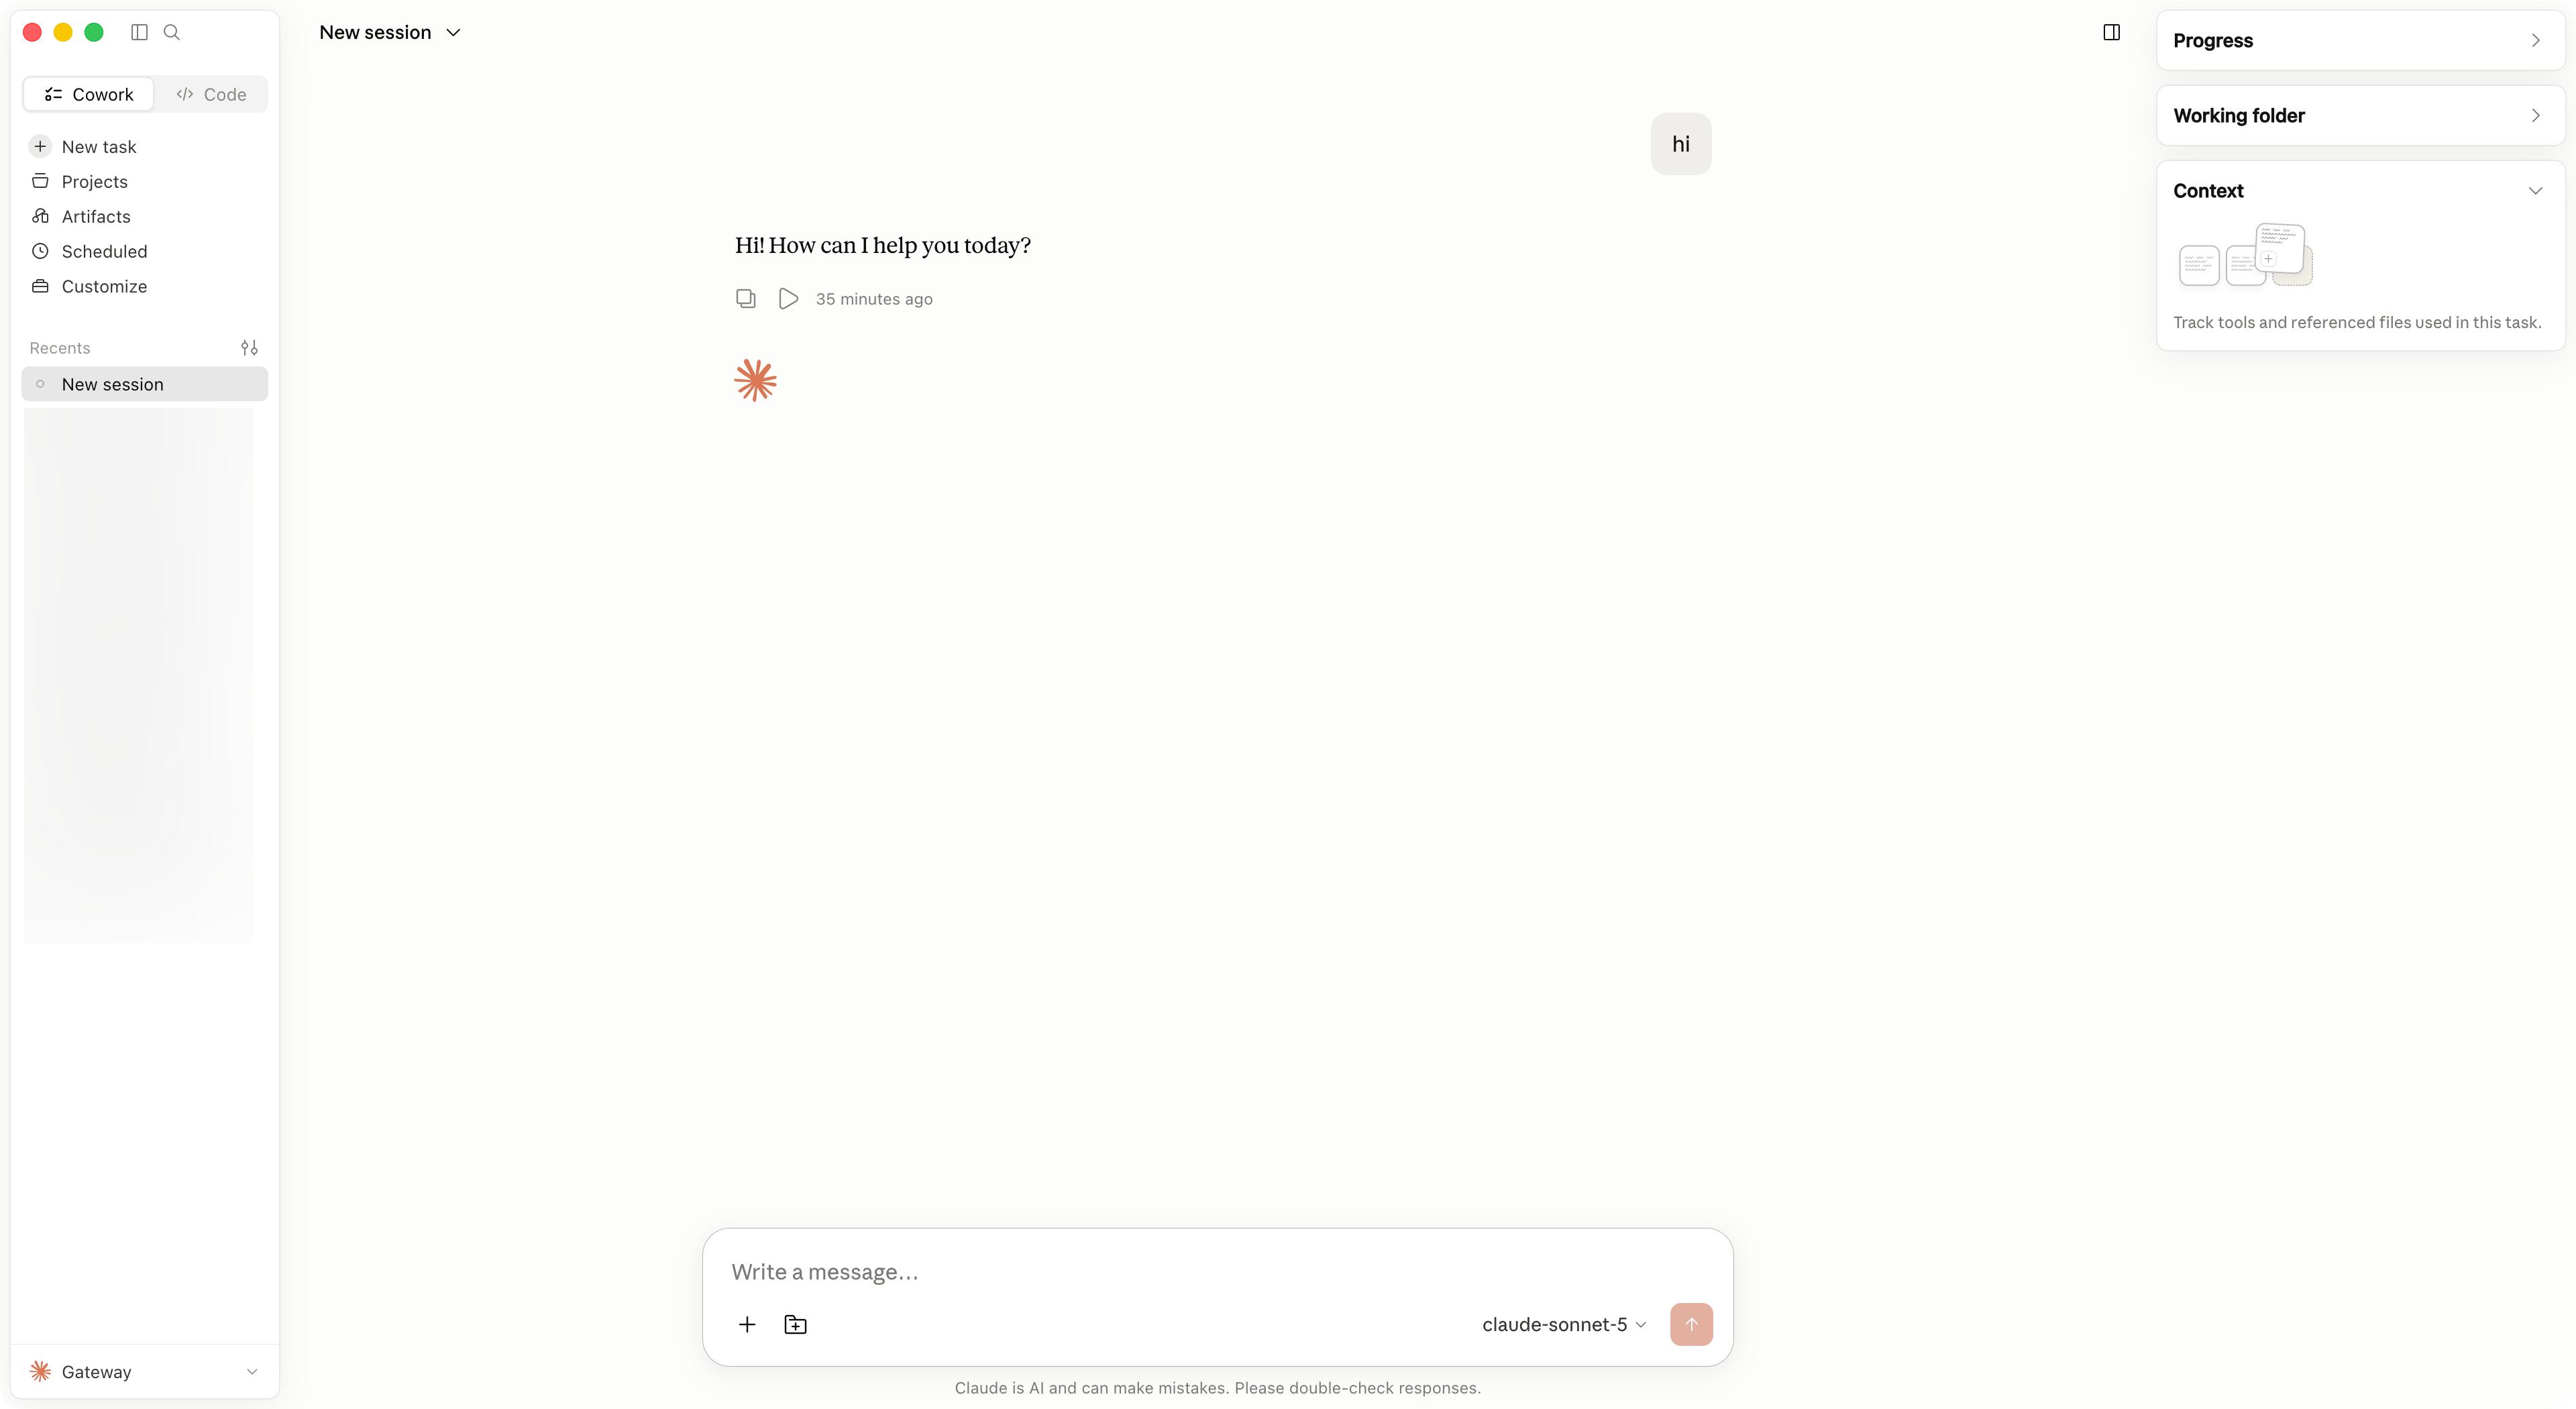
    选择 **Continue with Gateway**。进入 Claude 后，左下角显示 **Cowork 3P | Gateway**，即可正常使用。

    <Frame>
      <img src="https://mintcdn.com/bettertoken/Hz5PirDnykYqKKtv/images/claude-desktop-llmeasy-api/gateway-ready.png?fit=max&auto=format&n=Hz5PirDnykYqKKtv&q=85&s=64769ca6417cd1e420bd6057f10dea4b" alt="Claude 桌面端已通过 Gateway 进入并可以正常使用。" style={{ borderRadius: '0.5rem' }} width="3840" height="2100" data-path="images/claude-desktop-llmeasy-api/gateway-ready.png" />
    </Frame>
  </Step>
</Steps>

## 排查建议

如果仍然看到 **Your provider setup needs a fix**，优先检查：

1. CC Switch 里的 LLMEasy provider 是否已设为 **使用中**
2. **API 格式** 是否已选择 **OpenAI Responses API**
3. **模型映射** 是否已为主模型、Thinking、Haiku、Sonnet、Opus 显式选择 GPT 分组模型
4. **CC Switch 代理功能**、**路由总开关** 和 **Claude** 路由开关是否都已打开
5. Claude Desktop 的 **Gateway base URL** 是否为 CC Switch 复制出的本地服务地址
6. **Model list** 是否已为每个模型同时填写 **Model ID** 和 **Display name**