> ## Documentation Index
> Fetch the complete documentation index at: https://docs.llmeasy.ru/llms.txt
> Use this file to discover all available pages before exploring further.
# Kodacode 自定义模型接入 LLMEasy 指南
> 在 Kodacode / Koda VS Code 插件中配置自定义 OpenAI-compatible 模型。
Kodacode 的 VS Code 插件可以在聊天、Agent 和编辑场景中使用模型。接入 LLMEasy 时,请添加一个 **Any OpenAI-compatible API** 模型,并使用 GPT 分组 API Key。
本文以 VS Code 插件为例。Kodacode 官方安装文档说明,VS Code 版本需要 `1.75` 或更新版本,扩展 ID 为 `Koda.koda`。
## 前置条件
* 已安装 VS Code
* 已安装 Kodacode / Koda 插件
* 已获取 LLMEasy API Key(注册并获取)
* API Key 属于 **GPT 分组**
* 已从模型广场复制要使用的 GPT 分组模型 ID,例如 `gpt-5.5`
## 配置步骤
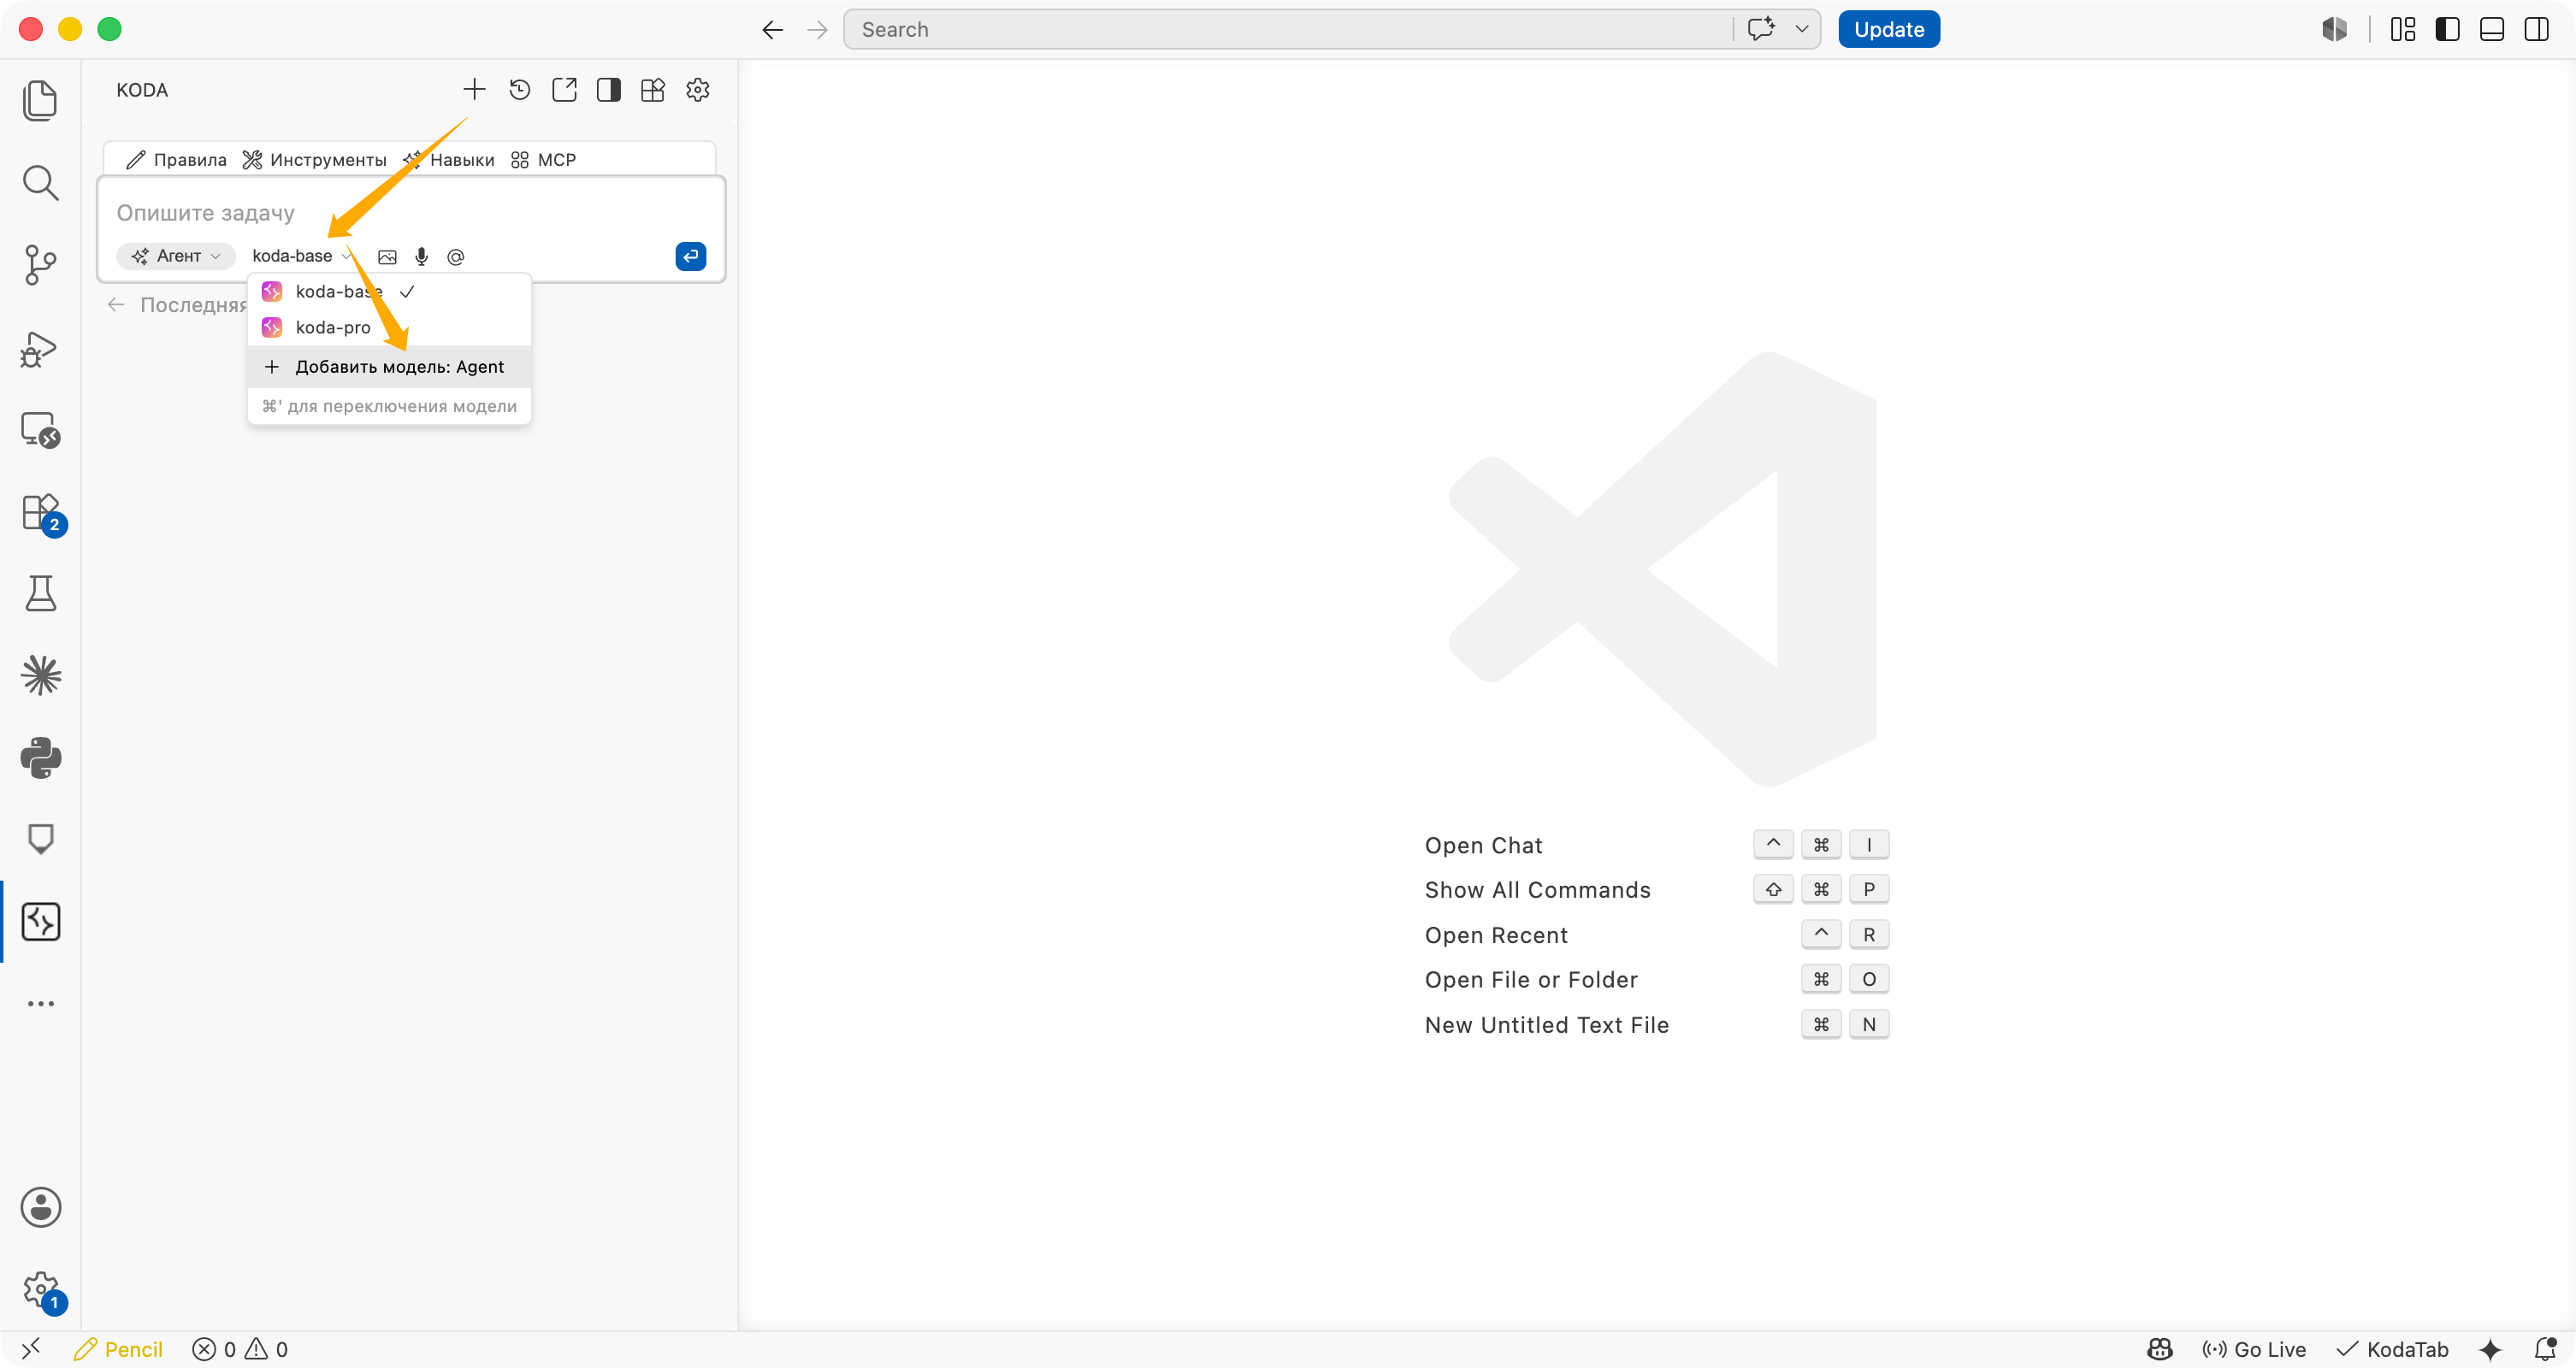
打开 VS Code 左侧的 **KODA** 面板,点击输入框下方的模型下拉菜单,然后选择 **Добавить модель: Agent** / **Add model: Agent**。
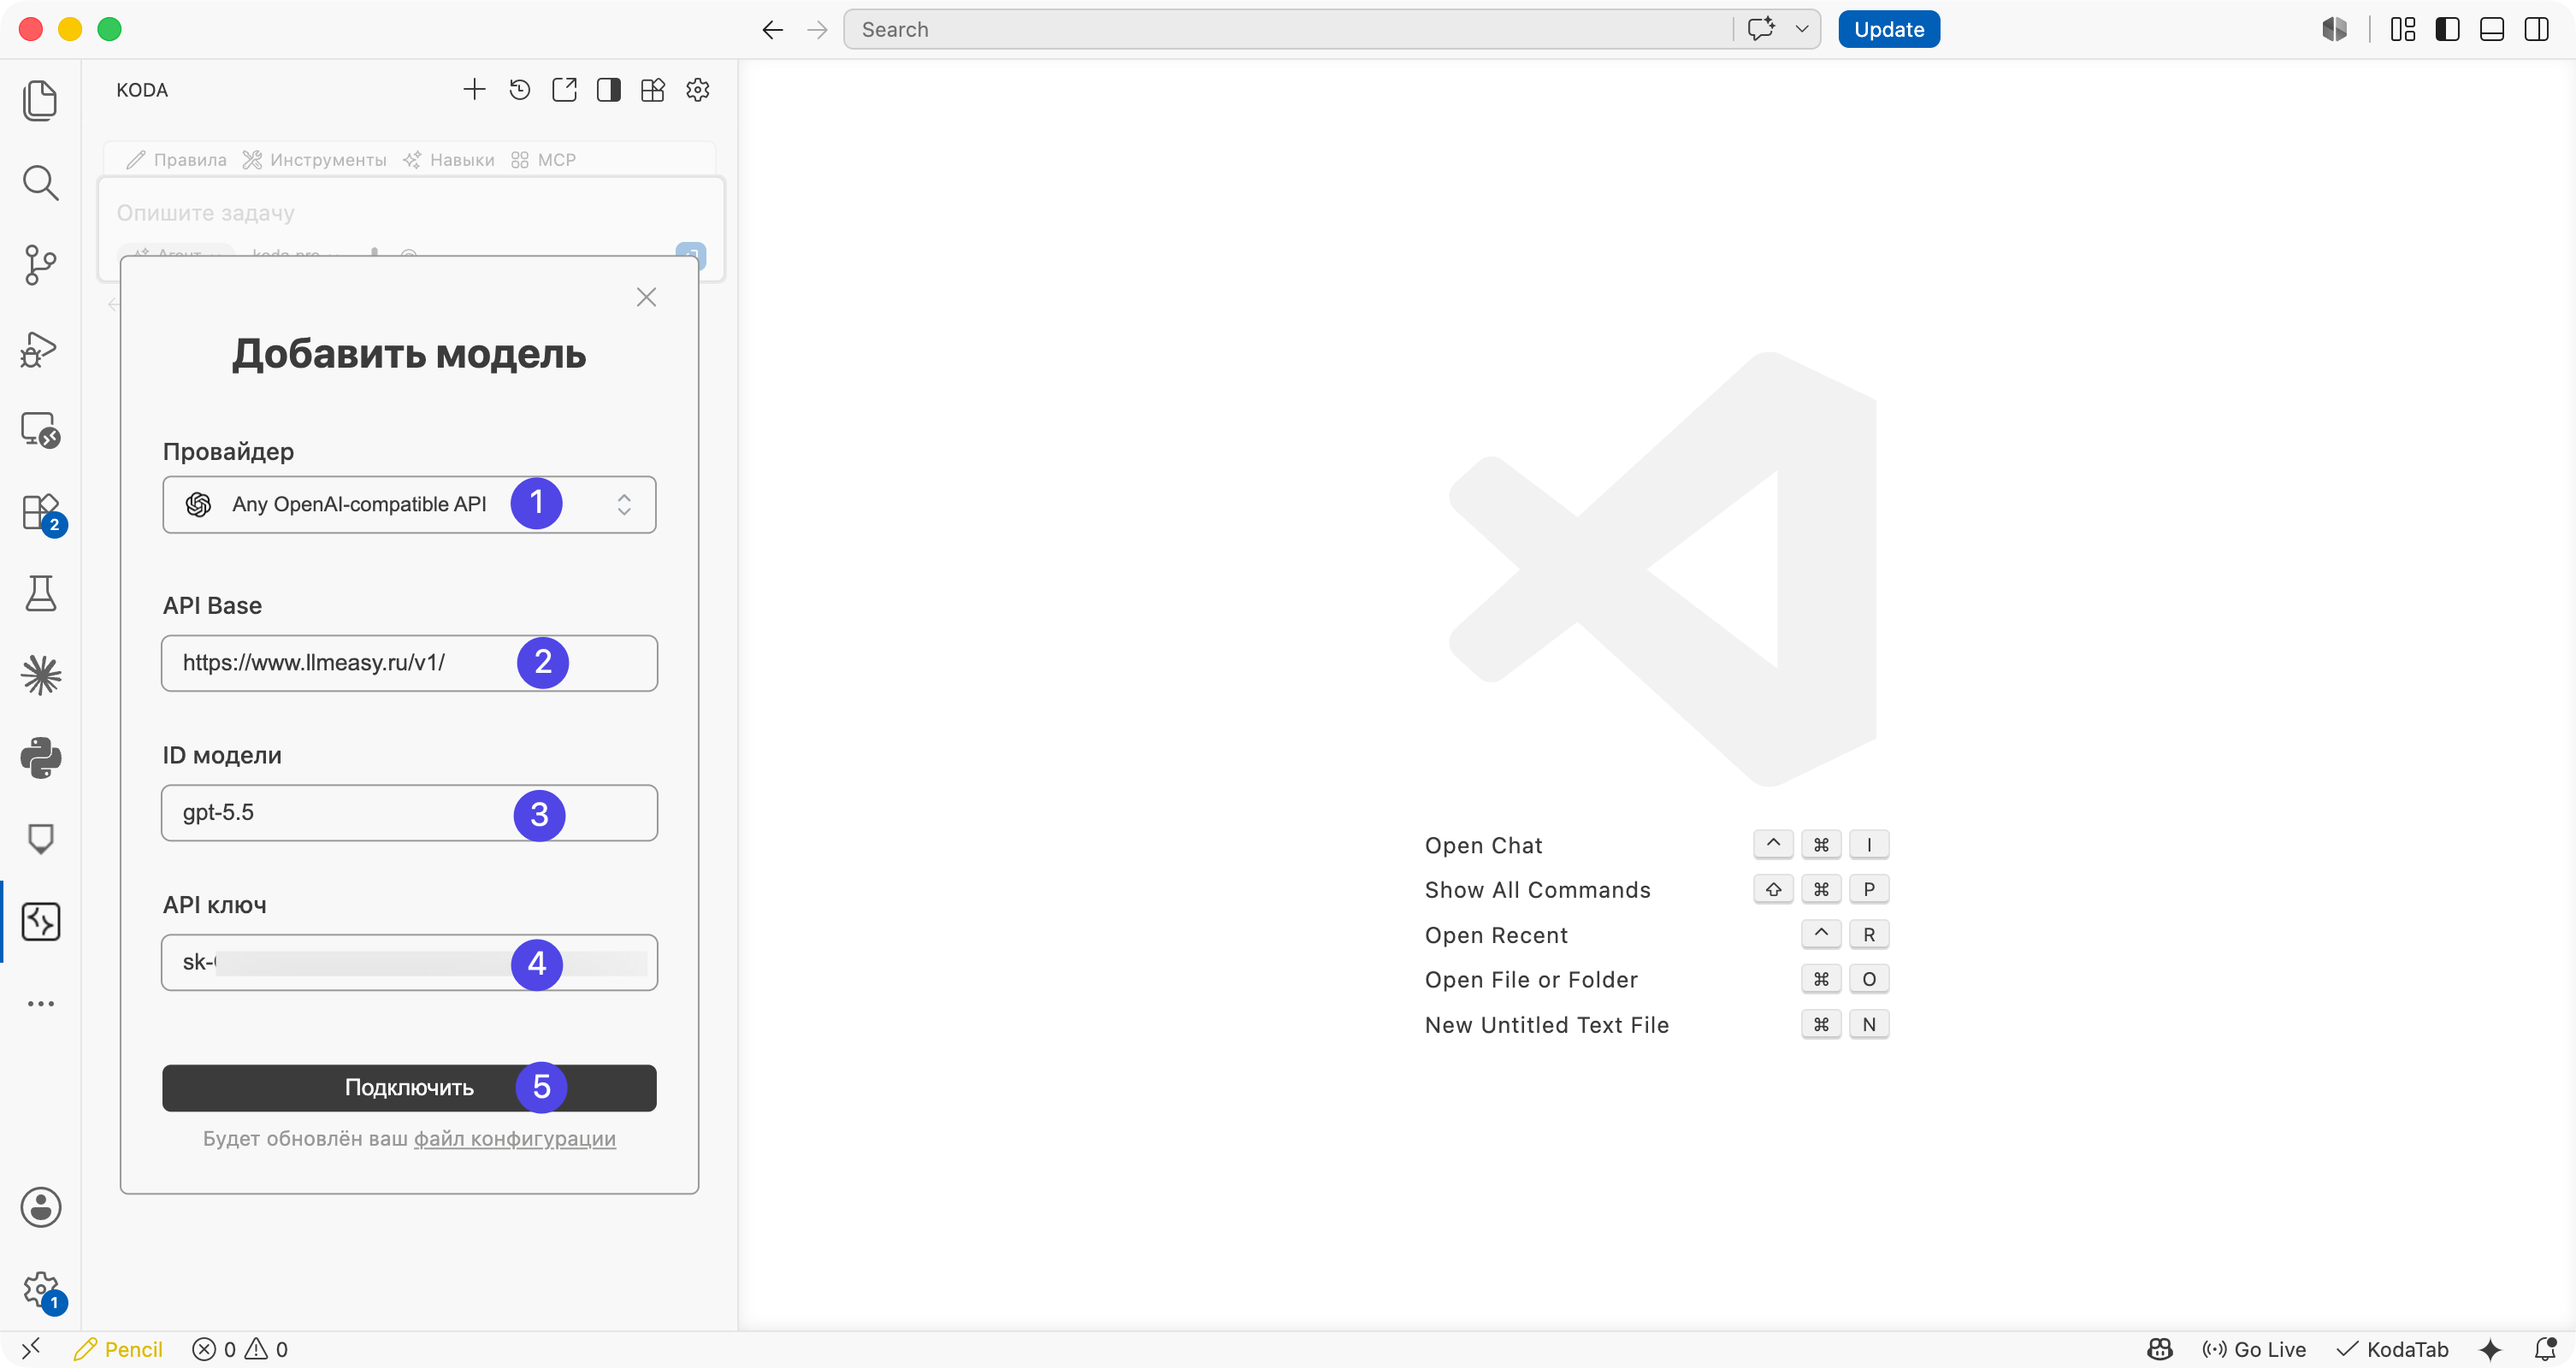
 在添加模型窗口中,按下面方式填写:
| 配置项 | 推荐值 |
| -------- | -------------------------------------------------------------------------------- |
| Provider | `Any OpenAI-compatible API` |
| API Base | `https://www.llmeasy.ru/v1/` |
| Model ID | 从模型广场复制的 GPT 分组模型 ID,例如 `gpt-5.5` |
| API Key | 你的 LLMEasy API Key |
填写完成后,点击 **Подключить** / **Connect**。
在添加模型窗口中,按下面方式填写:
| 配置项 | 推荐值 |
| -------- | -------------------------------------------------------------------------------- |
| Provider | `Any OpenAI-compatible API` |
| API Base | `https://www.llmeasy.ru/v1/` |
| Model ID | 从模型广场复制的 GPT 分组模型 ID,例如 `gpt-5.5` |
| API Key | 你的 LLMEasy API Key |
填写完成后,点击 **Подключить** / **Connect**。
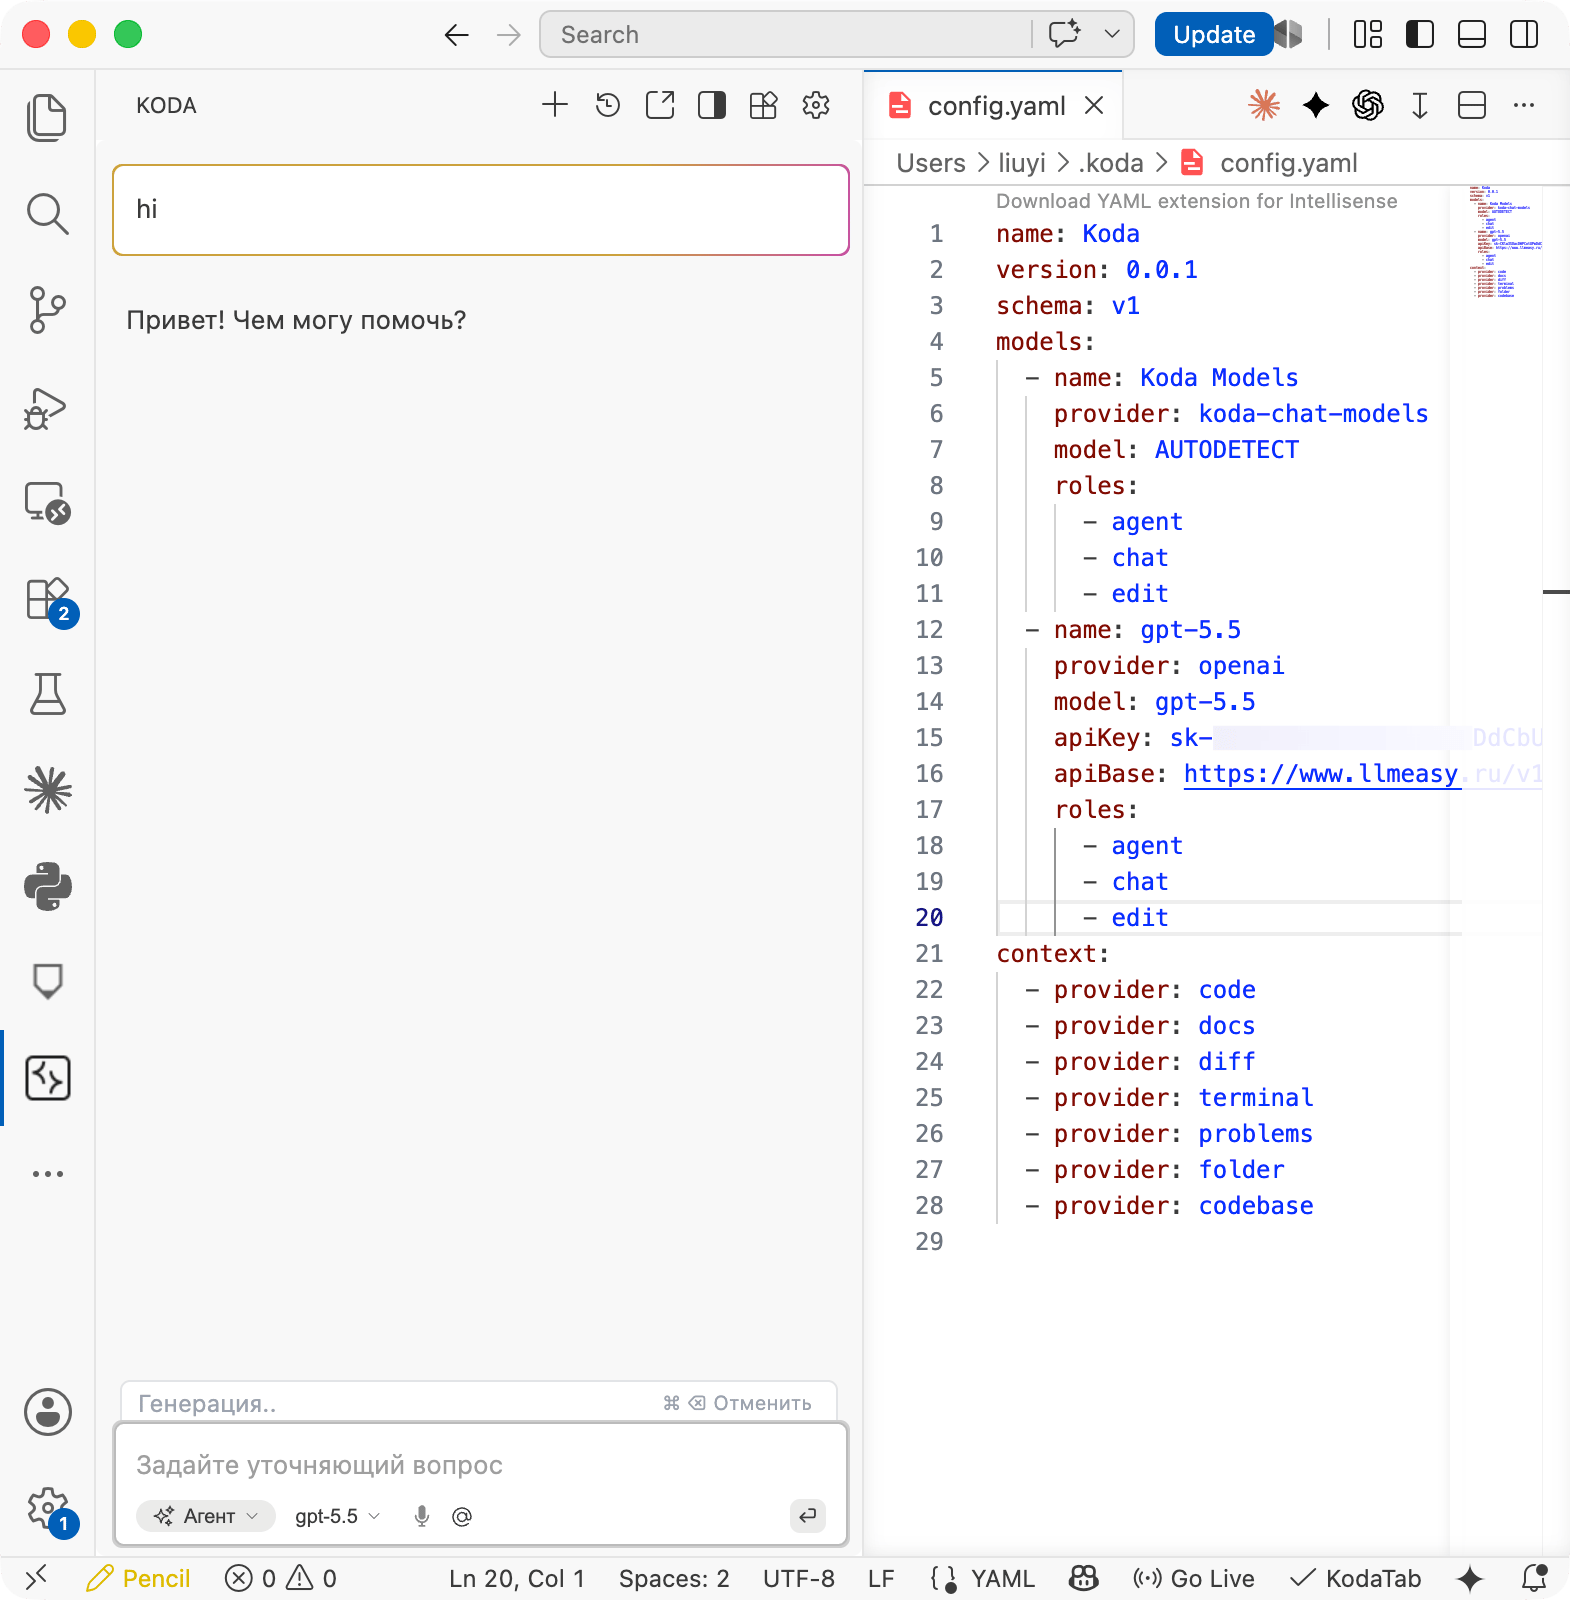
 连接完成后,在 Koda 输入框下方的模型选择器中选择刚添加的模型,例如 `gpt-5.5`。发送一条简单消息,确认能够正常返回结果。
Kodacode 会把配置写入本机的 `~/.koda/config.yaml`。你可以打开该文件确认模型已经写入。
连接完成后,在 Koda 输入框下方的模型选择器中选择刚添加的模型,例如 `gpt-5.5`。发送一条简单消息,确认能够正常返回结果。
Kodacode 会把配置写入本机的 `~/.koda/config.yaml`。你可以打开该文件确认模型已经写入。
 ## config.yaml 示例
下面是可以对照检查的完整结构。请把 `YOUR_API_KEY` 替换为你的 LLMEasy API Key,不要把真实 API Key 提交到仓库。
```yaml theme={null}
name: Koda
version: 0.0.1
schema: v1
models:
- name: Koda Models
provider: koda-chat-models
model: AUTODETECT
roles:
- agent
- chat
- edit
- name: gpt-5.5
provider: openai
model: gpt-5.5
apiKey: YOUR_API_KEY
apiBase: https://www.llmeasy.ru/v1/
roles:
- agent
- chat
- edit
context:
- provider: code
- provider: docs
- provider: diff
- provider: terminal
- provider: problems
- provider: folder
- provider: codebase
```
如果你使用的模型不是 `gpt-5.5`,请同时修改 `name` 和 `model`,保持它们与模型广场中的 GPT 分组模型 ID 一致。
## 排障提示
* 如果连接失败,先确认 **API Base** 是否为 `https://www.llmeasy.ru/v1/`,并保留末尾 `/`。
* 如果模型不可用,确认 **Model ID** 是否来自 GPT 分组。
* 如果鉴权失败,重新复制 API Key,避免多复制空格或换行。
* 如果修改 `config.yaml` 后没有生效,重启 VS Code 或执行 **Developer: Reload Window**。
* 接入 LLMEasy 时通常不需要额外设置 `User-Agent` 或其他 headers。
## 参考资料
* [Kodacode 插件概览](https://docs.kodacode.ru/plugin/overview.html)
* [Kodacode 插件安装文档](https://docs.kodacode.ru/plugin/install.html)
## config.yaml 示例
下面是可以对照检查的完整结构。请把 `YOUR_API_KEY` 替换为你的 LLMEasy API Key,不要把真实 API Key 提交到仓库。
```yaml theme={null}
name: Koda
version: 0.0.1
schema: v1
models:
- name: Koda Models
provider: koda-chat-models
model: AUTODETECT
roles:
- agent
- chat
- edit
- name: gpt-5.5
provider: openai
model: gpt-5.5
apiKey: YOUR_API_KEY
apiBase: https://www.llmeasy.ru/v1/
roles:
- agent
- chat
- edit
context:
- provider: code
- provider: docs
- provider: diff
- provider: terminal
- provider: problems
- provider: folder
- provider: codebase
```
如果你使用的模型不是 `gpt-5.5`,请同时修改 `name` 和 `model`,保持它们与模型广场中的 GPT 分组模型 ID 一致。
## 排障提示
* 如果连接失败,先确认 **API Base** 是否为 `https://www.llmeasy.ru/v1/`,并保留末尾 `/`。
* 如果模型不可用,确认 **Model ID** 是否来自 GPT 分组。
* 如果鉴权失败,重新复制 API Key,避免多复制空格或换行。
* 如果修改 `config.yaml` 后没有生效,重启 VS Code 或执行 **Developer: Reload Window**。
* 接入 LLMEasy 时通常不需要额外设置 `User-Agent` 或其他 headers。
## 参考资料
* [Kodacode 插件概览](https://docs.kodacode.ru/plugin/overview.html)
* [Kodacode 插件安装文档](https://docs.kodacode.ru/plugin/install.html)