> ## Documentation Index
> Fetch the complete documentation index at: https://docs.llmeasy.ru/llms.txt
> Use this file to discover all available pages before exploring further.
# CC Switch 接入 LLMEasy 指南
> 在 CC Switch 中接入 LLMEasy,统一管理 Claude Code、Codex CLI、OpenCode 和 OpenClaw。
CC Switch 是一款跨平台桌面工具,用来统一管理 Claude Code、Codex、OpenCode 和 OpenClaw 的供应商配置。这篇文档介绍如何在 CC Switch 中接入 LLMEasy,并覆盖 Claude Code、Codex、OpenCode、OpenClaw 这四条已确认的接入路径。
## 安装 CC Switch
推荐优先使用 Homebrew;也可以从 [GitHub Releases](https://github.com/farion1231/cc-switch/releases) 下载最新版 `.dmg` 或 `.zip`。
```bash theme={null}
brew tap farion1231/ccswitch
brew install --cask cc-switch
```
从 [GitHub Releases](https://github.com/farion1231/cc-switch/releases) 下载最新版 `CC-Switch-v{version}-Windows.msi` 或便携版 `.zip`,然后按安装向导完成安装。
从 [GitHub Releases](https://github.com/farion1231/cc-switch/releases) 下载最新版 `.deb`、`.rpm` 或 `.AppImage`。
## 开始前准备
* LLMEasy API Key(注册并获取)
* Claude Code 使用 Anthropic 协议:`Base URL` 填 `https://www.llmeasy.ru`
* Codex、OpenCode、OpenClaw 使用 OpenAI-compatible 协议:`Base URL` 填 `https://www.llmeasy.ru/v1`
* 给 Codex、OpenCode、OpenClaw 准备一个当前可用的 **GPT 分组**模型 ID。你可以从 LLMEasy 模型广场 复制,或在 CC Switch 里用 **获取模型** 直接从 `/v1/models` 拉取
CC Switch 首次启动时会自动导入本机已有的配置。你可以保留官方 provider 作为回退,再新增 LLMEasy。
LLMEasy 同时提供 Anthropic 和 OpenAI-compatible 两种接入模式。为了避免把 `https://www.llmeasy.ru` 和 `https://www.llmeasy.ru/v1` 混在一起,建议在 CC Switch 里按应用分别创建 provider,而不是把 Claude Code 和 OpenAI-compatible 工具合并到一个统一供应商。
## 添加 LLMEasy provider
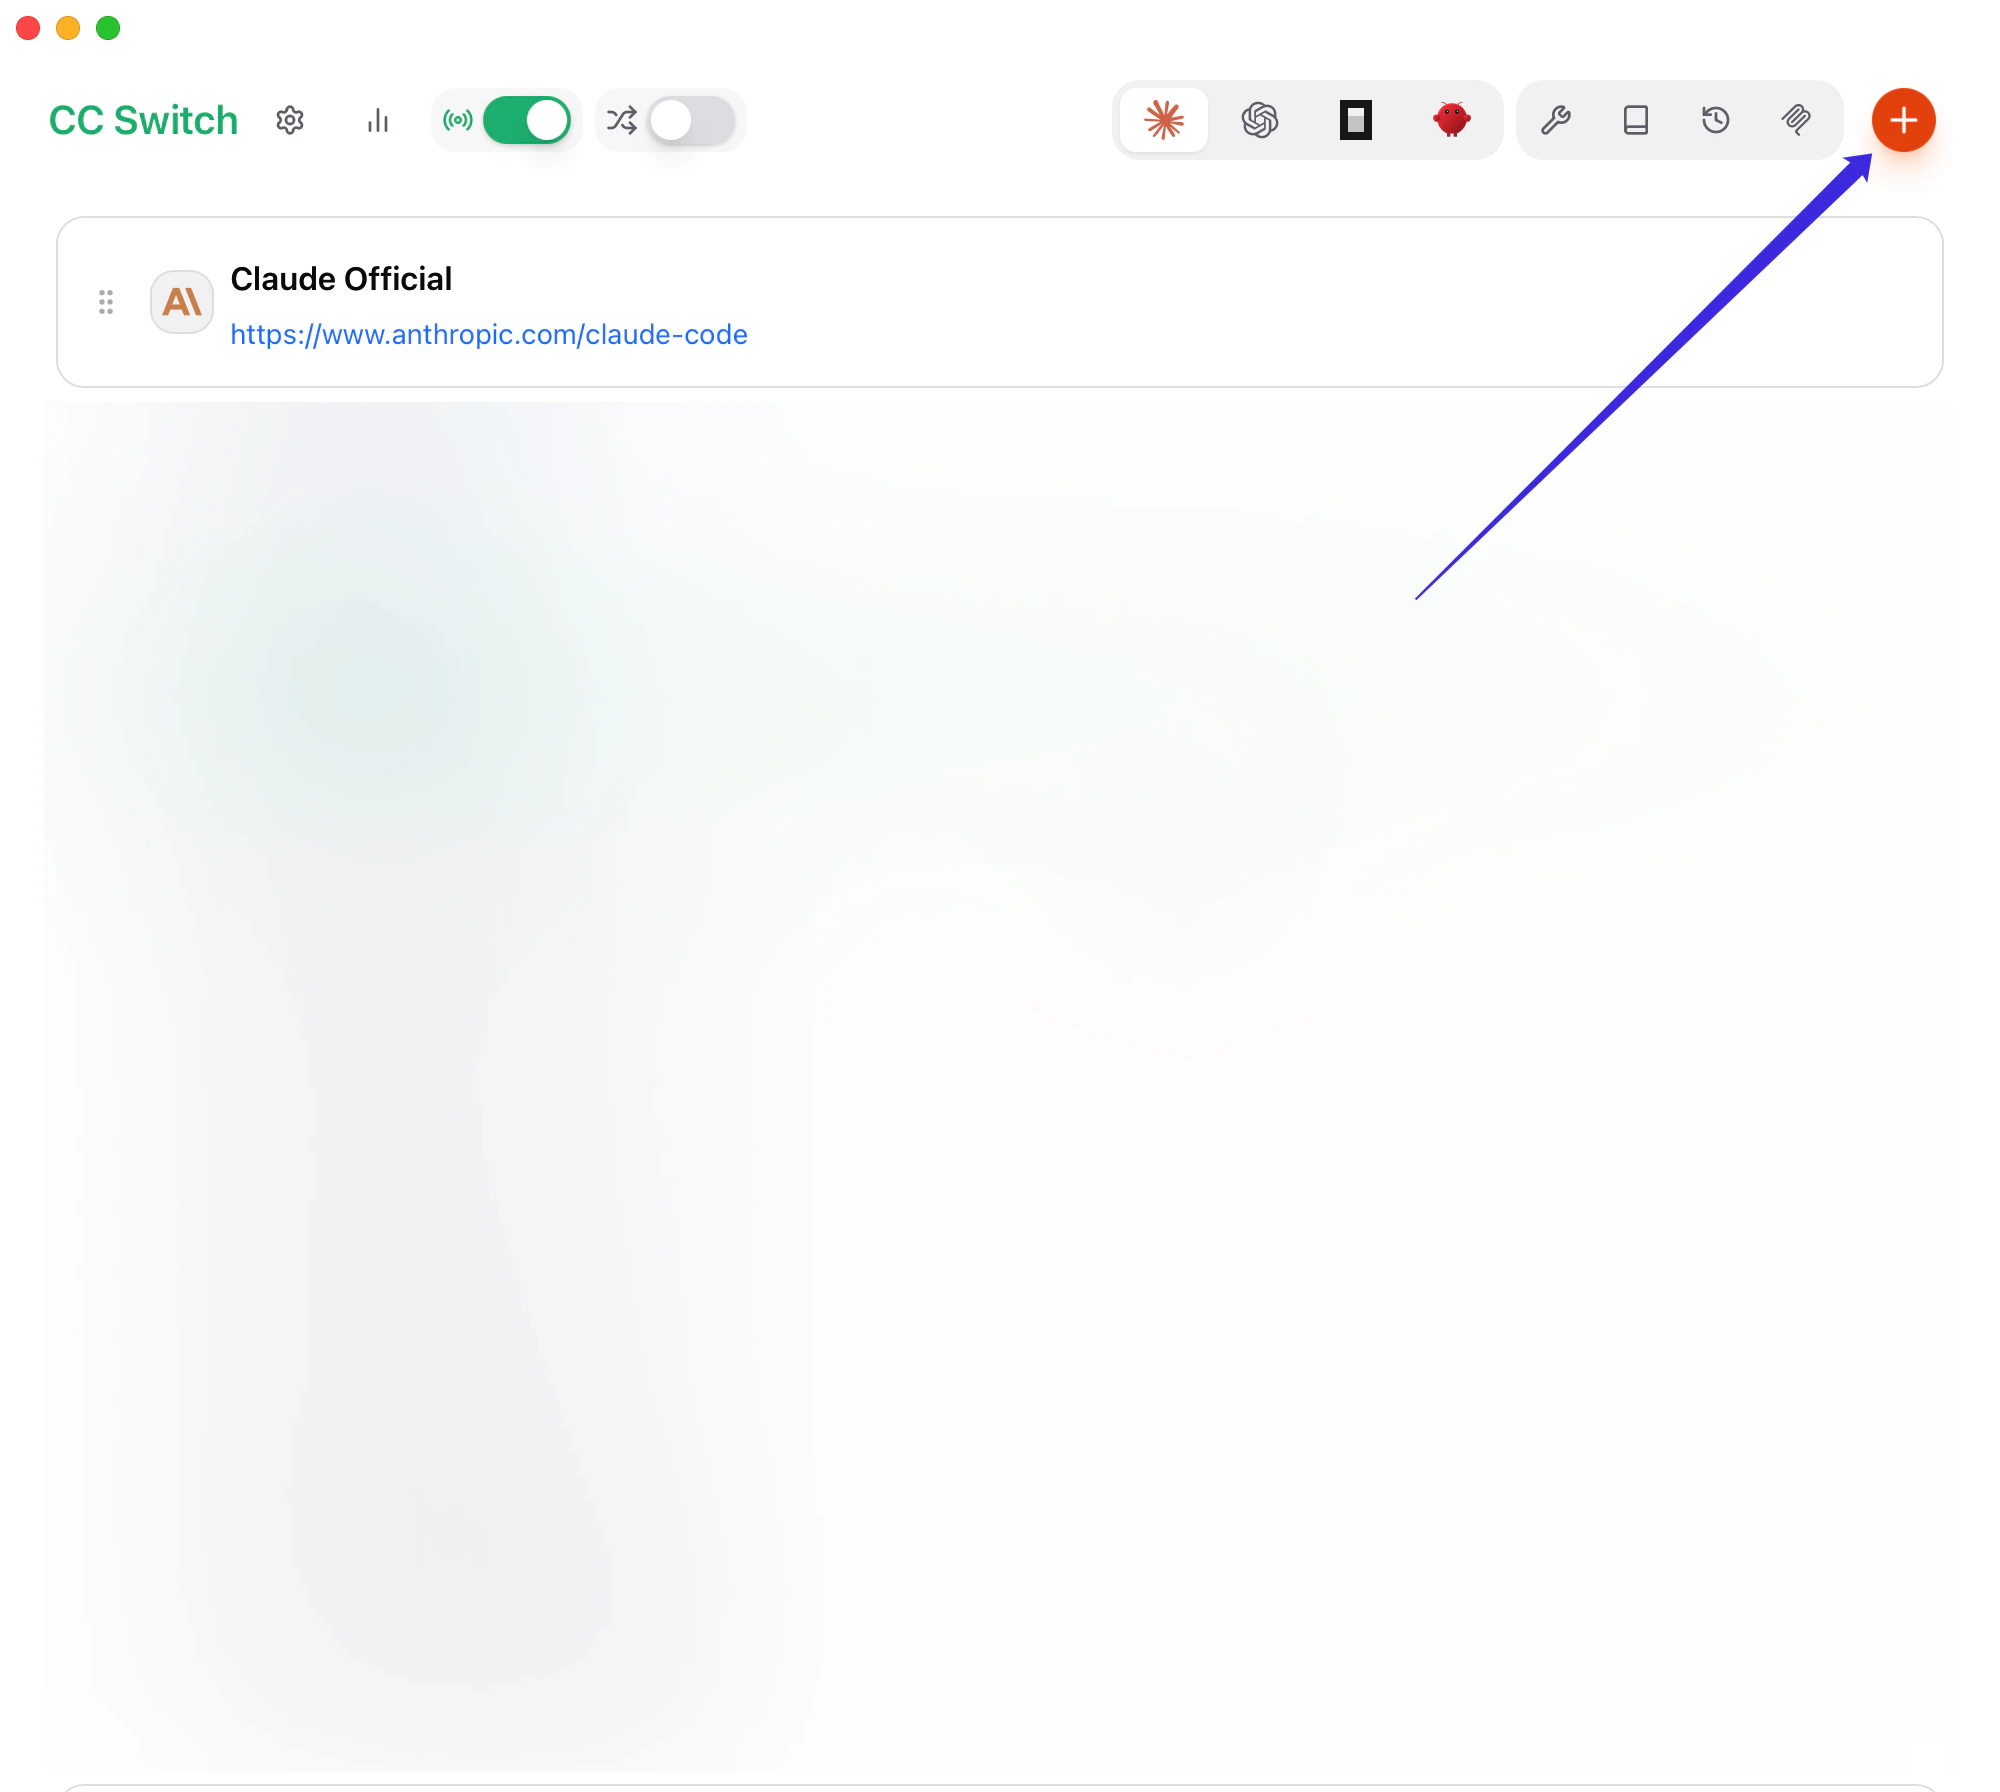
打开 CC Switch,切到 **Claude Code**,点击 **Add Provider**。
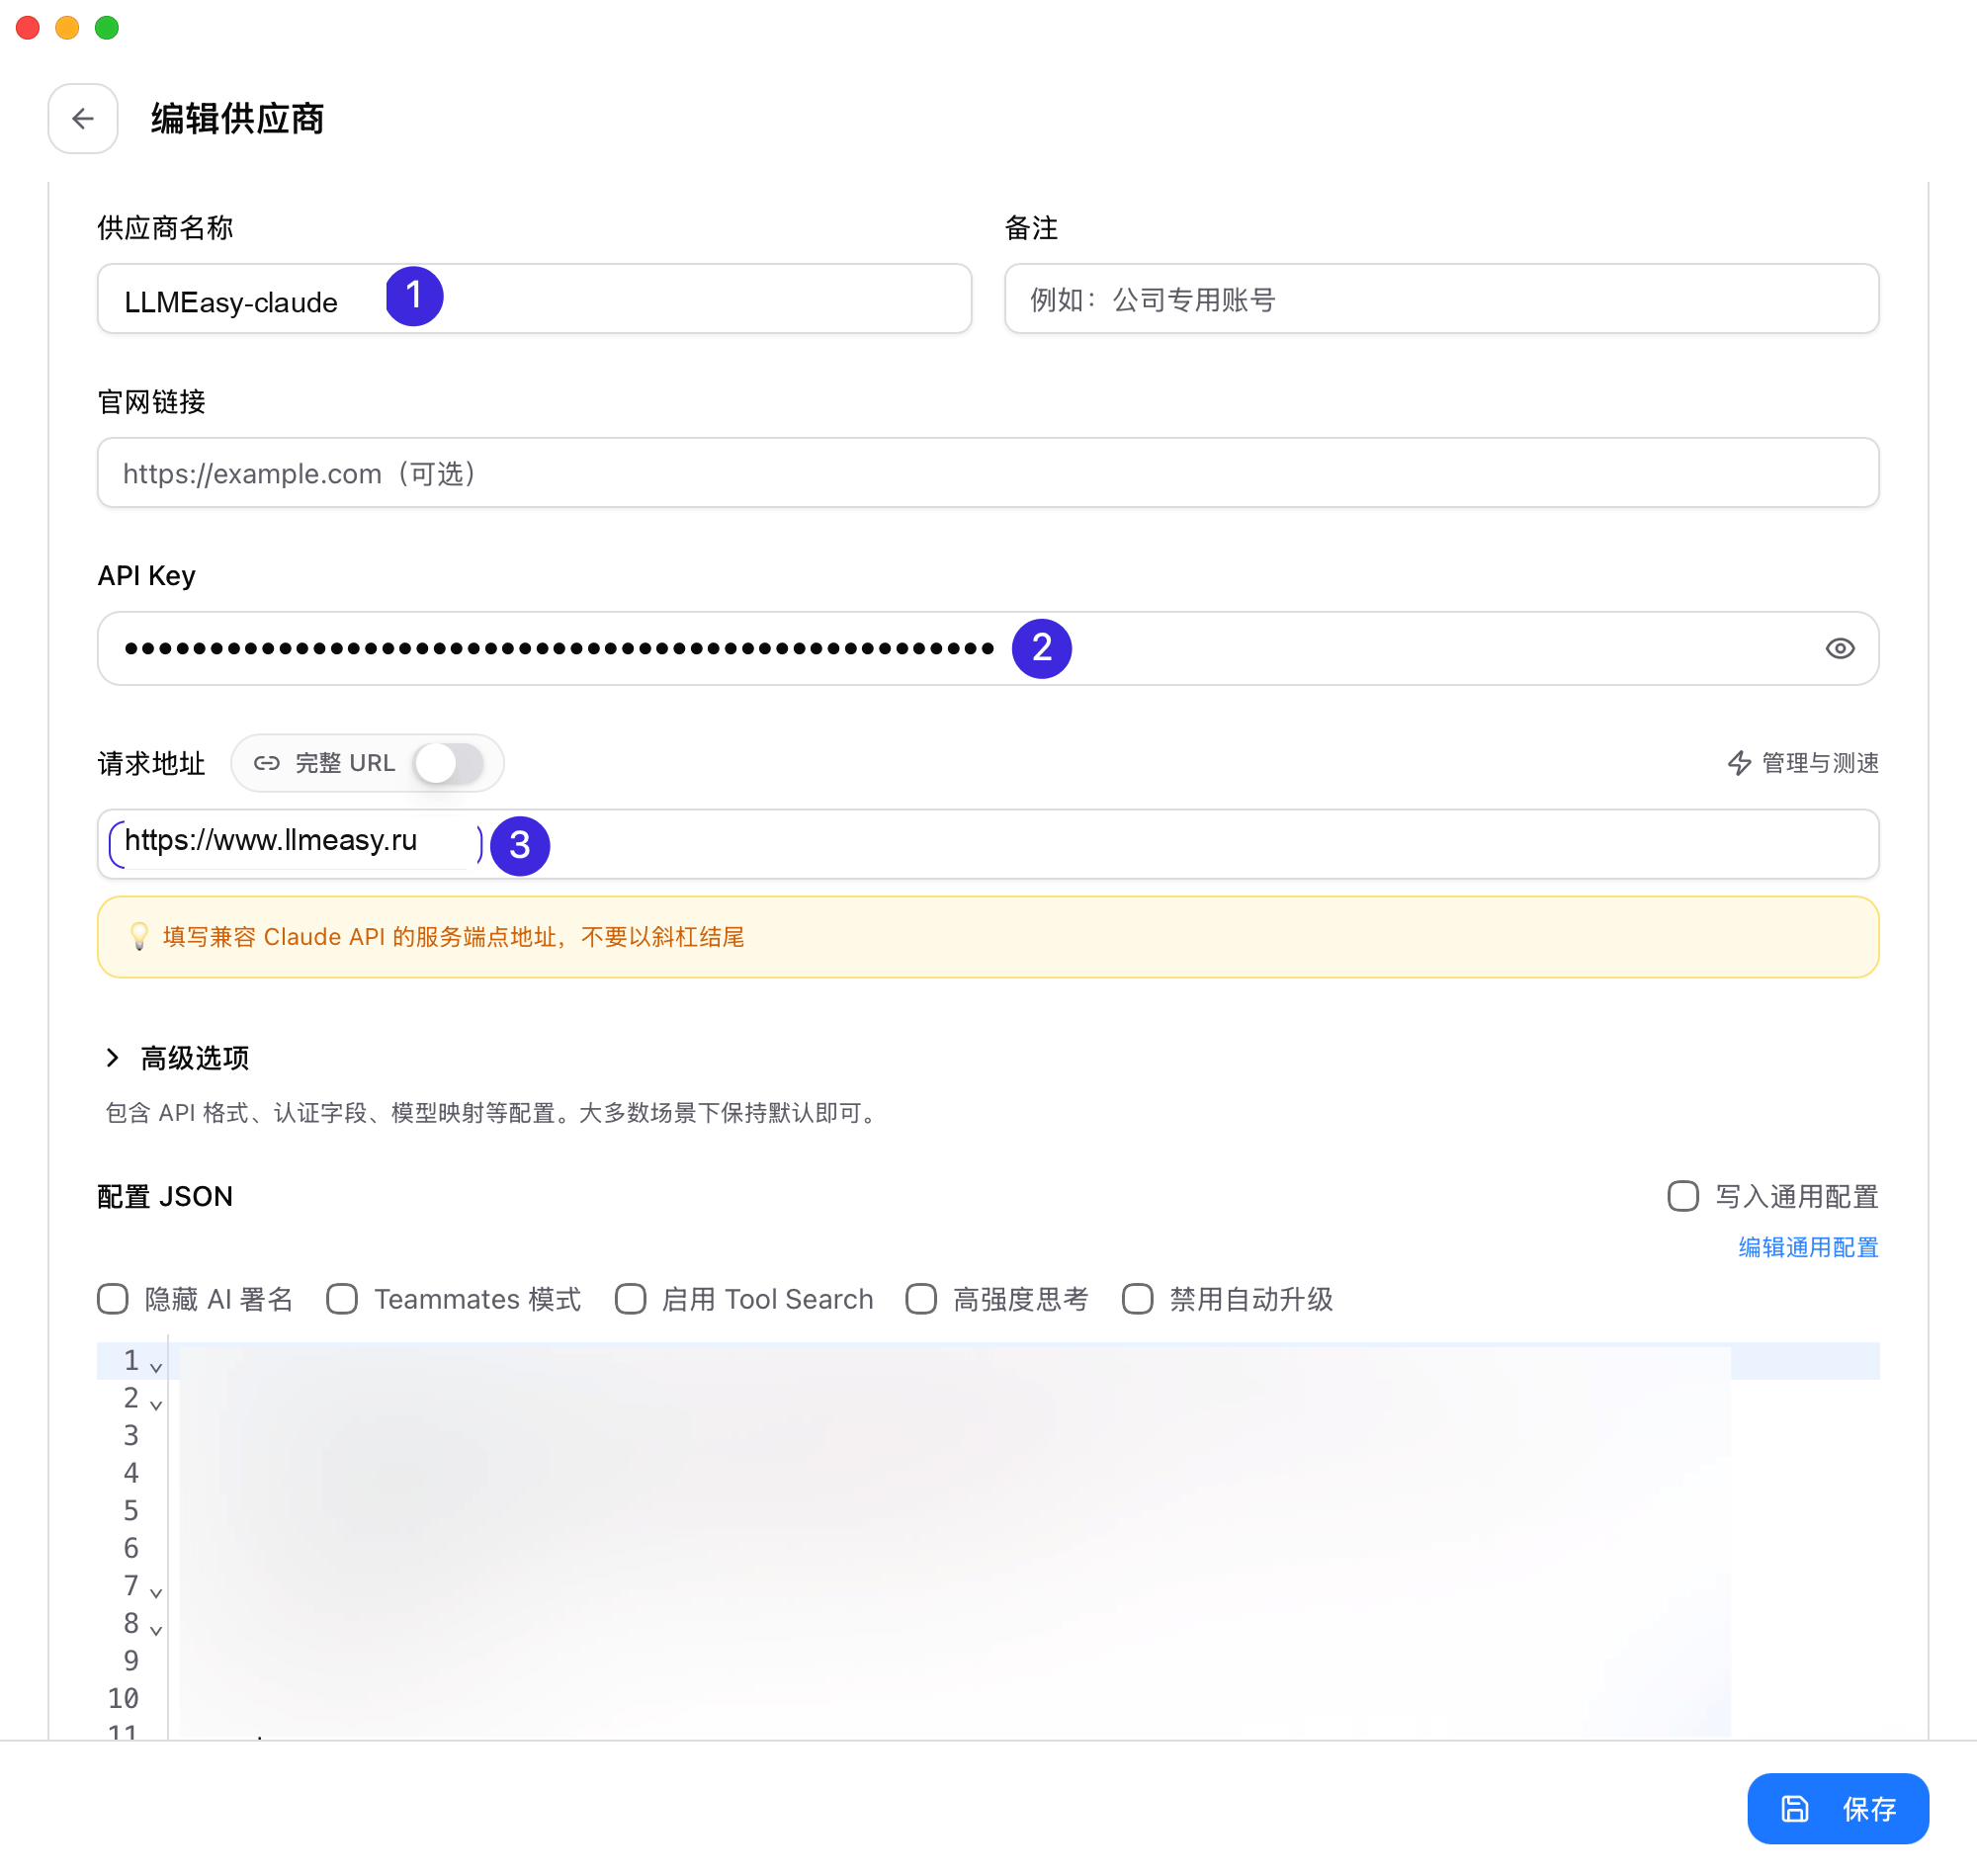
 * **Provider Name**:`LLMEasy`
* **Base URL**:`https://www.llmeasy.ru`
* **API Key**:你的 LLMEasy API Key
下图中的标注对应:
1. **Provider Name**
2. **API Key**
3. **Base URL**
* **Provider Name**:`LLMEasy`
* **Base URL**:`https://www.llmeasy.ru`
* **API Key**:你的 LLMEasy API Key
下图中的标注对应:
1. **Provider Name**
2. **API Key**
3. **Base URL**
 * 如果你使用 **Claude 分组**,通常不需要再调整高级选项或模型映射
* 如果你使用 **GPT 分组**,请额外完成下面这些设置:
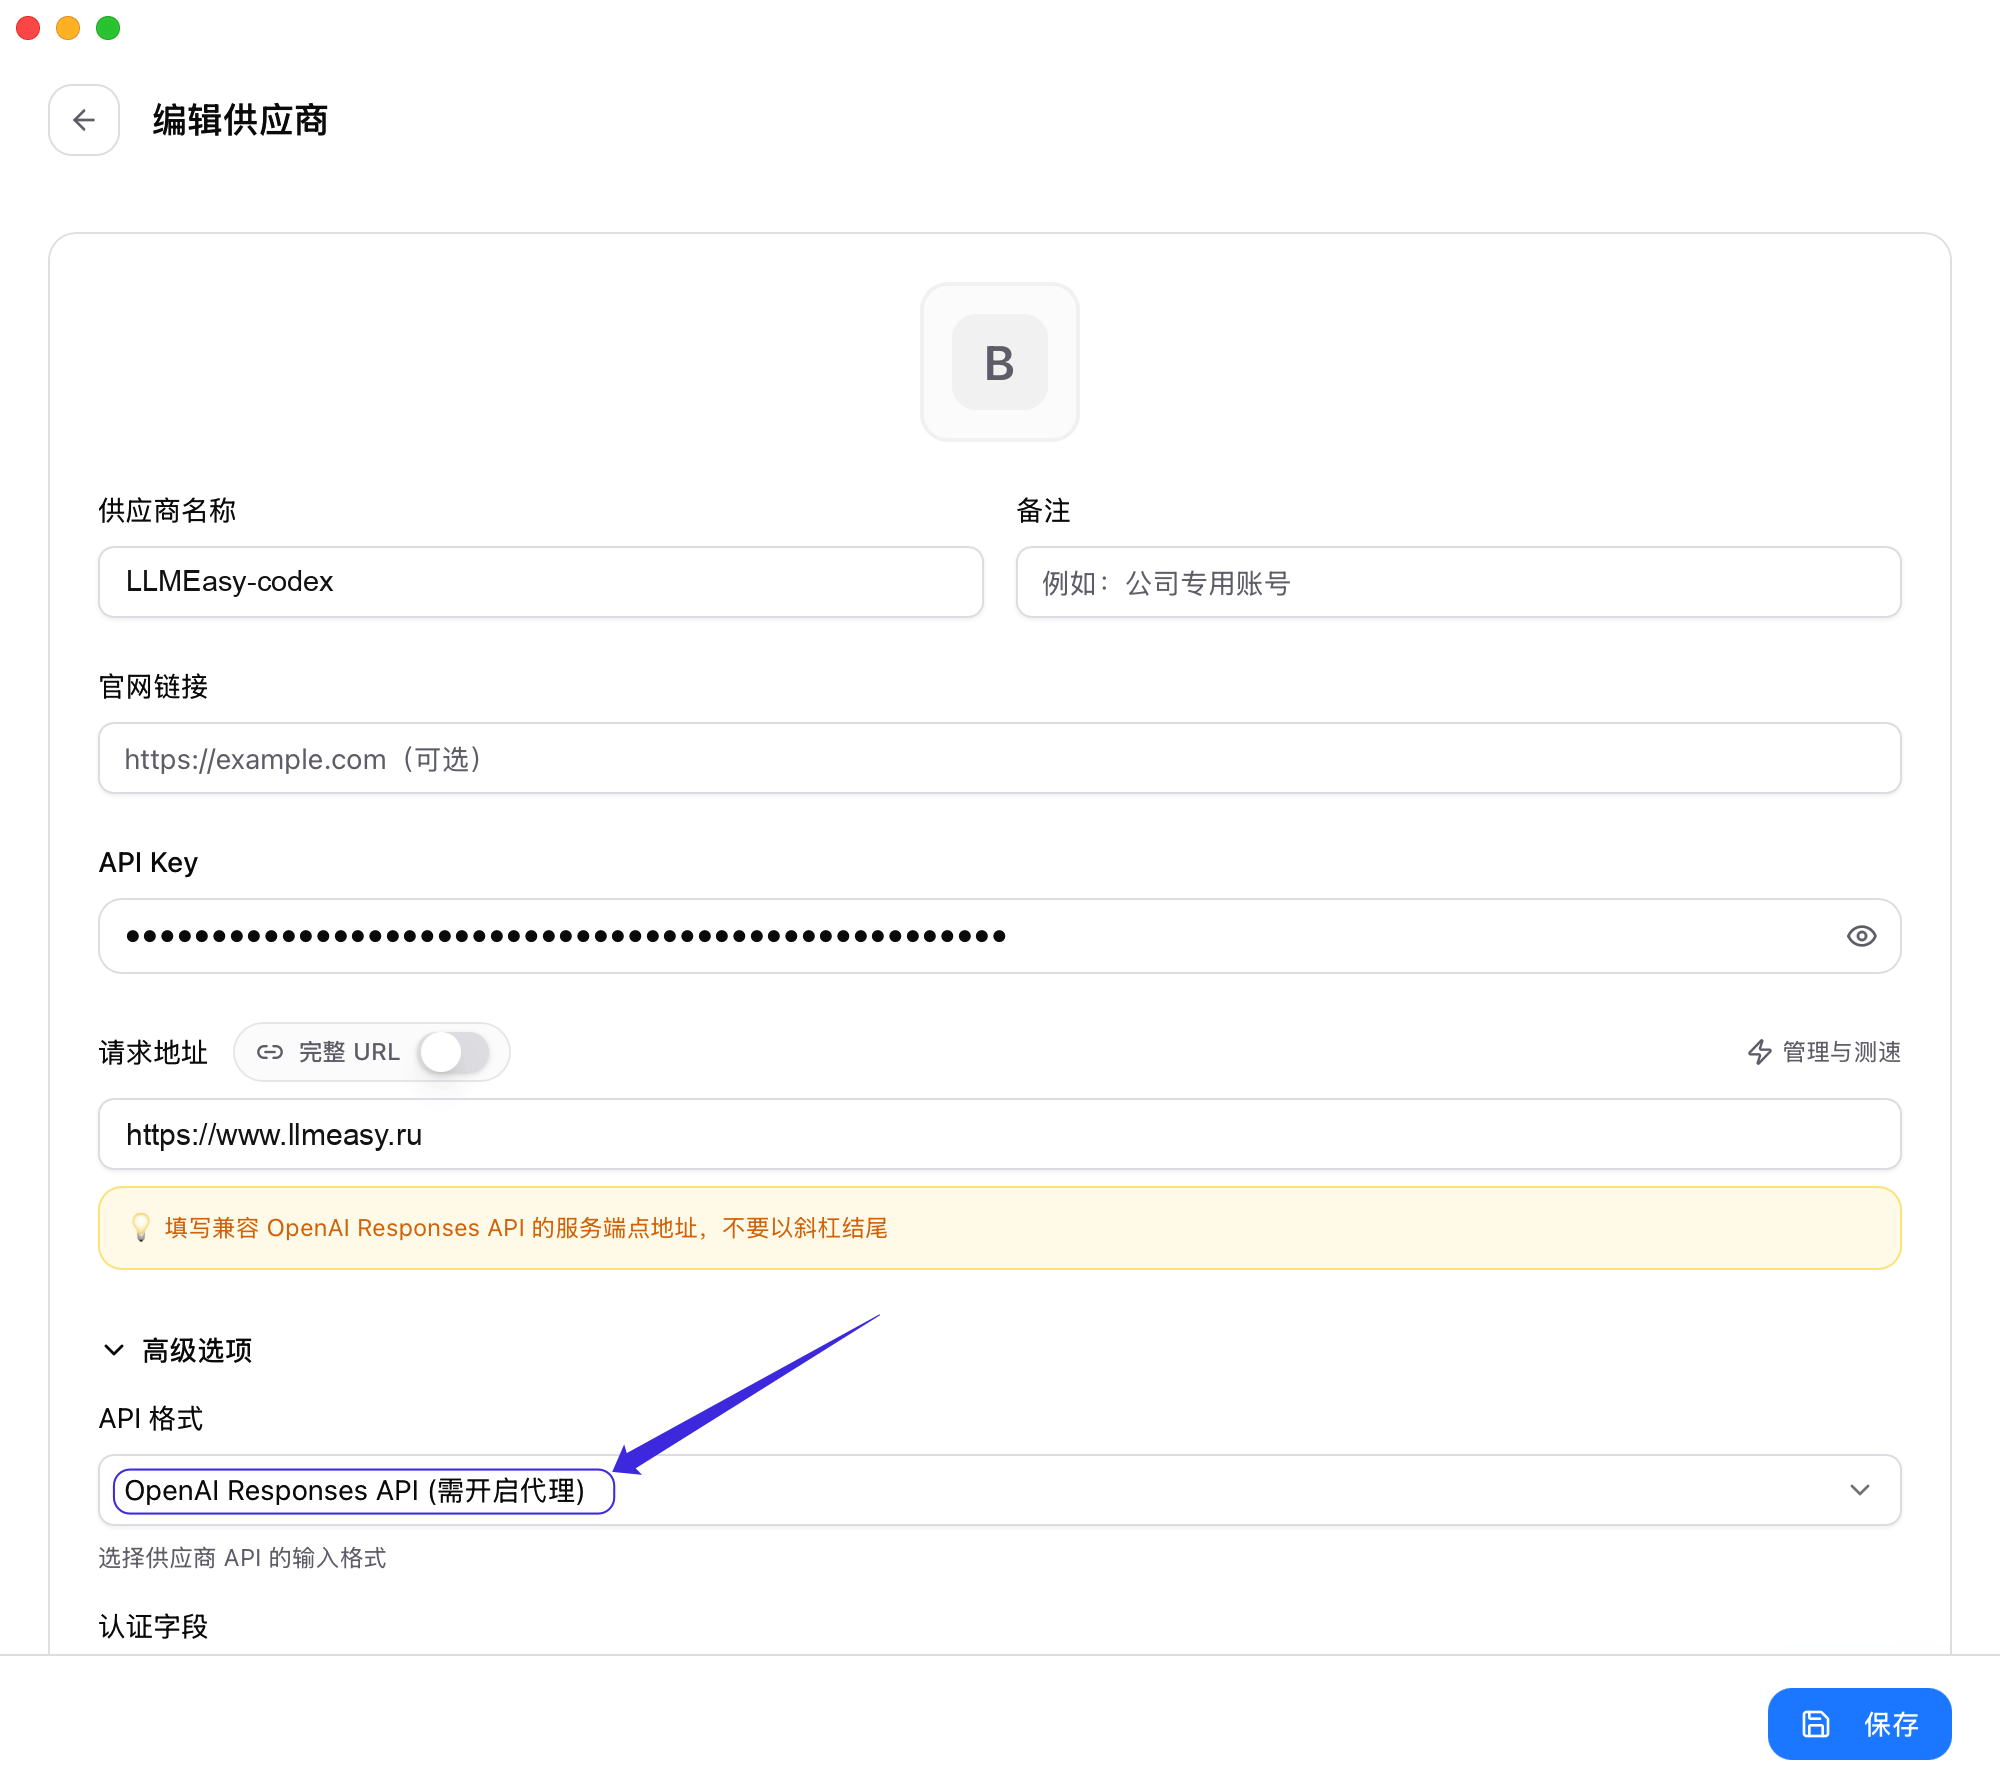
1. 打开 **高级选项**
2. 在 **API 格式** 中选择 **OpenAI Responses API**
* 如果你使用 **Claude 分组**,通常不需要再调整高级选项或模型映射
* 如果你使用 **GPT 分组**,请额外完成下面这些设置:
1. 打开 **高级选项**
2. 在 **API 格式** 中选择 **OpenAI Responses API**
 3. 在 **模型映射** 里点击 **获取模型列表**
4. 将 **主模型**、**推理模型(Thinking)**、**Haiku 默认模型**、**Sonnet 默认模型**、**Opus 默认模型** 都从下拉列表中显式选中
3. 在 **模型映射** 里点击 **获取模型列表**
4. 将 **主模型**、**推理模型(Thinking)**、**Haiku 默认模型**、**Sonnet 默认模型**、**Opus 默认模型** 都从下拉列表中显式选中
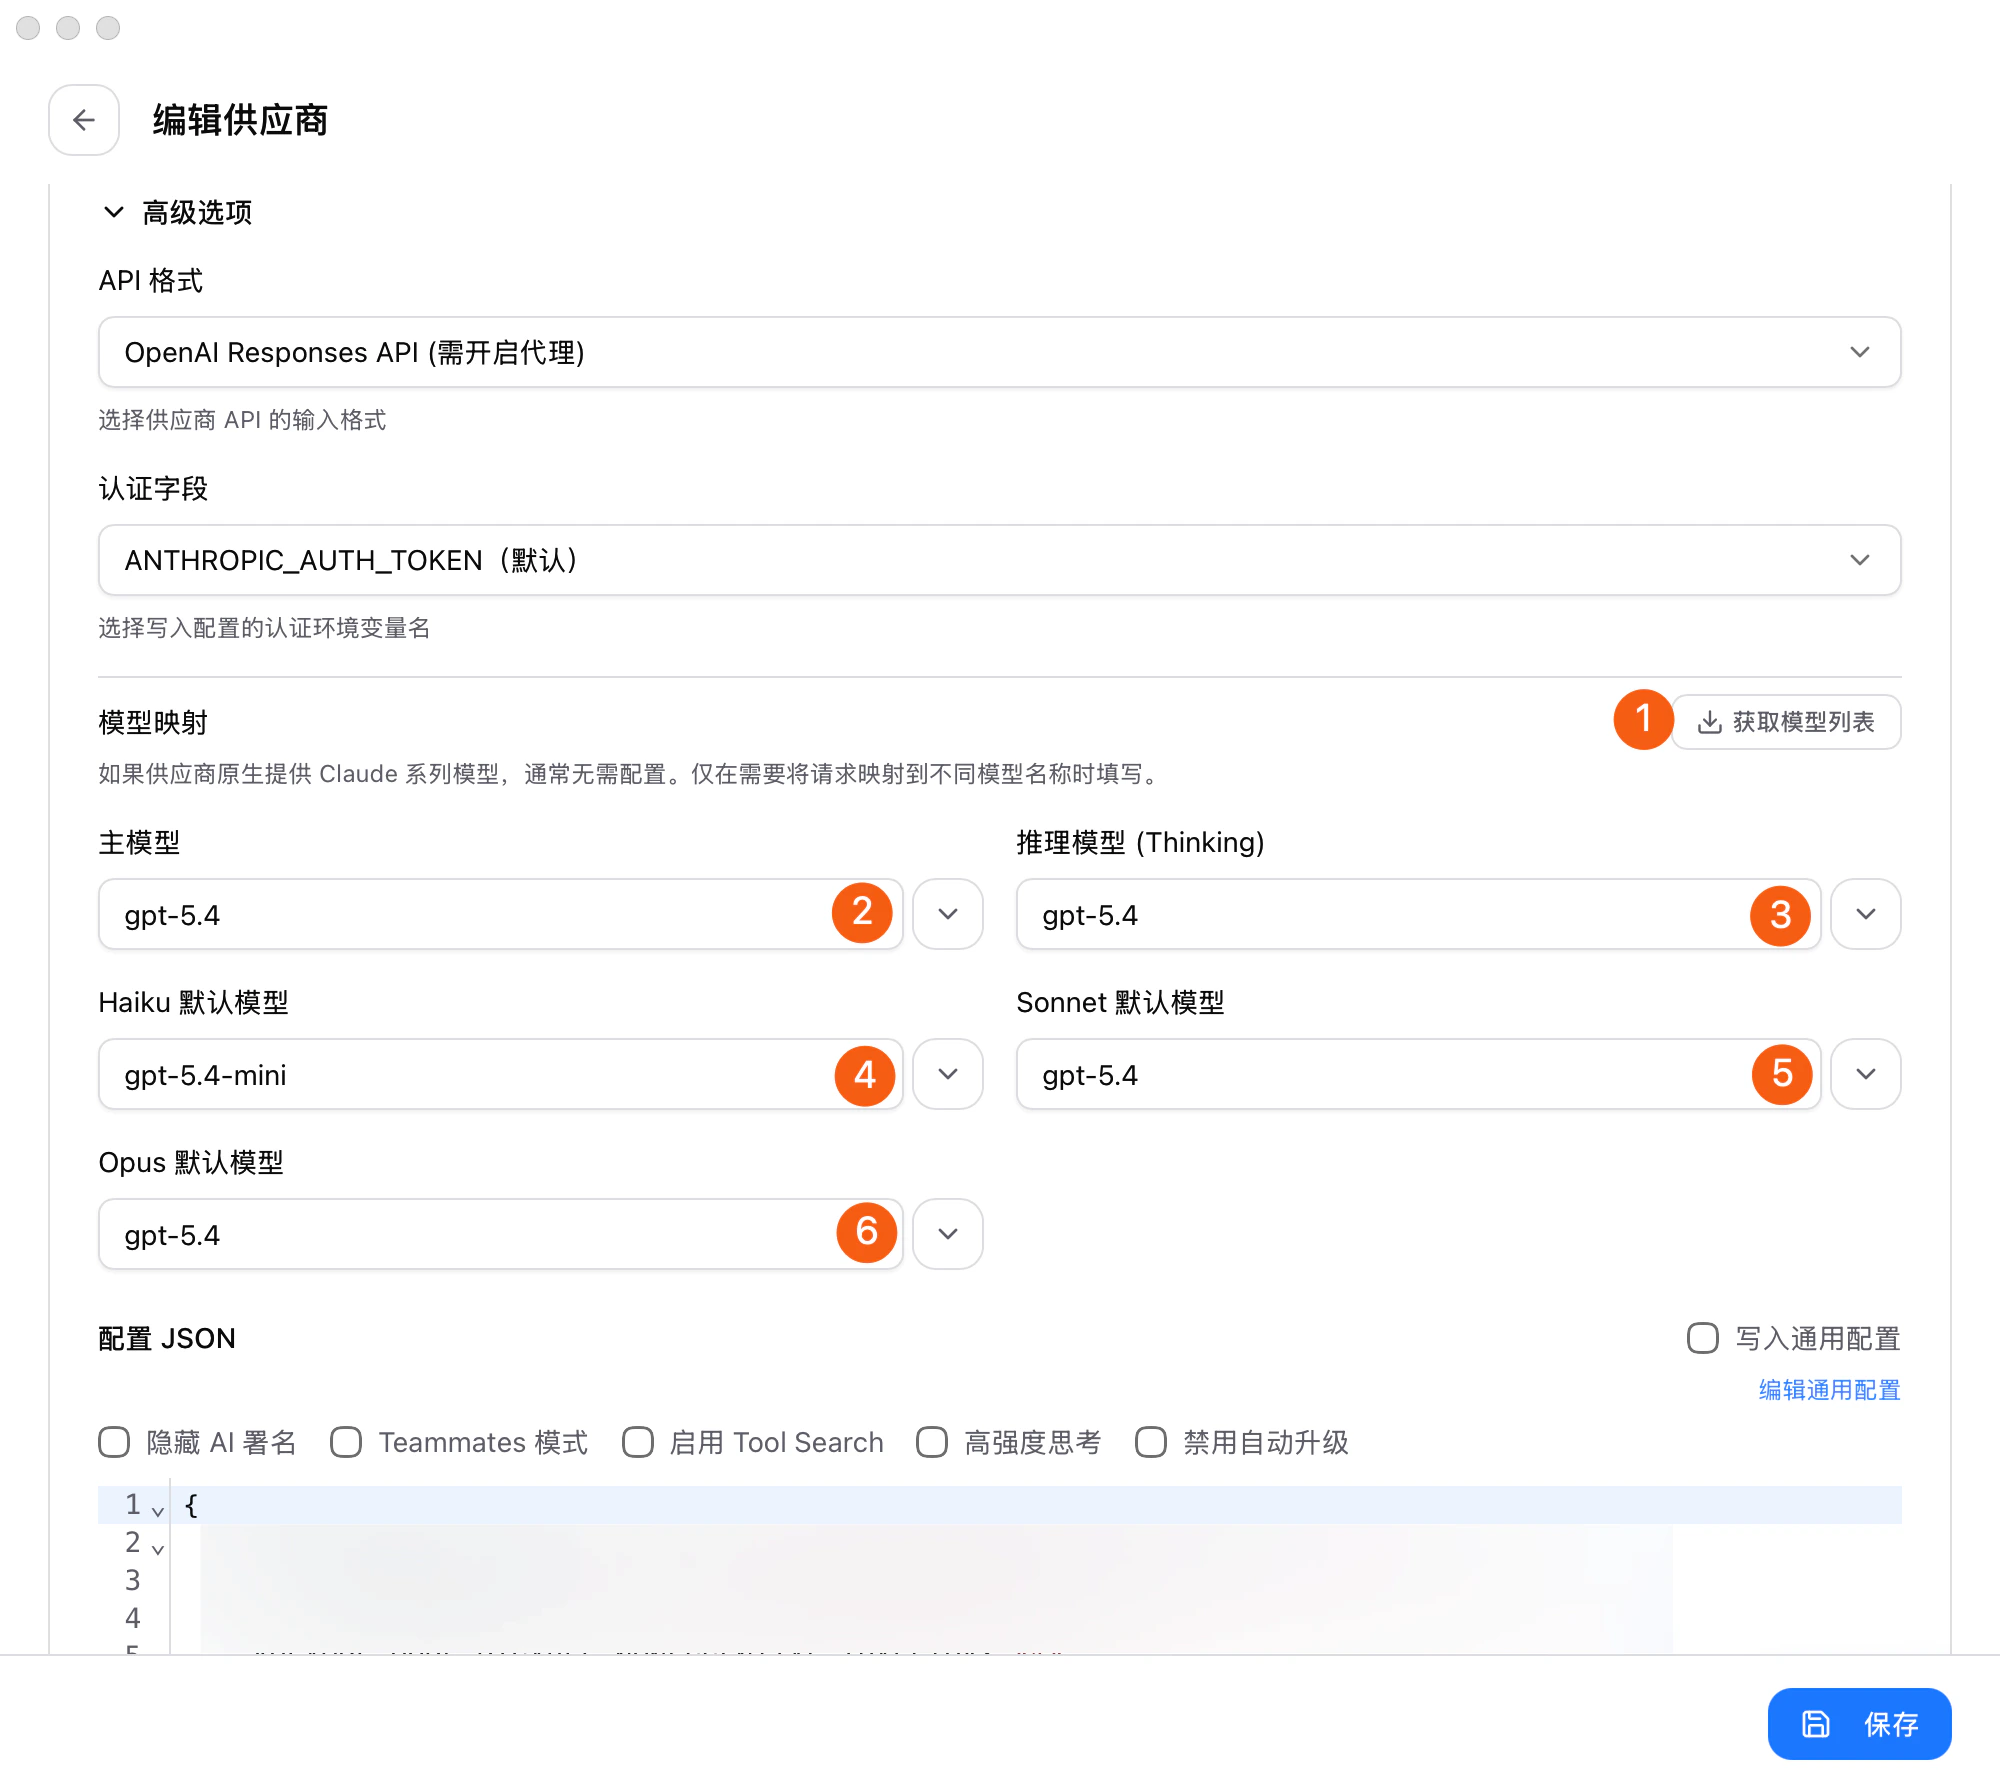 这里使用的模型都应来自 LLMEasy 模型广场 当前可用的 **GPT 分组**模型 ID。
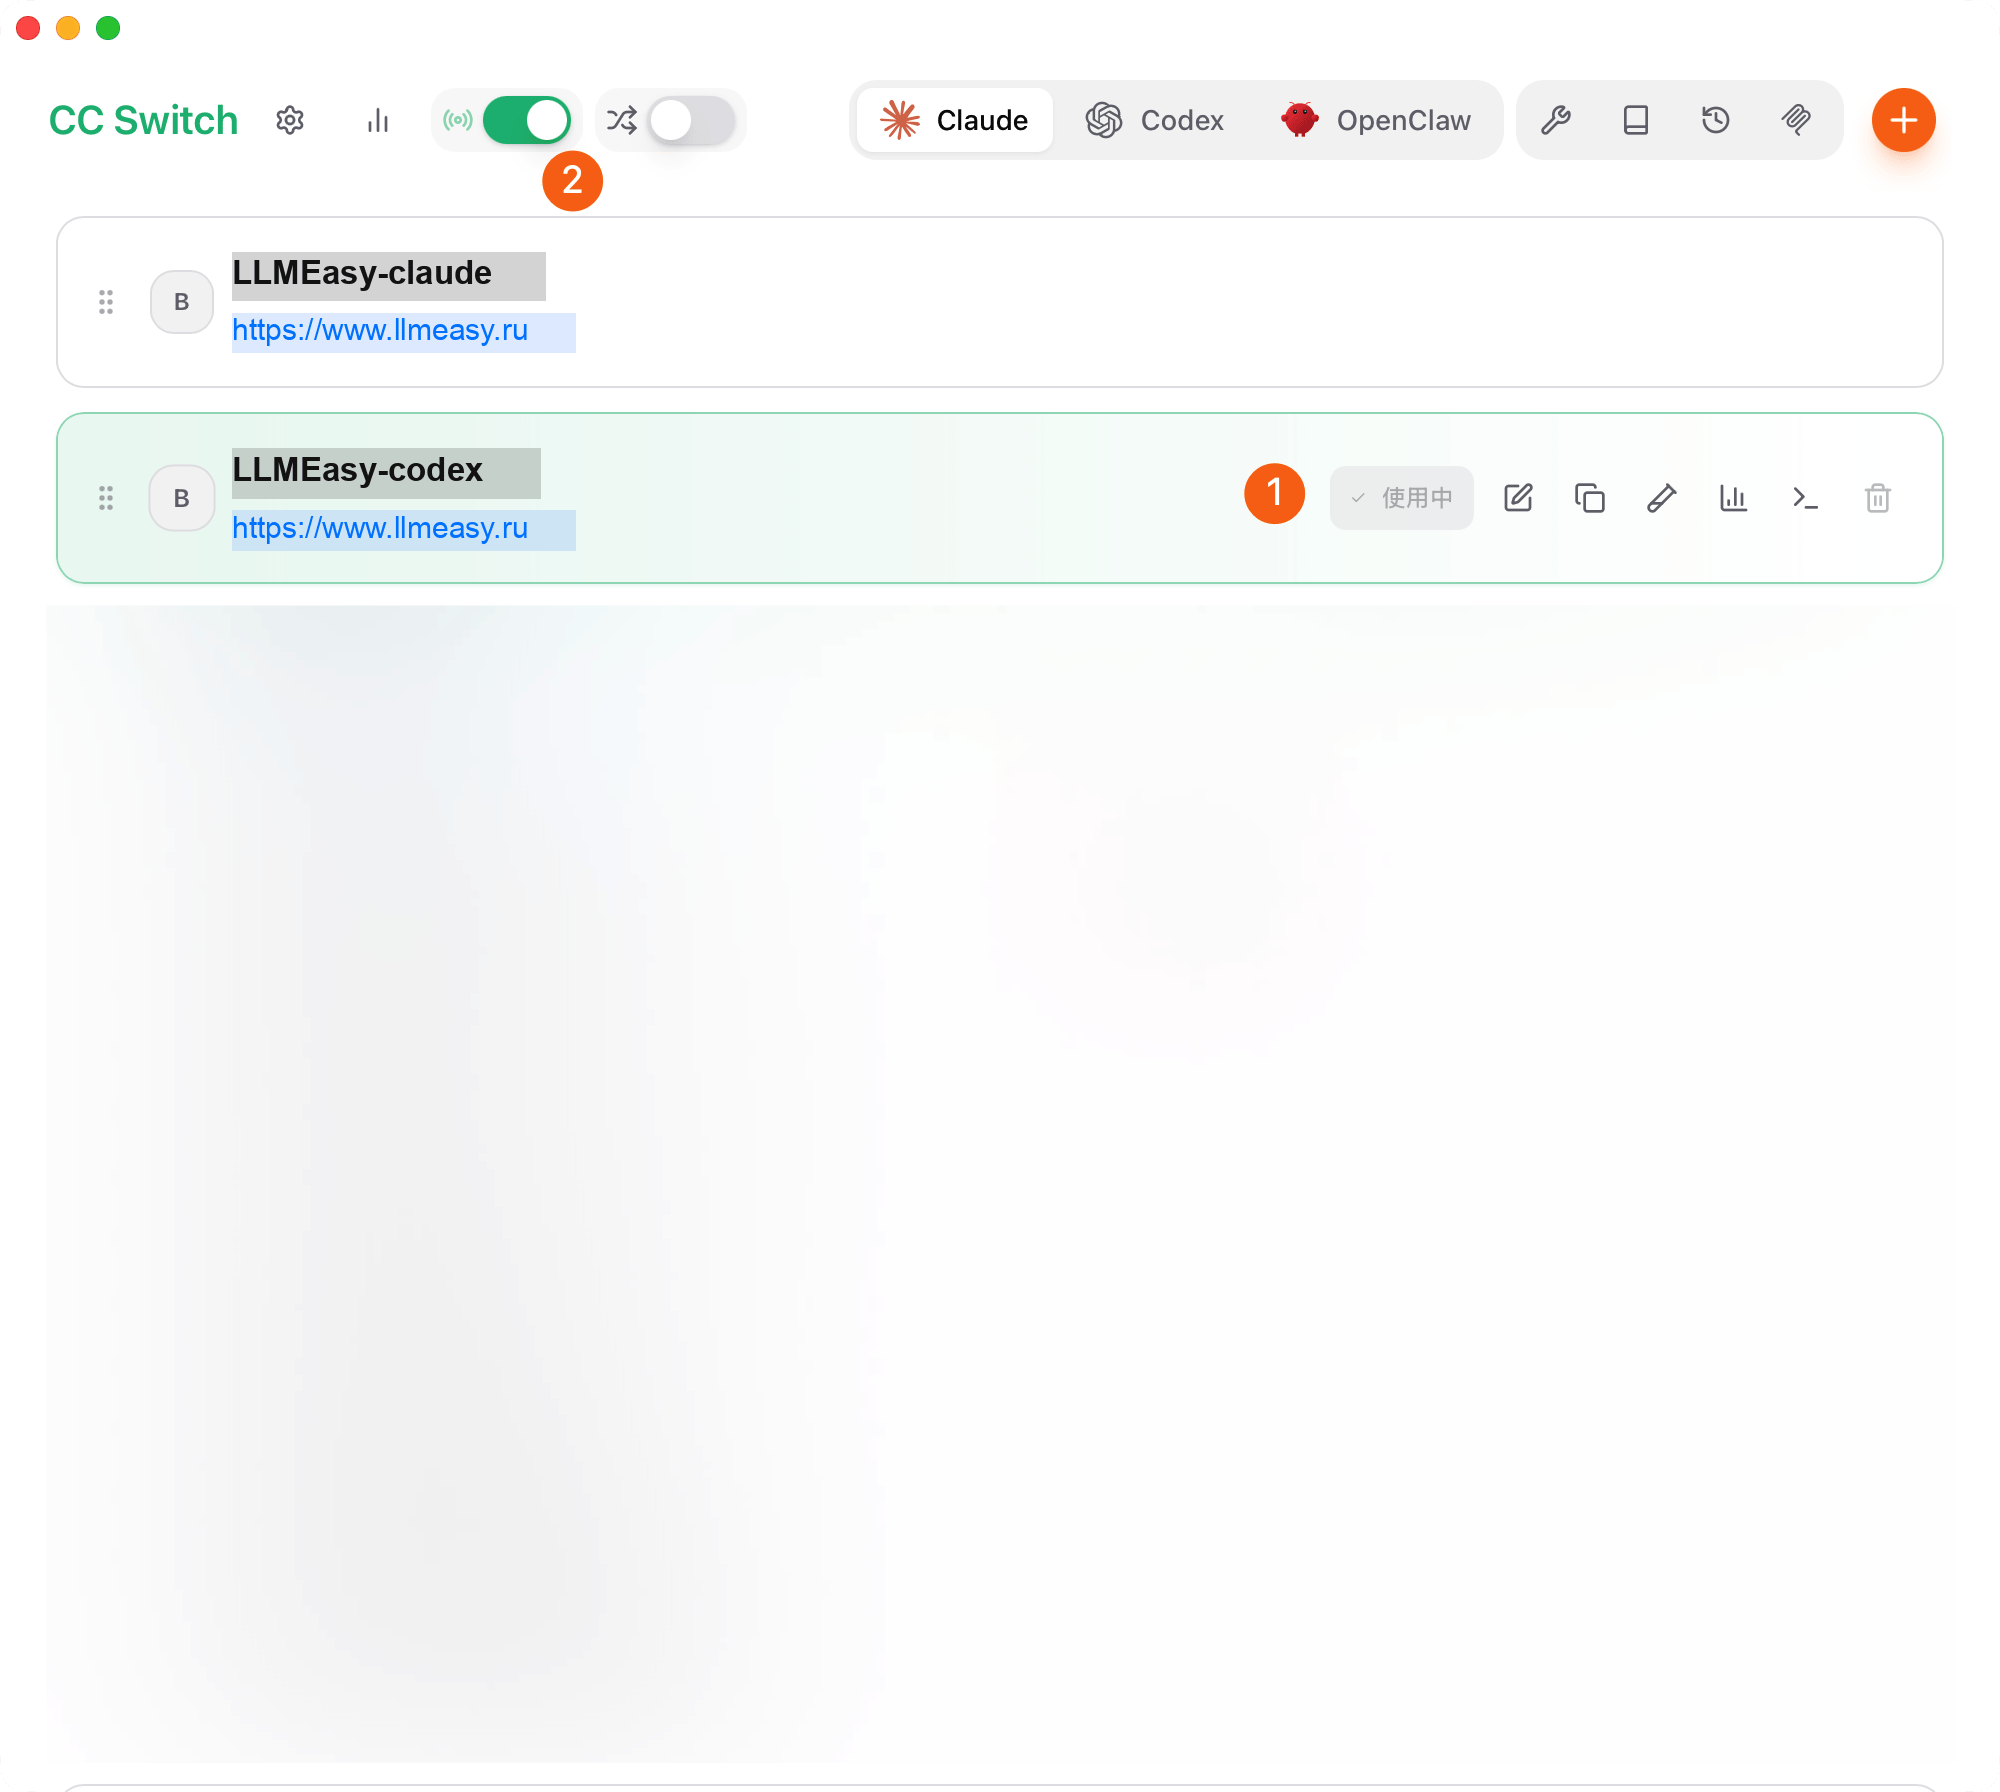
保存后,回到渠道列表页:
1. 将刚保存的 LLMEasy provider 设为 **使用中**
2. 如果你使用 **Claude 分组**,不需要打开左上角的 **CC Switch 代理功能**
3. 如果你使用 **GPT 分组**,再打开左上角的 **CC Switch 代理功能**
下图示例对应需要开启代理的 **GPT 分组**场景。
这里使用的模型都应来自 LLMEasy 模型广场 当前可用的 **GPT 分组**模型 ID。
保存后,回到渠道列表页:
1. 将刚保存的 LLMEasy provider 设为 **使用中**
2. 如果你使用 **Claude 分组**,不需要打开左上角的 **CC Switch 代理功能**
3. 如果你使用 **GPT 分组**,再打开左上角的 **CC Switch 代理功能**
下图示例对应需要开启代理的 **GPT 分组**场景。
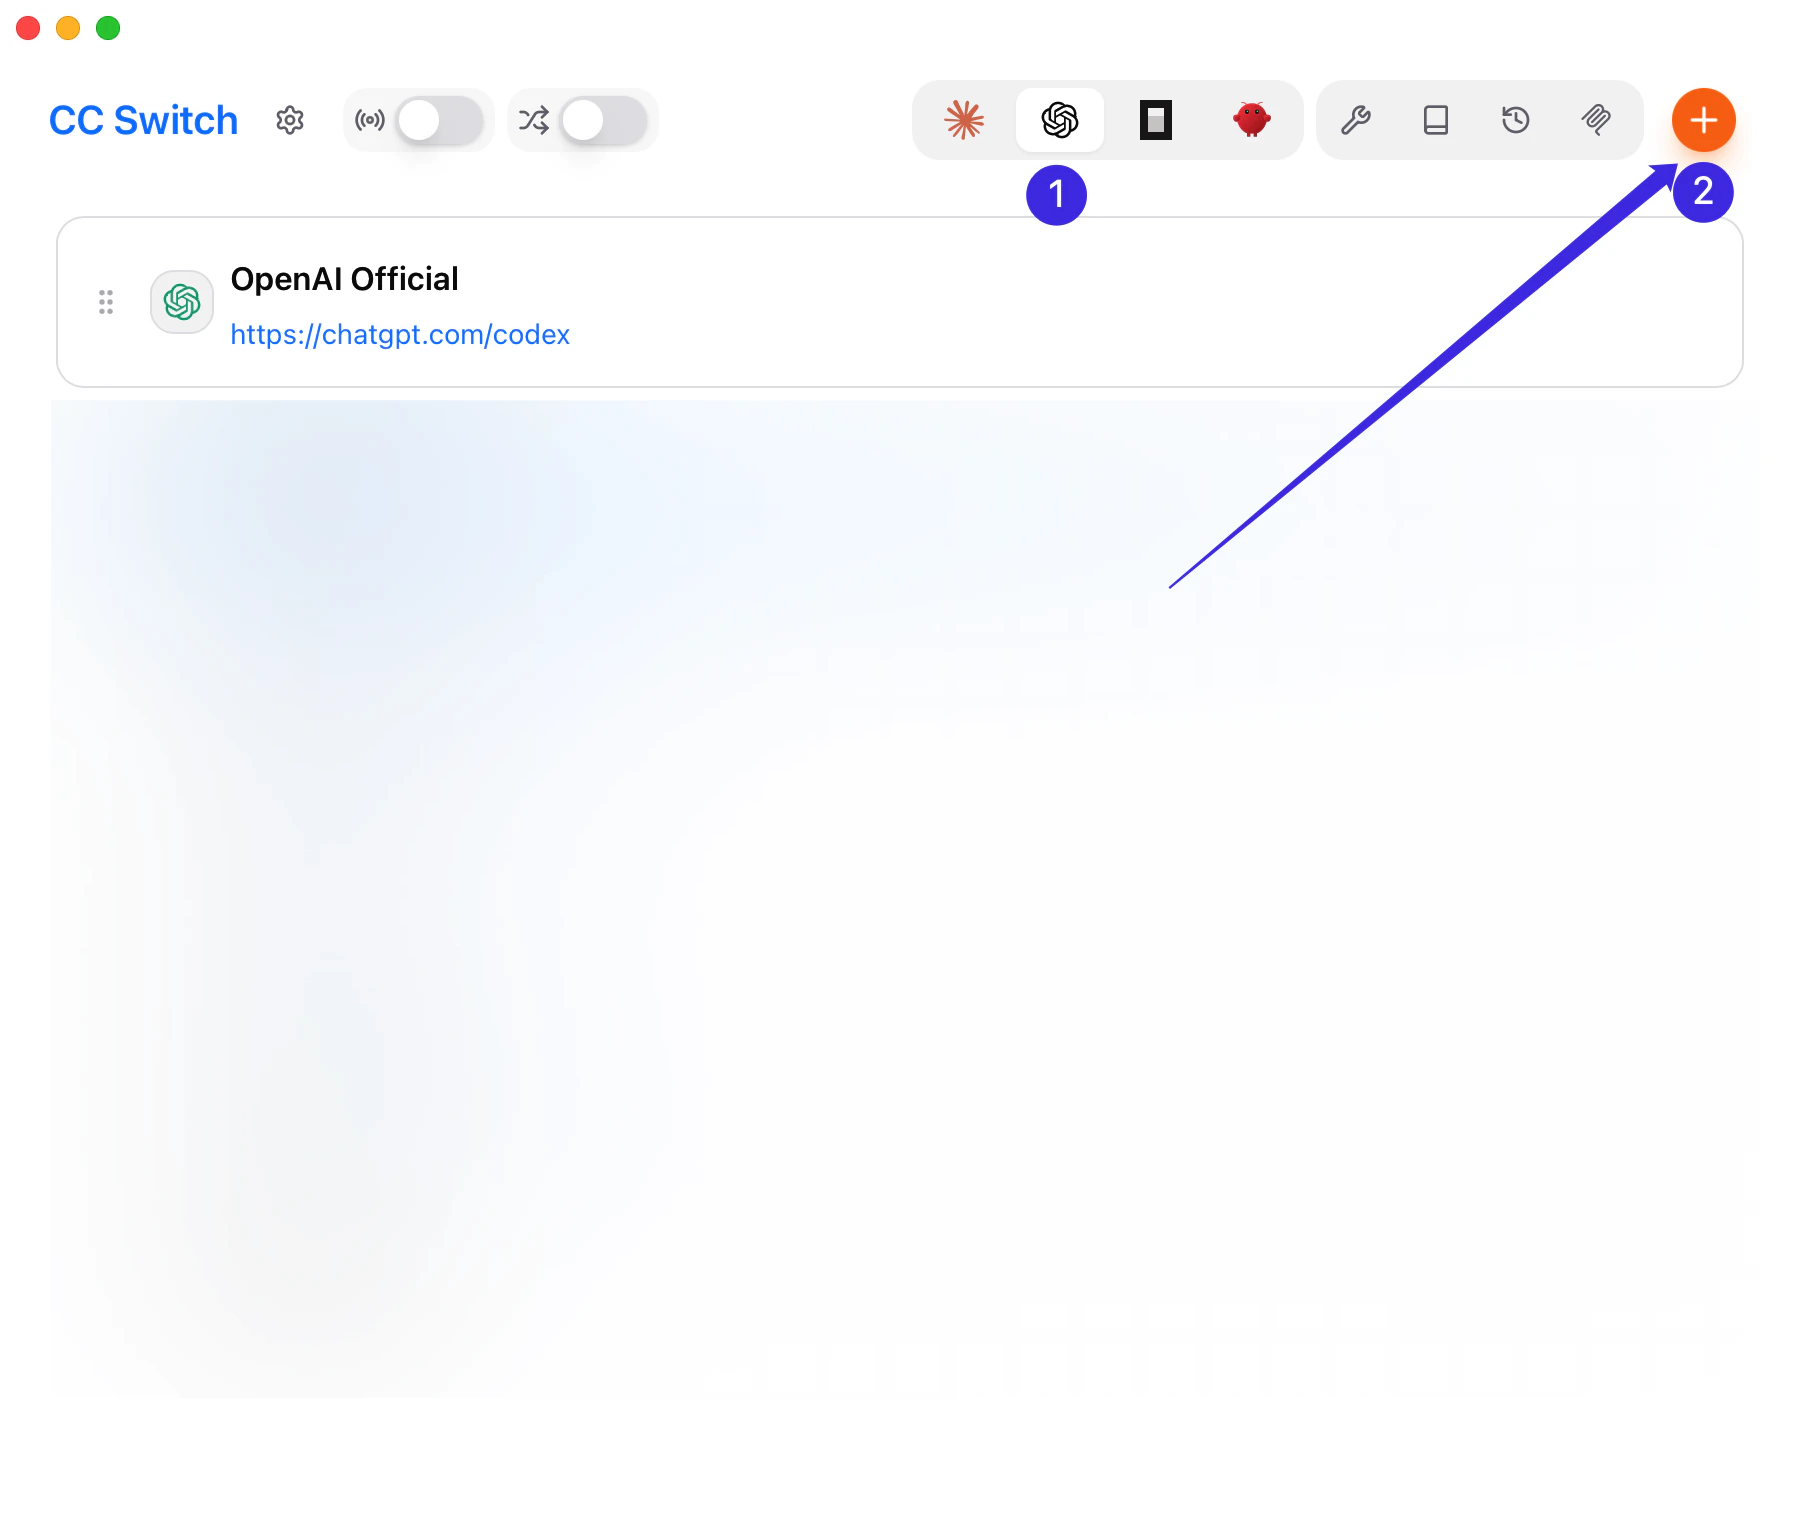
 打开 CC Switch,切到 **Codex**,点击 **Add Provider**。如果界面先让你选预设,优先选择 **OpenAI Compatible** 或 **Custom** 这一类自定义 OpenAI-compatible provider。
图中对应顺序如下:
1. 切到 **Codex**
2. 点击右上角 **Add Provider**
打开 CC Switch,切到 **Codex**,点击 **Add Provider**。如果界面先让你选预设,优先选择 **OpenAI Compatible** 或 **Custom** 这一类自定义 OpenAI-compatible provider。
图中对应顺序如下:
1. 切到 **Codex**
2. 点击右上角 **Add Provider**
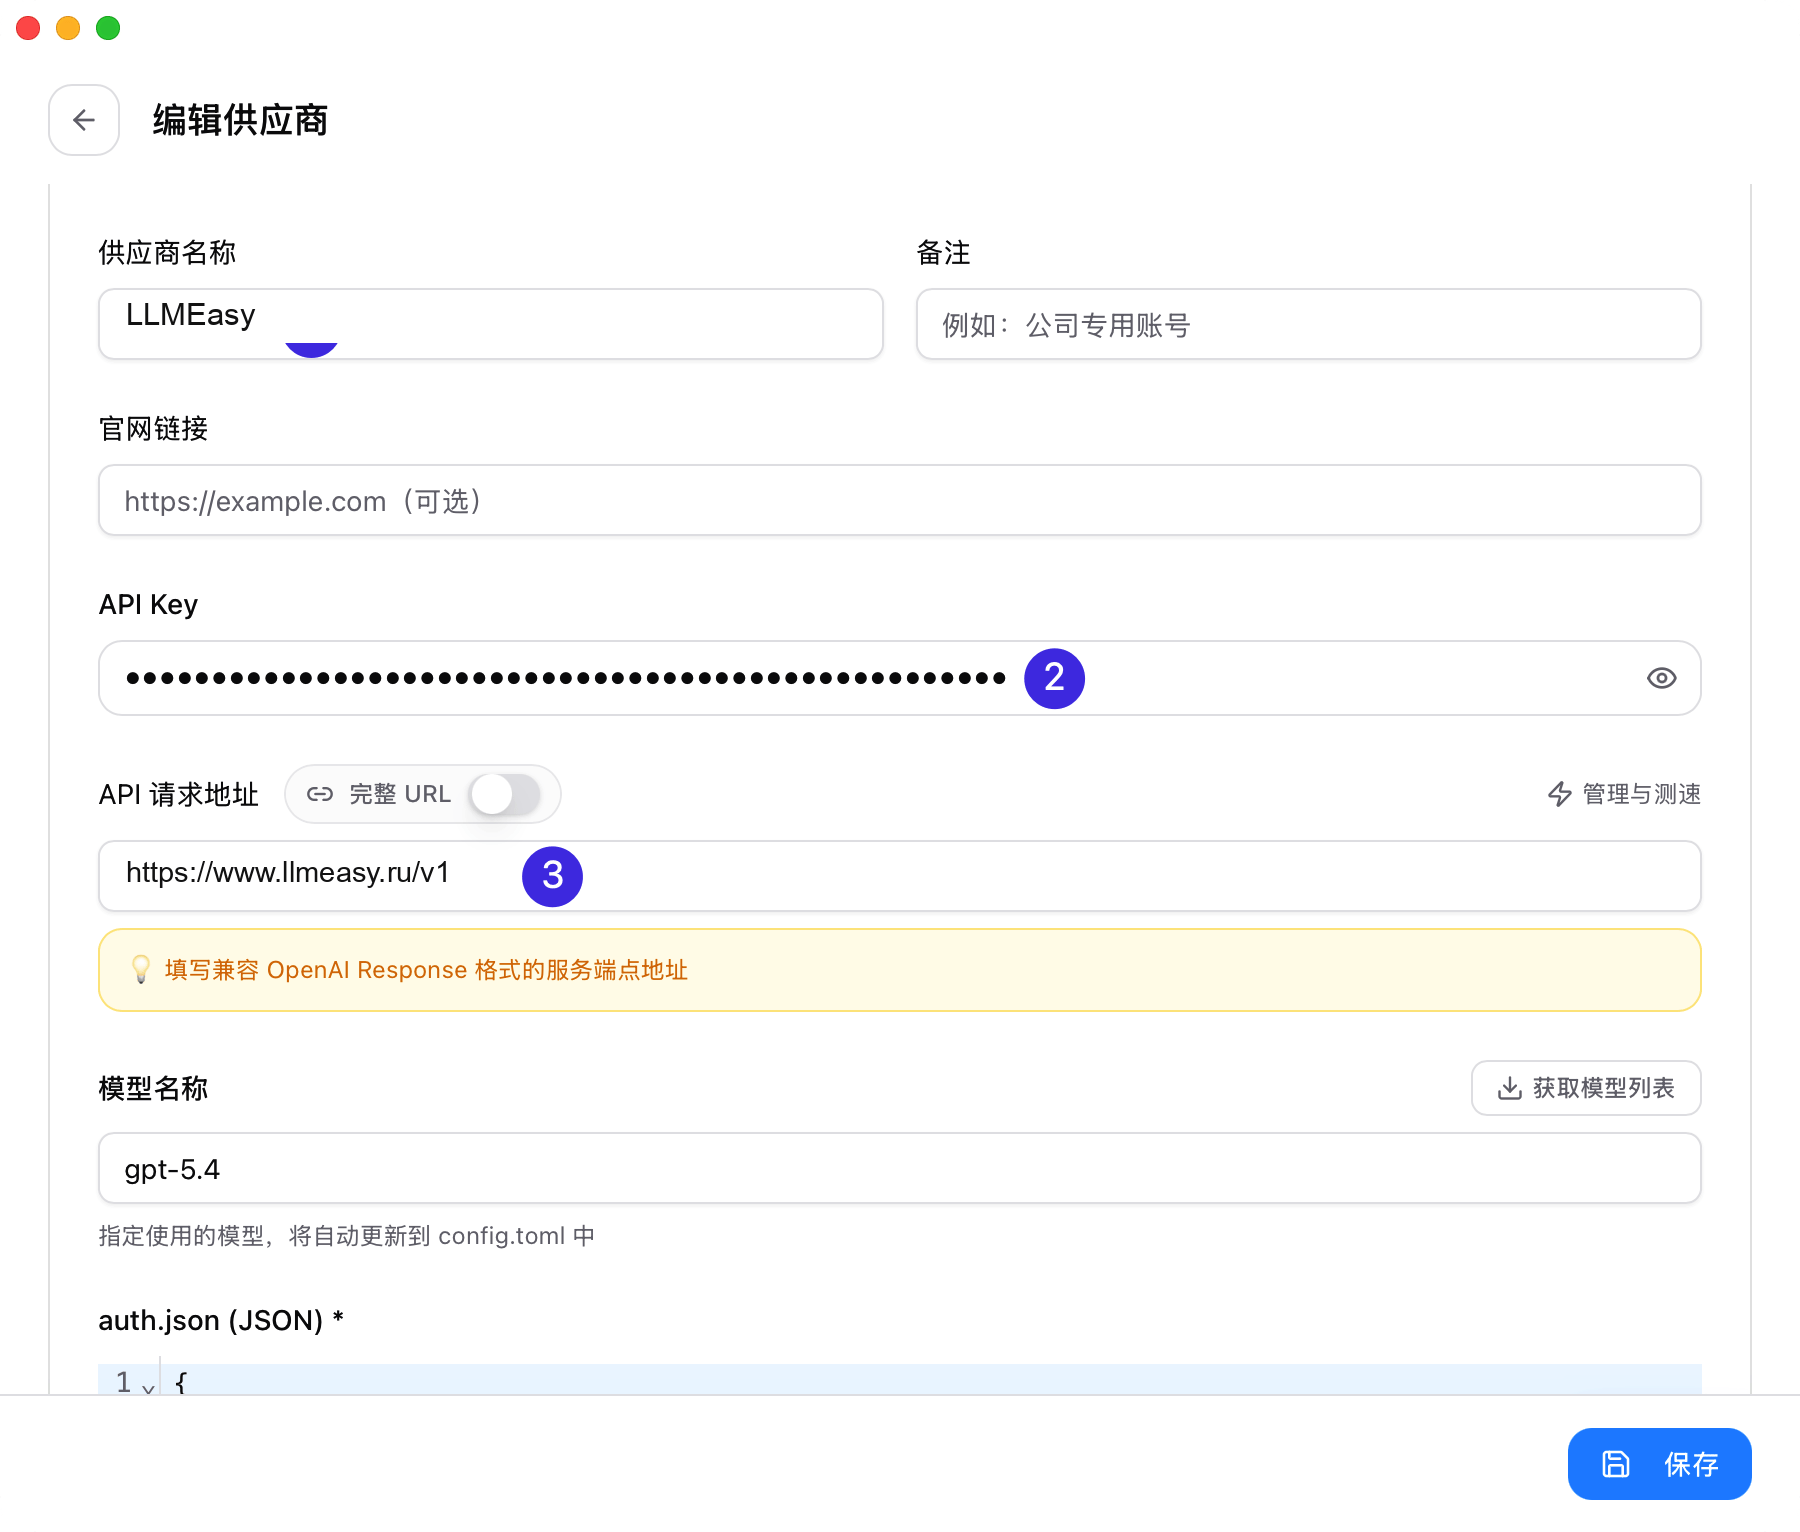
 * **Provider Name**:`LLMEasy`
* **Base URL**:`https://www.llmeasy.ru/v1`
* **API Key**:你的 LLMEasy API Key
如果你切到了自定义配置视图,确保底层配置使用 `wire_api = "responses"`。
图中标注对应:
1. **Provider Name**
2. **API Key**
3. **Base URL**
* **Provider Name**:`LLMEasy`
* **Base URL**:`https://www.llmeasy.ru/v1`
* **API Key**:你的 LLMEasy API Key
如果你切到了自定义配置视图,确保底层配置使用 `wire_api = "responses"`。
图中标注对应:
1. **Provider Name**
2. **API Key**
3. **Base URL**
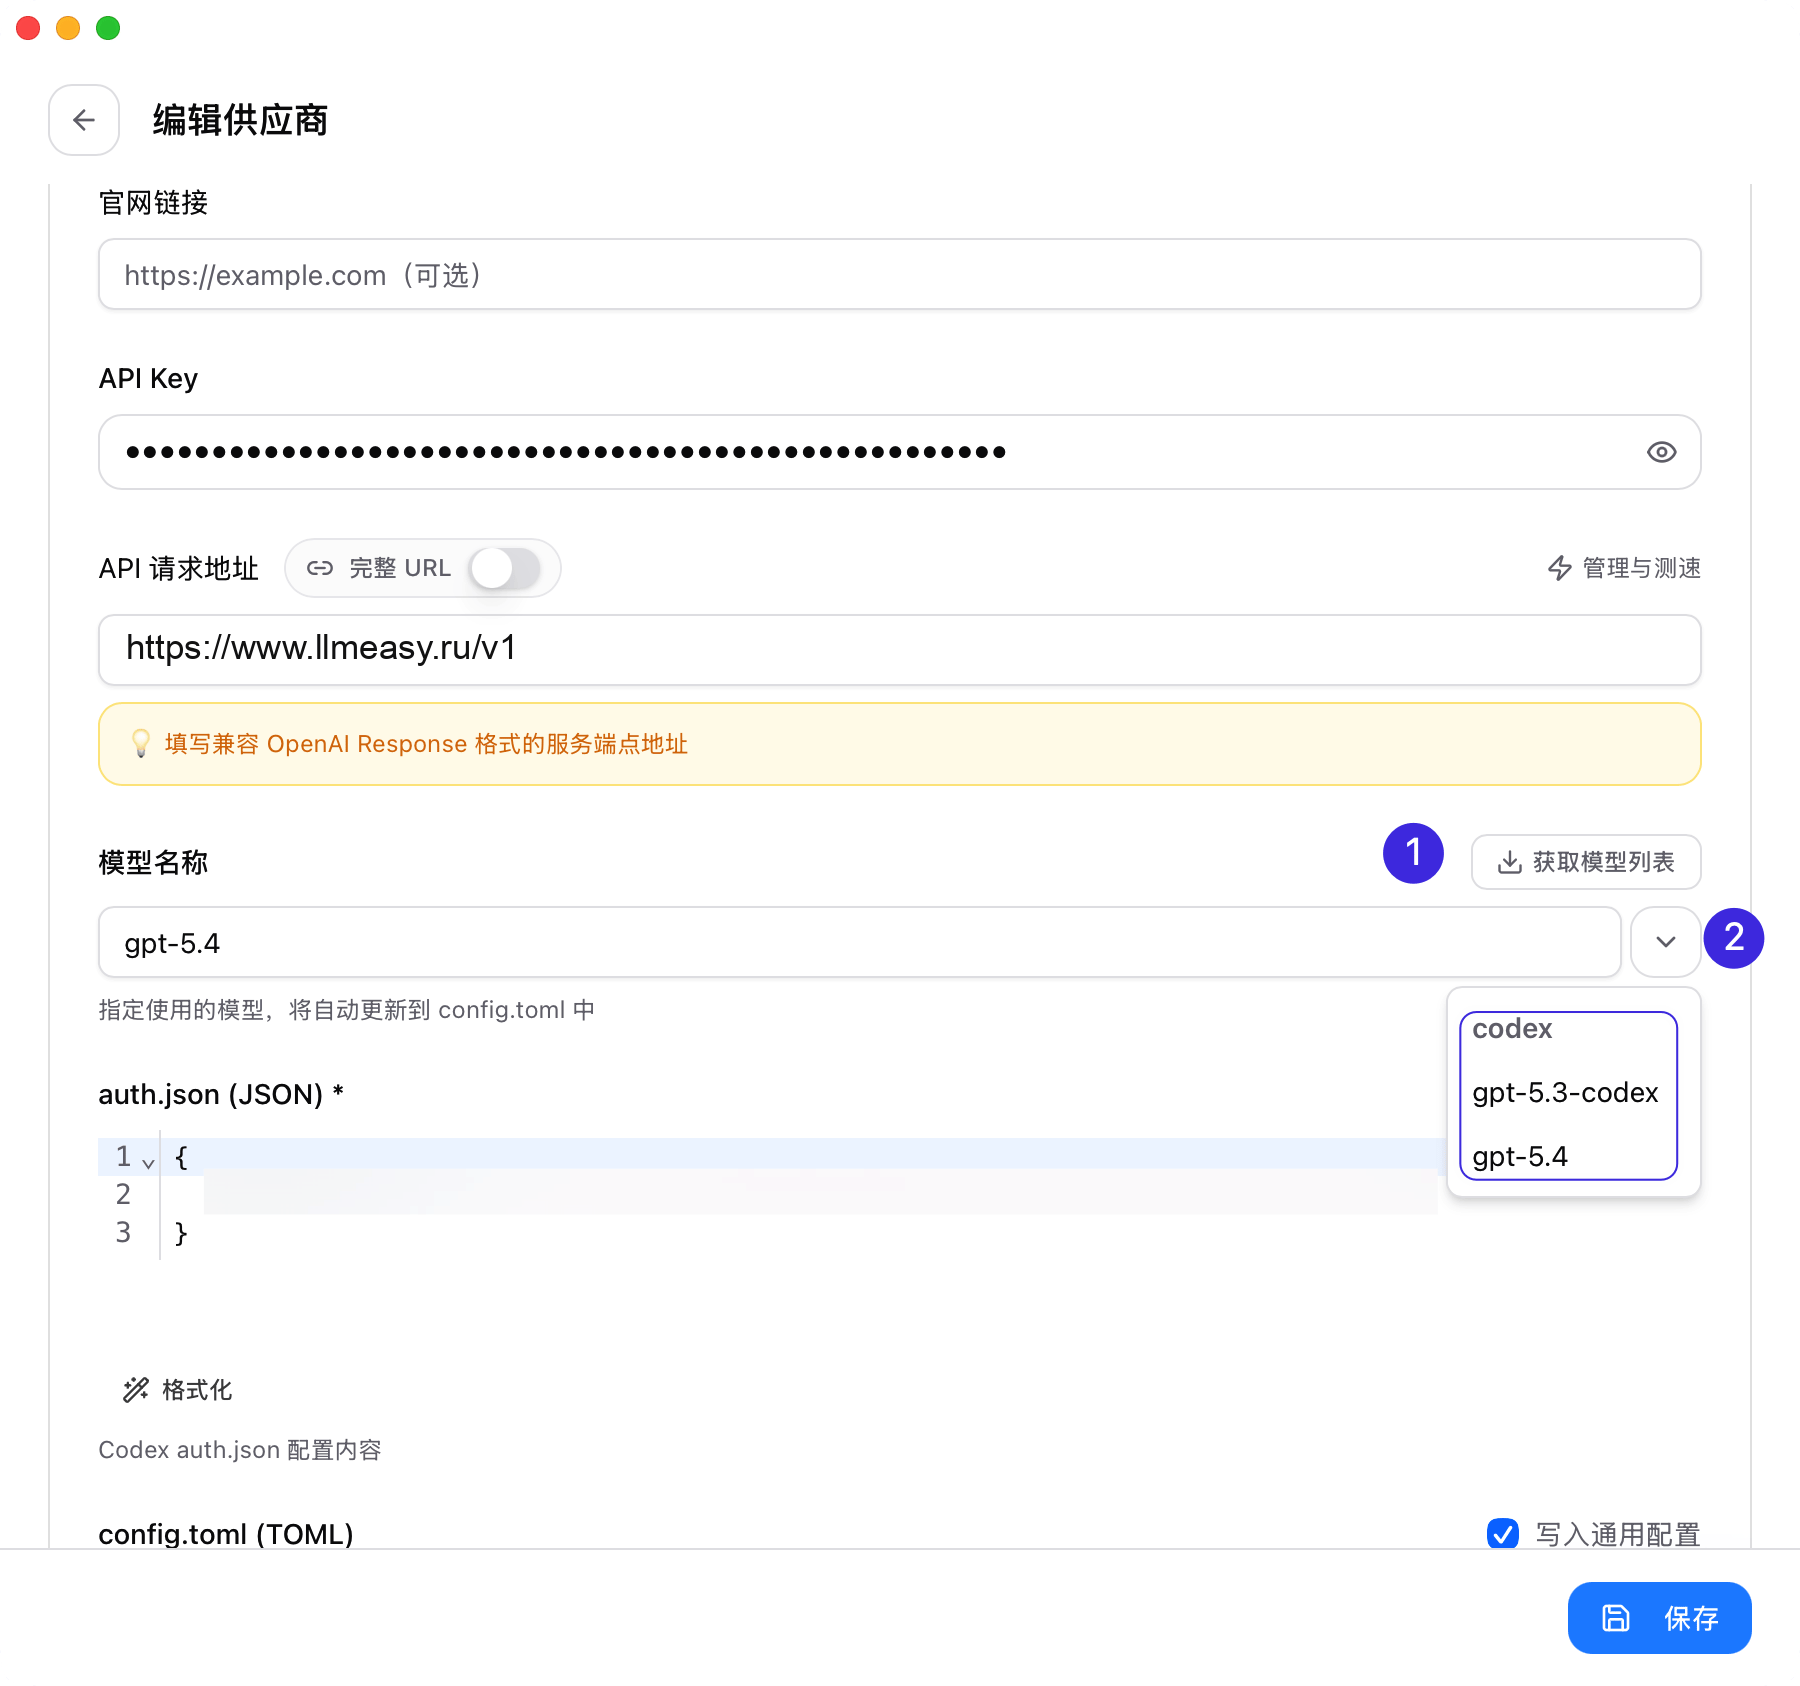
 先点击 **获取模型**。CC Switch 会使用你填写的 API Key 去请求 `/v1/models`,然后把可用模型按分组列出来。
如果没有返回模型列表,就手动填入一个当前可用的 **GPT 分组**模型 ID。
图中标注对应:
1. 点击 **获取模型列表**
2. 从下拉列表中选择要使用的模型
先点击 **获取模型**。CC Switch 会使用你填写的 API Key 去请求 `/v1/models`,然后把可用模型按分组列出来。
如果没有返回模型列表,就手动填入一个当前可用的 **GPT 分组**模型 ID。
图中标注对应:
1. 点击 **获取模型列表**
2. 从下拉列表中选择要使用的模型
 保存后将 LLMEasy 设为当前 provider。CC Switch 会把对应配置写入 Codex 的认证和配置文件。
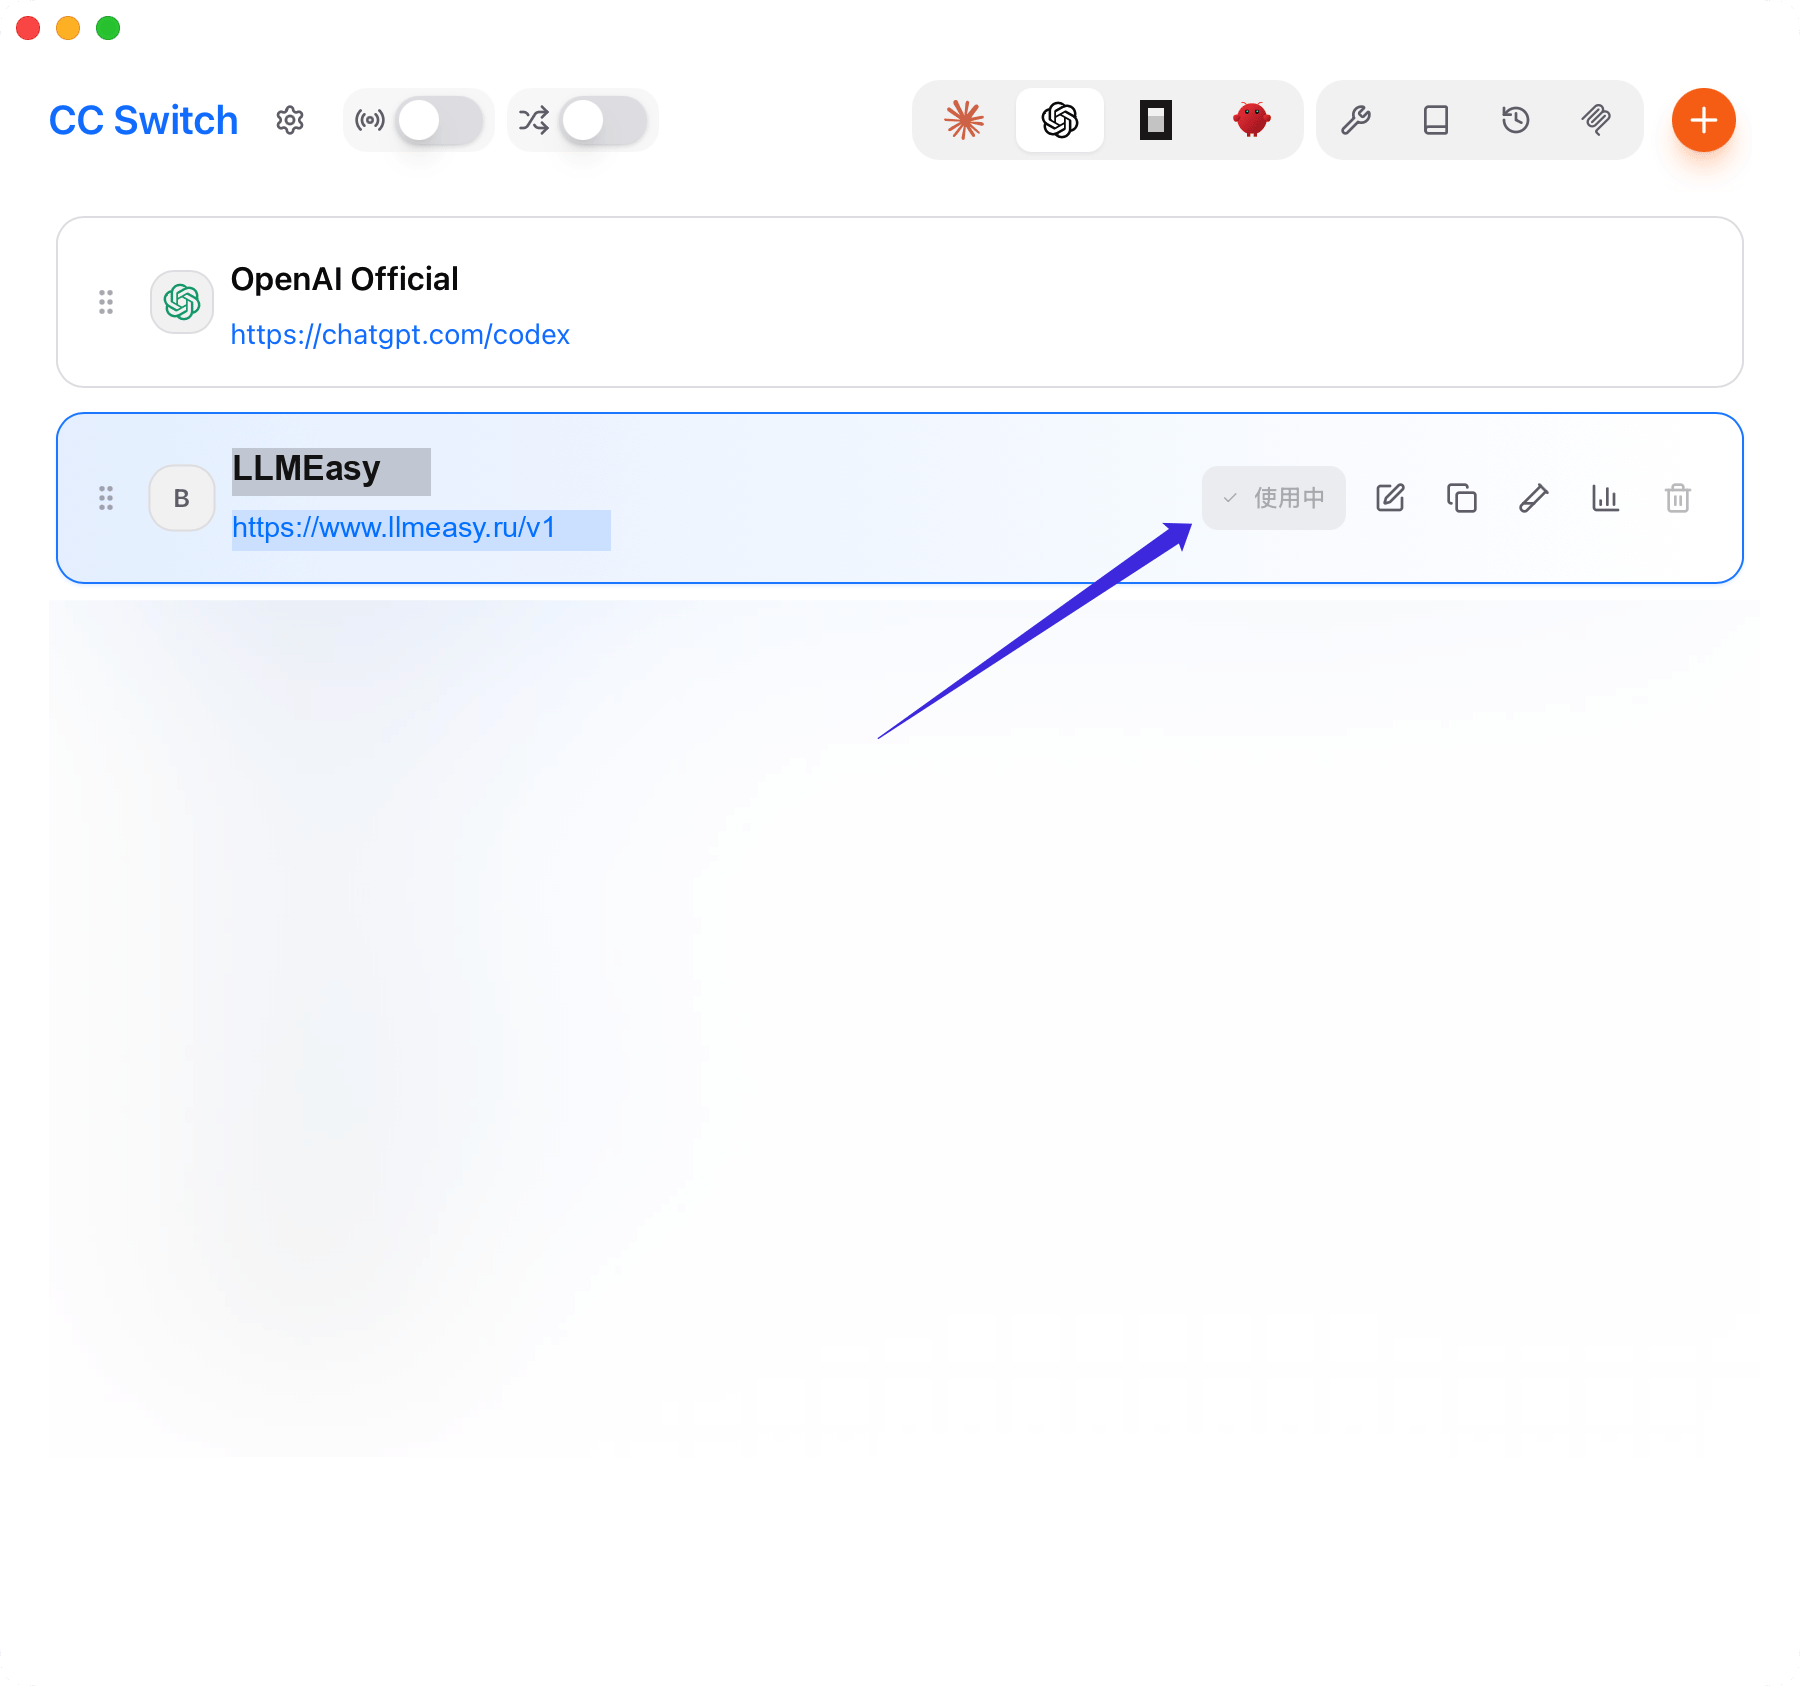
保存后回到列表页,确认 LLMEasy 这一项显示为 **使用中**。
保存后将 LLMEasy 设为当前 provider。CC Switch 会把对应配置写入 Codex 的认证和配置文件。
保存后回到列表页,确认 LLMEasy 这一项显示为 **使用中**。
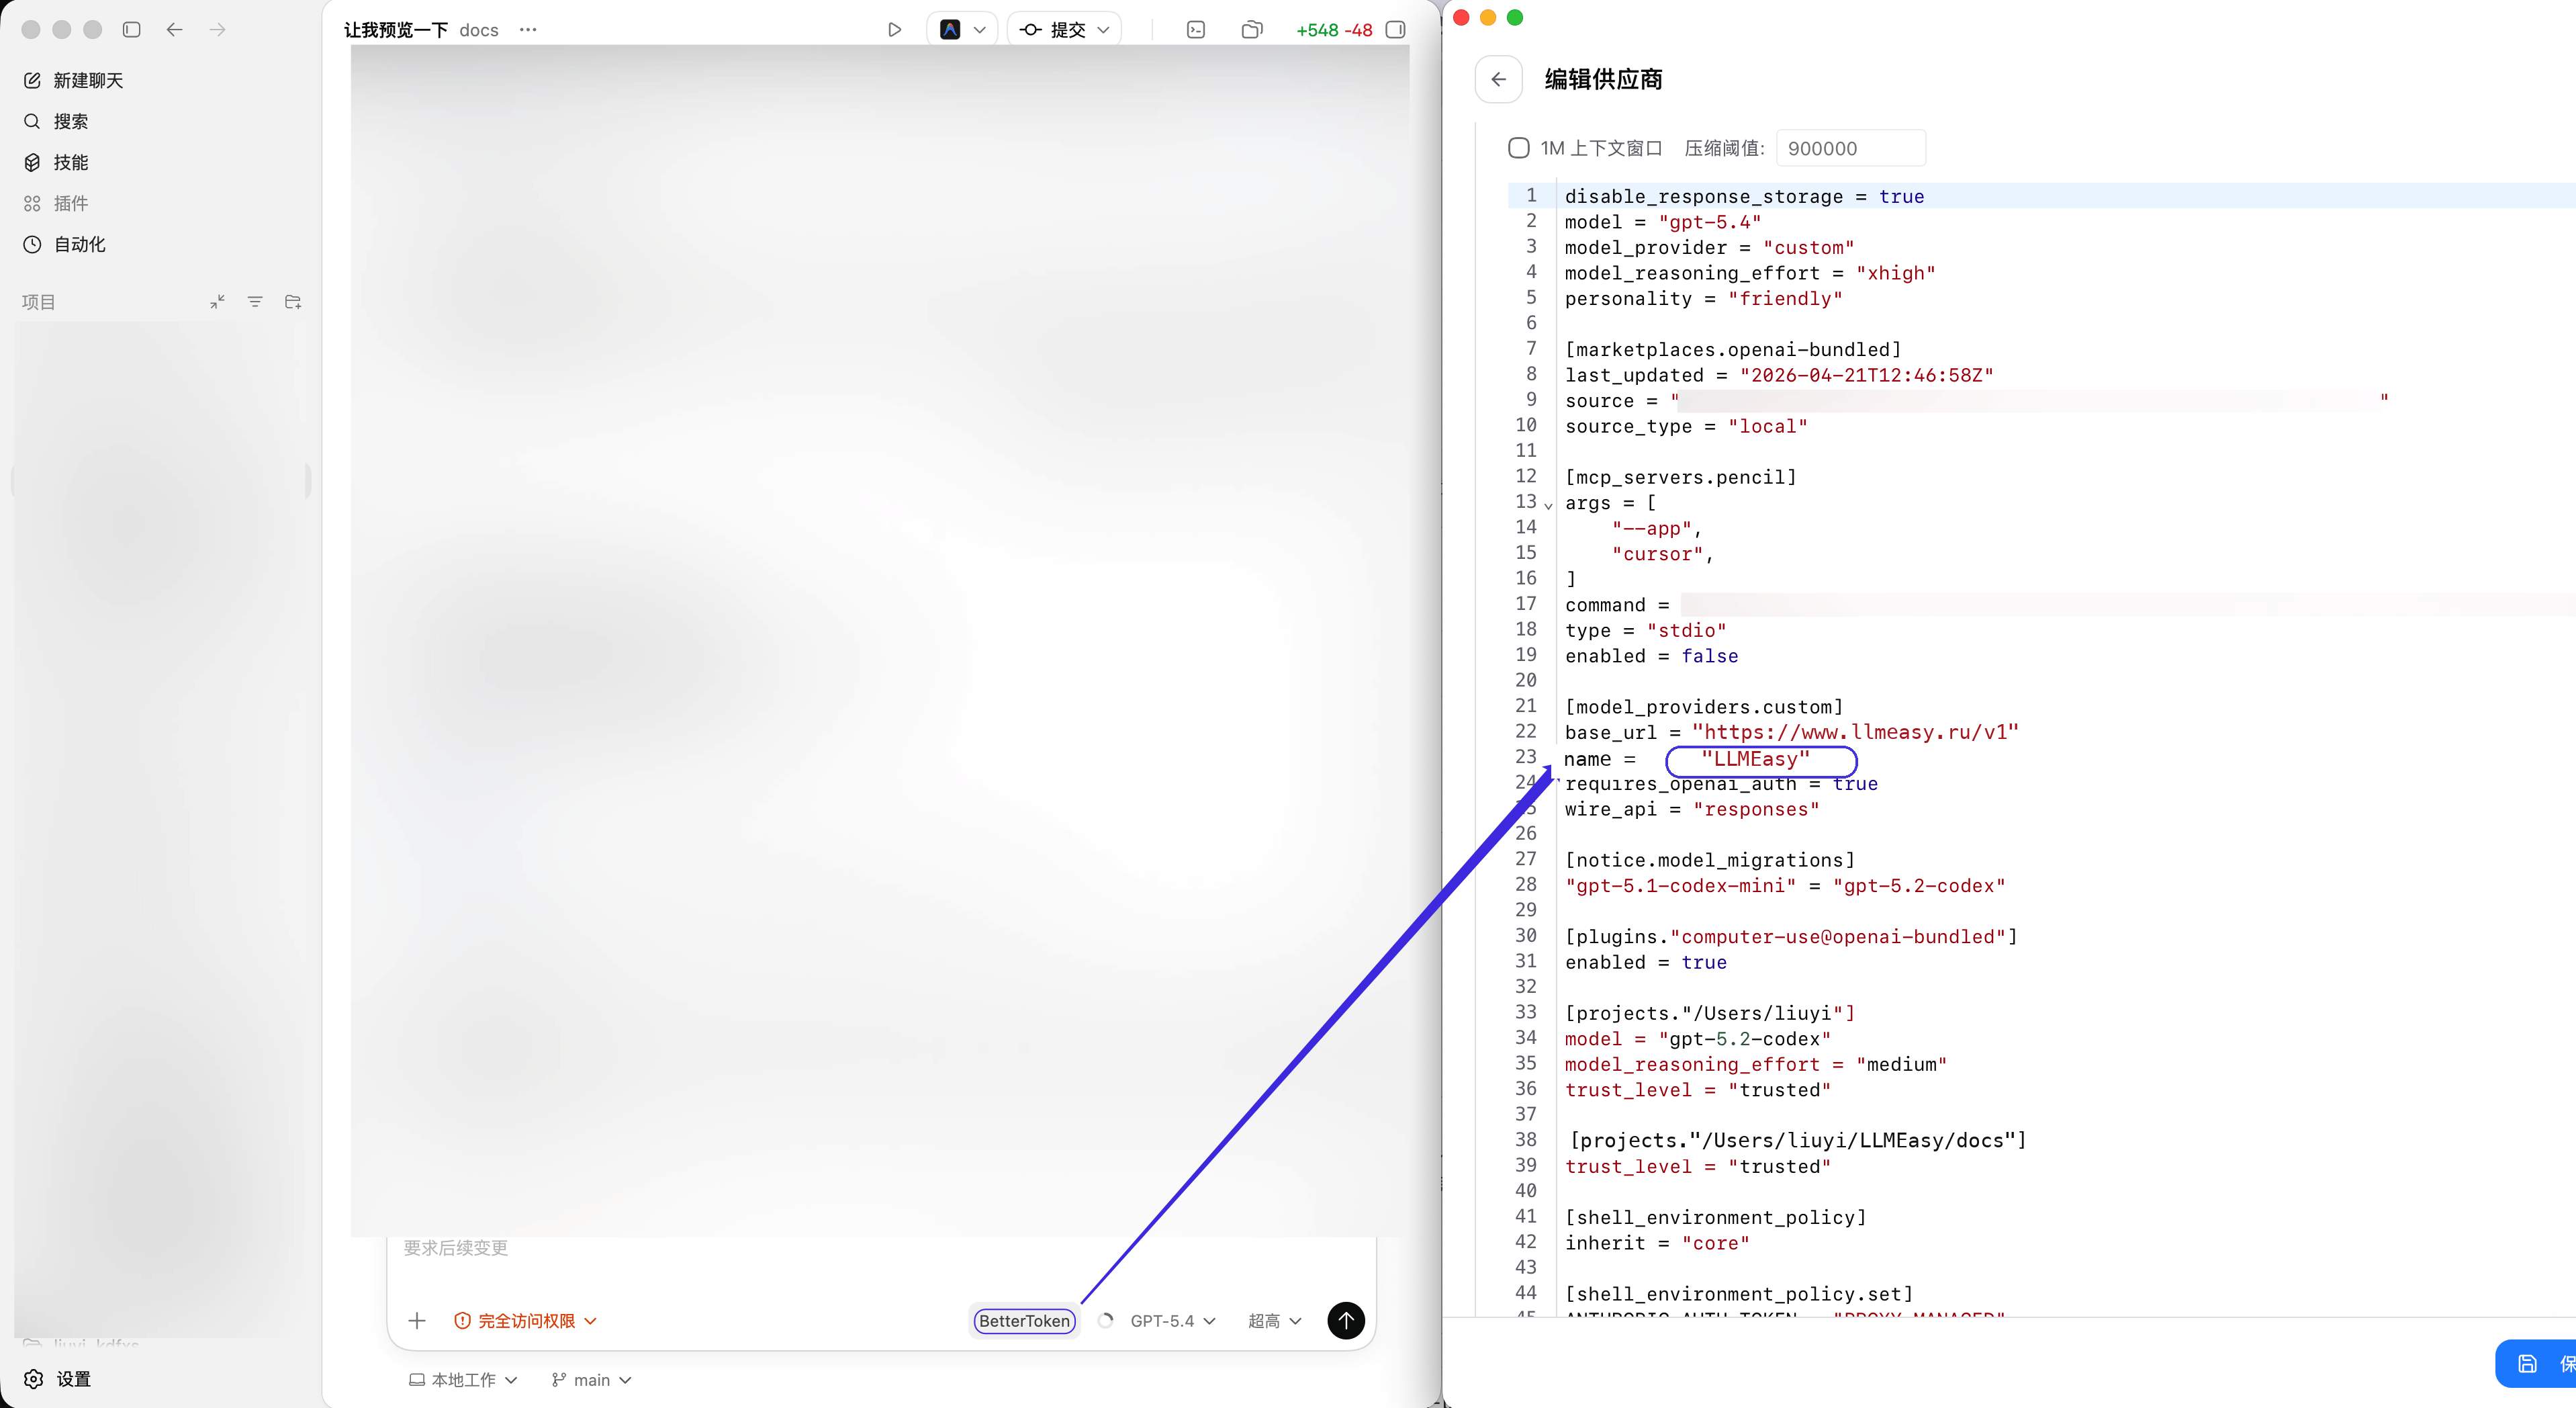
 如果你想让 Codex App 对话框右下角的 provider 标签更好区分,可以把配置项里的 `name` 改成你希望显示的名字,例如 `llmeasy`。
这个值会同步影响 Codex App 中展示的 provider 名称。
如果你想让 Codex App 对话框右下角的 provider 标签更好区分,可以把配置项里的 `name` 改成你希望显示的名字,例如 `llmeasy`。
这个值会同步影响 Codex App 中展示的 provider 名称。
 打开 CC Switch,切到 **OpenCode**,点击 **Add Provider**。如果界面先让你选预设,优先选择 **OpenAI Compatible** 或 **Custom**。
* **Provider Name**:`LLMEasy`
* **Base URL**:`https://www.llmeasy.ru/v1`
* **API Key**:你的 LLMEasy API Key
优先点击 **获取模型**。如果需要手动填写,请直接使用 LLMEasy 模型广场 中当前可用的 **GPT 分组**模型 ID。
保存后将 LLMEasy 设为当前 provider。
打开 CC Switch,切到 **OpenClaw**,点击 **Add Provider**。如果界面先让你选预设,优先选择 **OpenAI Compatible** 或 **Custom**。
* **Provider Name**:`LLMEasy`
* **Base URL**:`https://www.llmeasy.ru/v1`
* **API Key**:你的 LLMEasy API Key
如果你进入的是 OpenClaw 的自定义 provider 配置视图,确保 `api` 写成 `openai-responses`。
优先点击 **获取模型**。如果需要手动填写,请使用当前可用的 **GPT 分组**模型 ID。
保存后将 LLMEasy 设为当前 provider。
## 保存后如何生效
所有配置保存并切换完成后,都建议先重启对应客户端或网关,再开始验证。
* Claude Code:完全退出当前 Claude Code 会话,再重新启动。
* Codex:重启当前 Codex 进程,或新开一个终端会话。
* OpenCode:退出当前 OpenCode 会话并重新启动。
* OpenClaw:执行 `openclaw gateway restart`,再在 Discord 中依次执行 `/new`、`/status`、`/model`。
## 常见问题
* Claude Code 的 `Base URL` 不要加 `/v1`
* Claude Code 使用 **GPT 分组**时,要在 **高级选项** 里把 **API 格式** 切到 **OpenAI Responses API**
* Claude Code 使用 **Claude 分组**时,不需要打开 **CC Switch 代理功能**
* Codex、OpenCode、OpenClaw 的 `Base URL` 要写 `https://www.llmeasy.ru/v1`
* Codex、OpenCode、OpenClaw 默认模型请使用 **GPT 分组**模型 ID,不要沿用 Claude 风格模型名
* 如果 **获取模型** 失败,先检查 API Key 和 `Base URL`,再改为手动粘贴模型 ID
* 如果切换后没有生效,先确认 LLMEasy provider 已被设为当前 provider,再按上面的方式重启对应客户端或网关
## 相关页面
* Claude Code 细节配置:[Claude Code](/zh/ai-tools/claude-code)
* Codex 细节配置:[Codex](/zh/ai-tools/codex)
* OpenCode 细节配置:[OpenCode](/zh/ai-tools/opencode)
* OpenClaw 细节配置:[OpenClaw](/zh/ai-tools/openclaw)
## 相关 FAQ
* [OpenAI-compatible API 和 Anthropic-compatible API 有什么区别?](/zh/faq/concepts/openai-compatible-vs-anthropic-compatible)
* [MCP 和 API Key / Base URL 有什么区别?](/zh/faq/concepts/mcp-vs-api-key-base-url)
* [Codex CLI 中 model\_provider、base\_url 和 wire\_api 是什么?](/zh/faq/codex/model-provider-base-url-wire-api)
* [Cline 如何配置 OpenAI-compatible API?](/zh/faq/cline/openai-compatible-api)
打开 CC Switch,切到 **OpenCode**,点击 **Add Provider**。如果界面先让你选预设,优先选择 **OpenAI Compatible** 或 **Custom**。
* **Provider Name**:`LLMEasy`
* **Base URL**:`https://www.llmeasy.ru/v1`
* **API Key**:你的 LLMEasy API Key
优先点击 **获取模型**。如果需要手动填写,请直接使用 LLMEasy 模型广场 中当前可用的 **GPT 分组**模型 ID。
保存后将 LLMEasy 设为当前 provider。
打开 CC Switch,切到 **OpenClaw**,点击 **Add Provider**。如果界面先让你选预设,优先选择 **OpenAI Compatible** 或 **Custom**。
* **Provider Name**:`LLMEasy`
* **Base URL**:`https://www.llmeasy.ru/v1`
* **API Key**:你的 LLMEasy API Key
如果你进入的是 OpenClaw 的自定义 provider 配置视图,确保 `api` 写成 `openai-responses`。
优先点击 **获取模型**。如果需要手动填写,请使用当前可用的 **GPT 分组**模型 ID。
保存后将 LLMEasy 设为当前 provider。
## 保存后如何生效
所有配置保存并切换完成后,都建议先重启对应客户端或网关,再开始验证。
* Claude Code:完全退出当前 Claude Code 会话,再重新启动。
* Codex:重启当前 Codex 进程,或新开一个终端会话。
* OpenCode:退出当前 OpenCode 会话并重新启动。
* OpenClaw:执行 `openclaw gateway restart`,再在 Discord 中依次执行 `/new`、`/status`、`/model`。
## 常见问题
* Claude Code 的 `Base URL` 不要加 `/v1`
* Claude Code 使用 **GPT 分组**时,要在 **高级选项** 里把 **API 格式** 切到 **OpenAI Responses API**
* Claude Code 使用 **Claude 分组**时,不需要打开 **CC Switch 代理功能**
* Codex、OpenCode、OpenClaw 的 `Base URL` 要写 `https://www.llmeasy.ru/v1`
* Codex、OpenCode、OpenClaw 默认模型请使用 **GPT 分组**模型 ID,不要沿用 Claude 风格模型名
* 如果 **获取模型** 失败,先检查 API Key 和 `Base URL`,再改为手动粘贴模型 ID
* 如果切换后没有生效,先确认 LLMEasy provider 已被设为当前 provider,再按上面的方式重启对应客户端或网关
## 相关页面
* Claude Code 细节配置:[Claude Code](/zh/ai-tools/claude-code)
* Codex 细节配置:[Codex](/zh/ai-tools/codex)
* OpenCode 细节配置:[OpenCode](/zh/ai-tools/opencode)
* OpenClaw 细节配置:[OpenClaw](/zh/ai-tools/openclaw)
## 相关 FAQ
* [OpenAI-compatible API 和 Anthropic-compatible API 有什么区别?](/zh/faq/concepts/openai-compatible-vs-anthropic-compatible)
* [MCP 和 API Key / Base URL 有什么区别?](/zh/faq/concepts/mcp-vs-api-key-base-url)
* [Codex CLI 中 model\_provider、base\_url 和 wire\_api 是什么?](/zh/faq/codex/model-provider-base-url-wire-api)
* [Cline 如何配置 OpenAI-compatible API?](/zh/faq/cline/openai-compatible-api)